So we have three wonderful cats Ruby, Moon and Millie .. all of them were abandoned sadly. Ruby was left behind when her owner moved and didn’t take her with them
.. how someone could do that I don’t know .. Moon was abandoned in a garden and lived in the freezing cold shoved in between a garden fence and a garage wall . Millie was dumped by the local supermarket . All three have been transformed by love.
When we moved we went to live on a busy main road and so made the reluctant decision to keep them inside . Moon and Millie are both very nervous cats who didn’t want to go outside but Rubes was a different kettle of fish. She is a nosy cat and doesn’t have a sense of fear so it was how to strike that balance.
We found the balance – instead of walking the dog we walk the cat !!
This has been the perfect solution for her and we found her this amazing lightweight harness from Amazon
It’s meant for a small dog but fits our chunky monkey really well and she actually walks in it rather than sort of shuffle like she has done in previous ones.
As Ruby is unfortunately not in the best of health we have just discovered the cat pram and it’s the best £45 we have spent ! It means we can go on family walks and take her with us – she gets her fresh air and the chance to indulge in her natural nosiness and also means we can all stay out for longer !! The pram is meant for dogs but again is perfect for Ruby.. it’s so popular that she sits by it waiting to go out 😹😹
The pram itself is lightweight and folds away . Was very easy to assemble and is sturdy , we have tested it on pavements roads and even up hills and it’s come up trumps . Has a cup holder and also a small storage shelf underneath
The only downside is that you don’t get anywhere quick as everyone stops to look and admire our beautiful cat !!!! Ruby gets the admiration she deserves, a chance to take in the world and fresh air the same time. It’s funny when people look in the pram expecting to see a baby and out of the pram pops Our Rubes .. it’s truly priceless and we cannot believe we didn’t buy one before !
We also got this super Cute elephant blanket to keep her warm and easily washable in case of accidents as we soon found out to our peril !!!
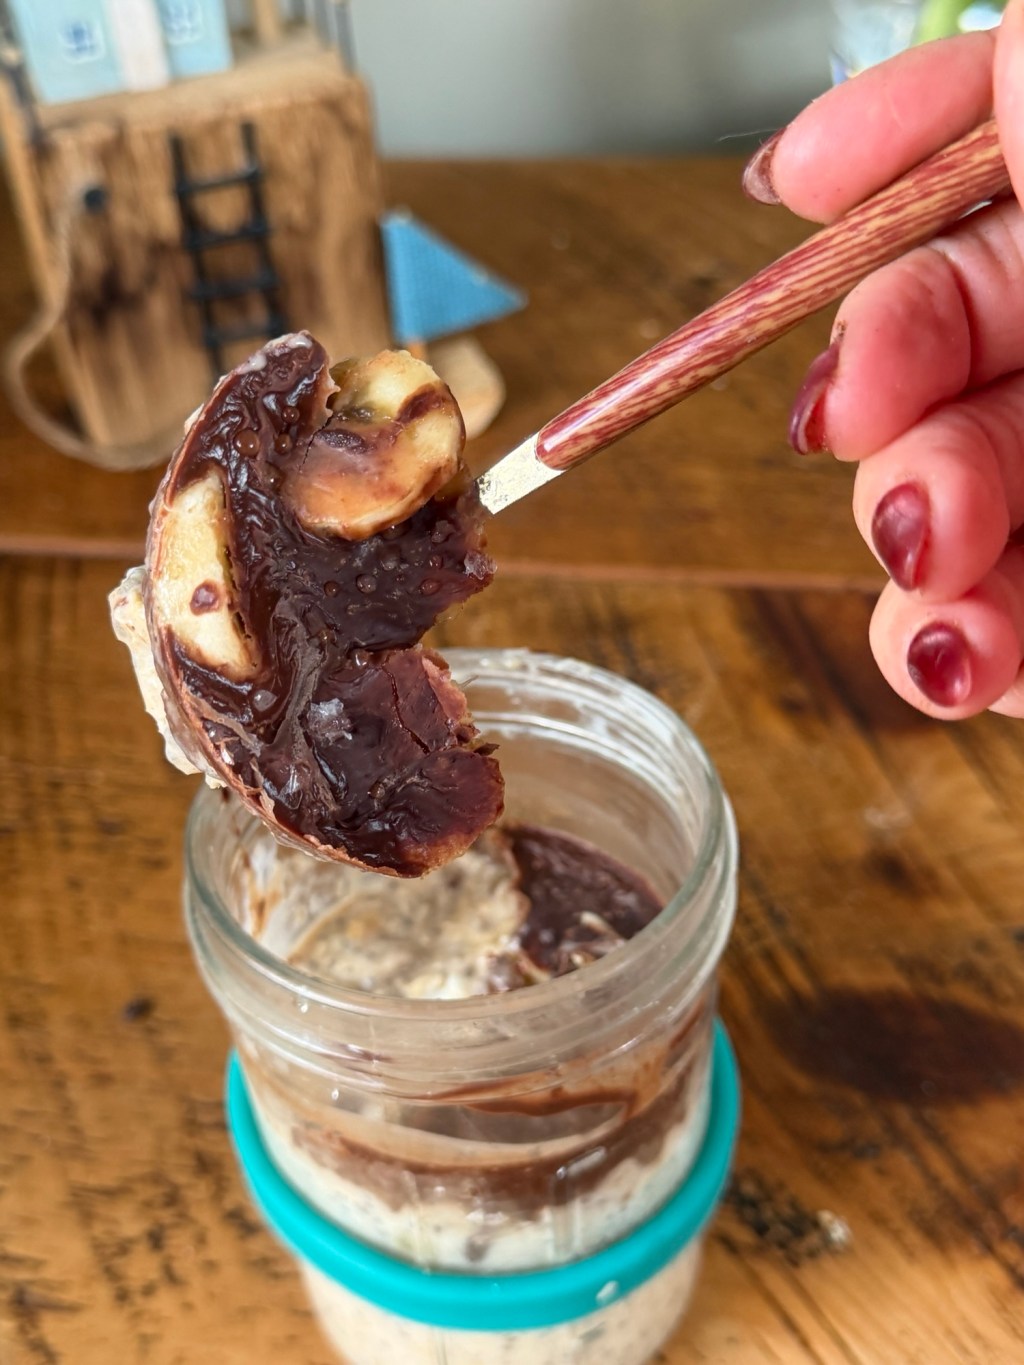
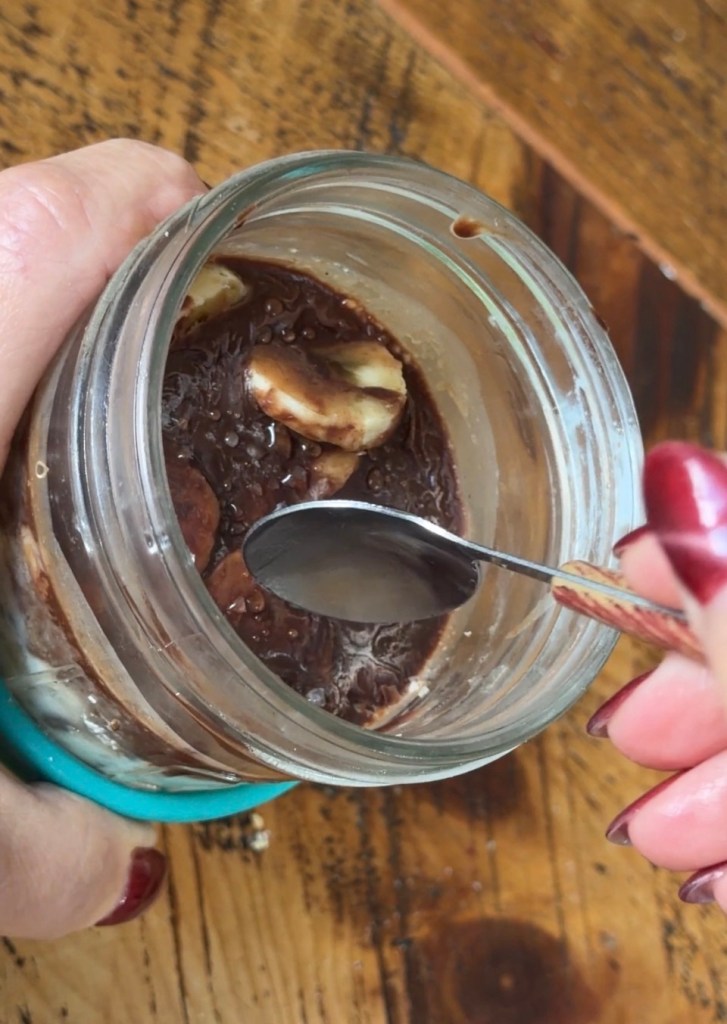
If you’re anything like me, breakfast has to tick three boxes: easy, comforting, and just a tiny bit like eating pudding first thing in the morning. These banana choc coconut overnight oats do exactly that. You get soft, creamy oats, a little crunch from coconut, pockets of dark chocolate and – the best bit – a set chocolate top you crack through with your spoon. Think “breakfast Crème Brûlée” vibes without any of the faff.
I also love anything I can make once and live off for a few days, and these jars are perfect for that. You throw everything together in about five minutes, park them in the fridge and forget about them. In the morning, you’ve got a grab‑and‑go pot that feels way more indulgent than it has any right to. They’re brilliant for busy workdays, early gym mornings, or those times when you know Future You is going to be grumpy without something ready and waiting.
What you’ll need
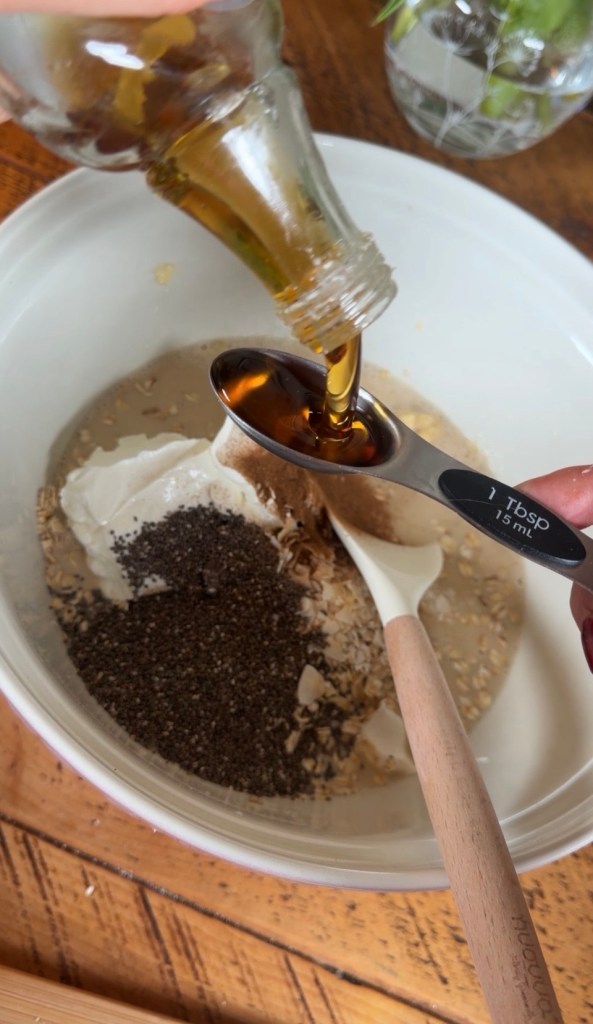
For four jars you’ll need: • 4 medium ripe bananas • 480 ml almond milk • 155 g rolled oats • 180 g low‑fat Greek yogurt • 30 g flaked coconut • 3 tbsp chia seeds • 1 tbsp maple syrup • 2 tsp vanilla extract • ¾ tsp ground cinnamon • 3 tbsp dark chocolate chips (about 45 g) • 2 tbsp coconut oil • Pinch of flaky salt
Nothing fancy – you might already have most of this in the cupboard. The chia seeds help thicken everything up, the yogurt adds protein and creaminess, and the coconut + dark chocolate is just a dreamy combo.
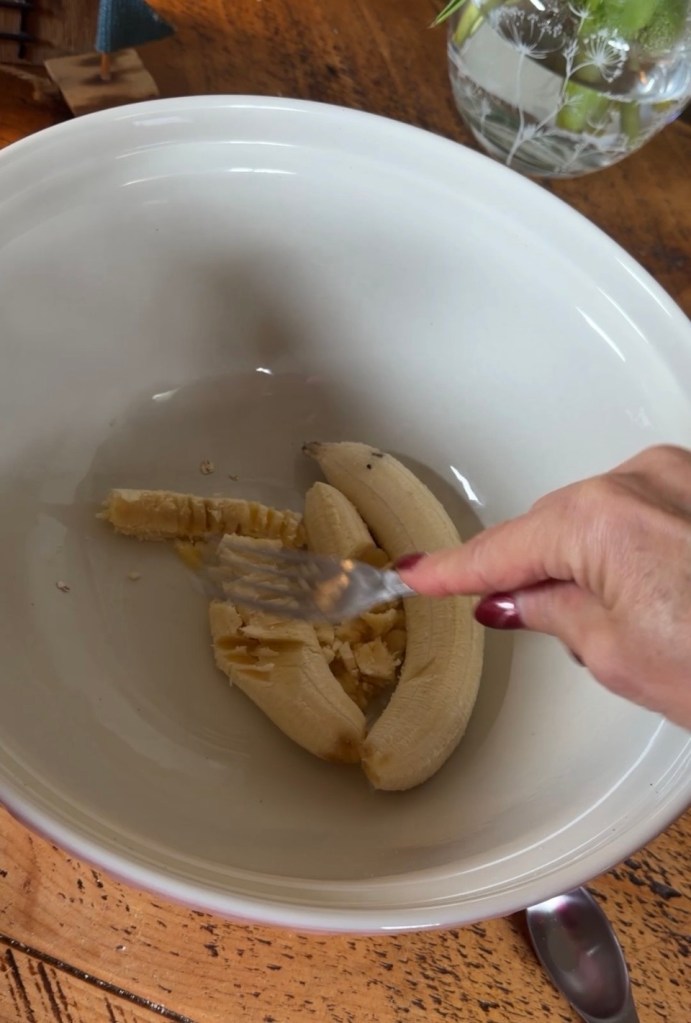
How to make the jars First, mash two of the bananas in a mixing bowl until they’re nice and smooth.
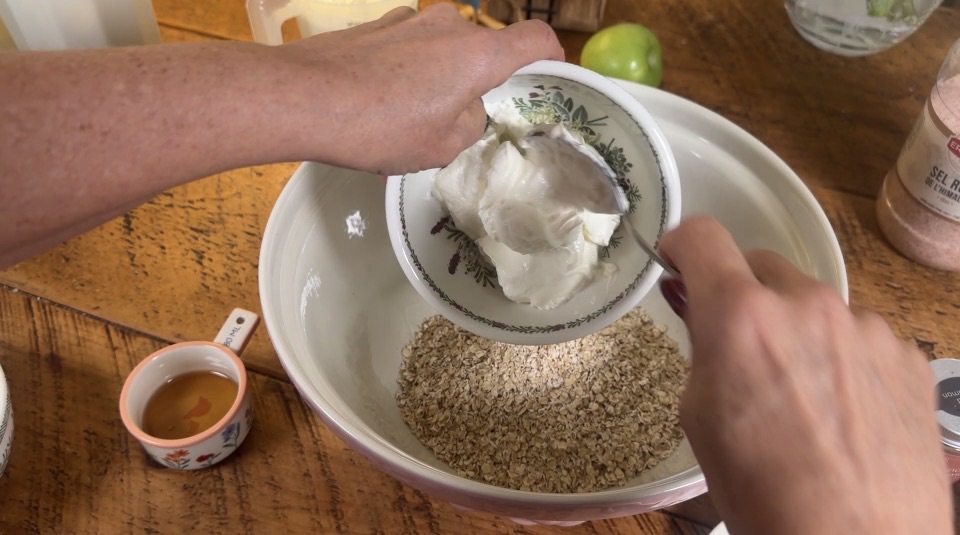
You don’t need to be precious here – a few little chunks are fine. Stir in the oats, almond milk, Greek yogurt, chia seeds, flaked coconut, maple syrup, vanilla and cinnamon.
It should look like a thick, pourable porridge. Pop In the fridge for 30 minutes to thicken a little
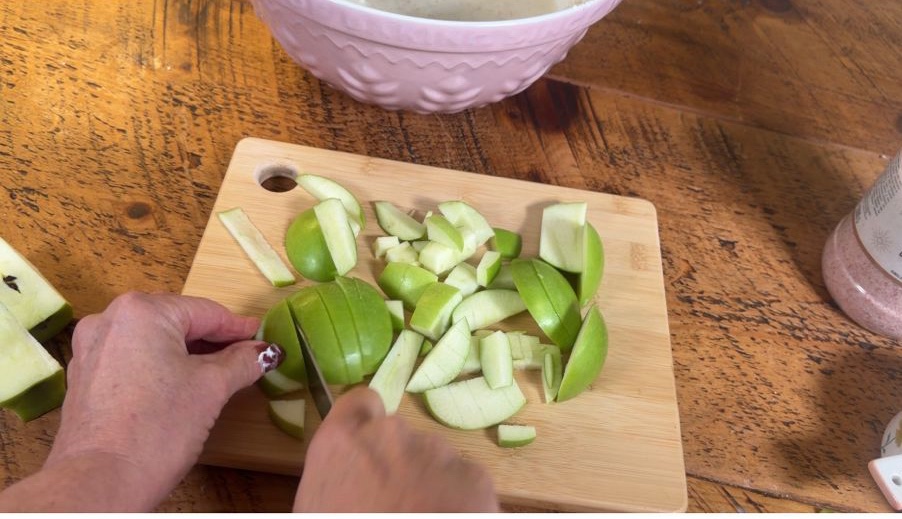
Thinly slice the two remaining bananas.
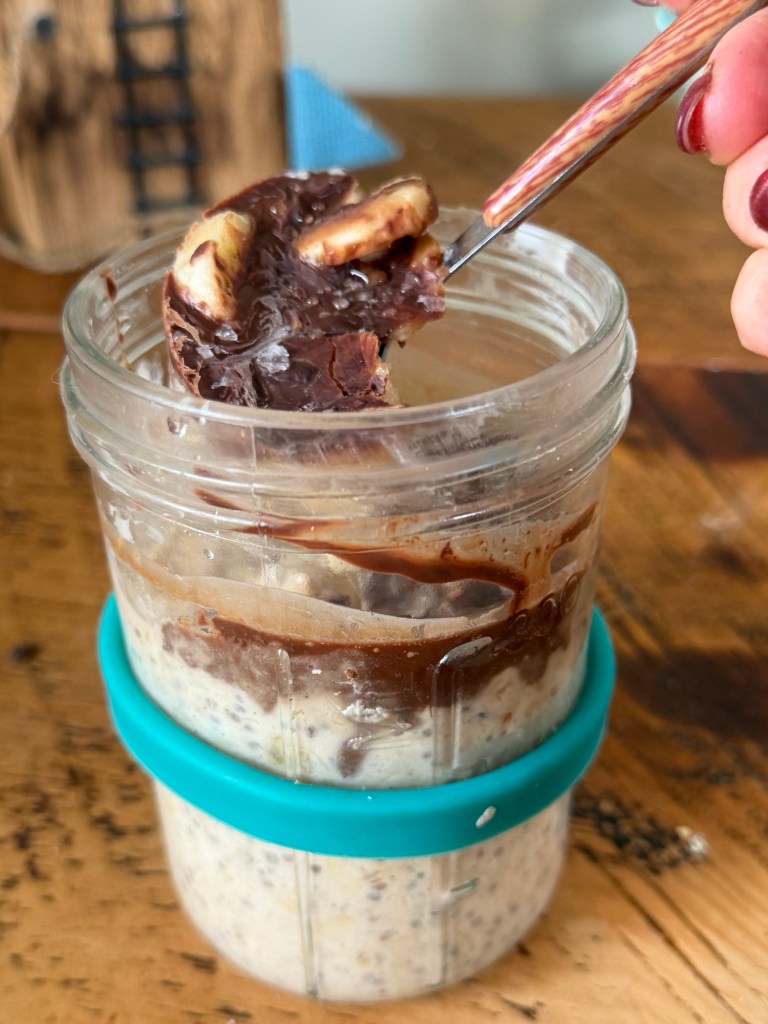
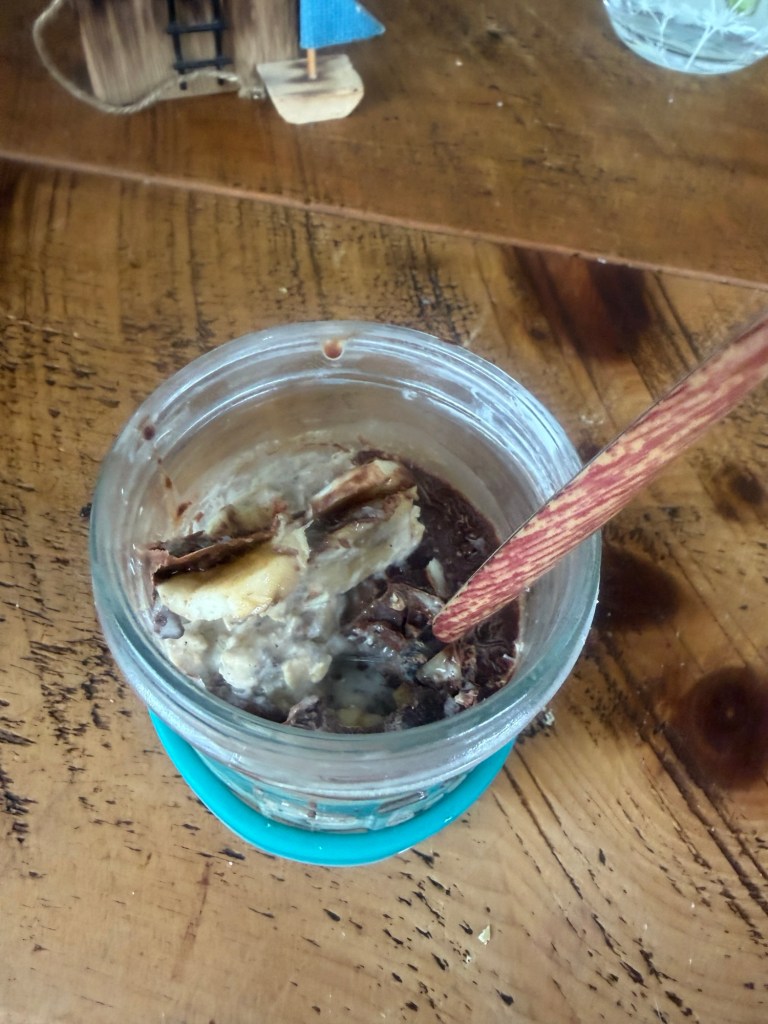
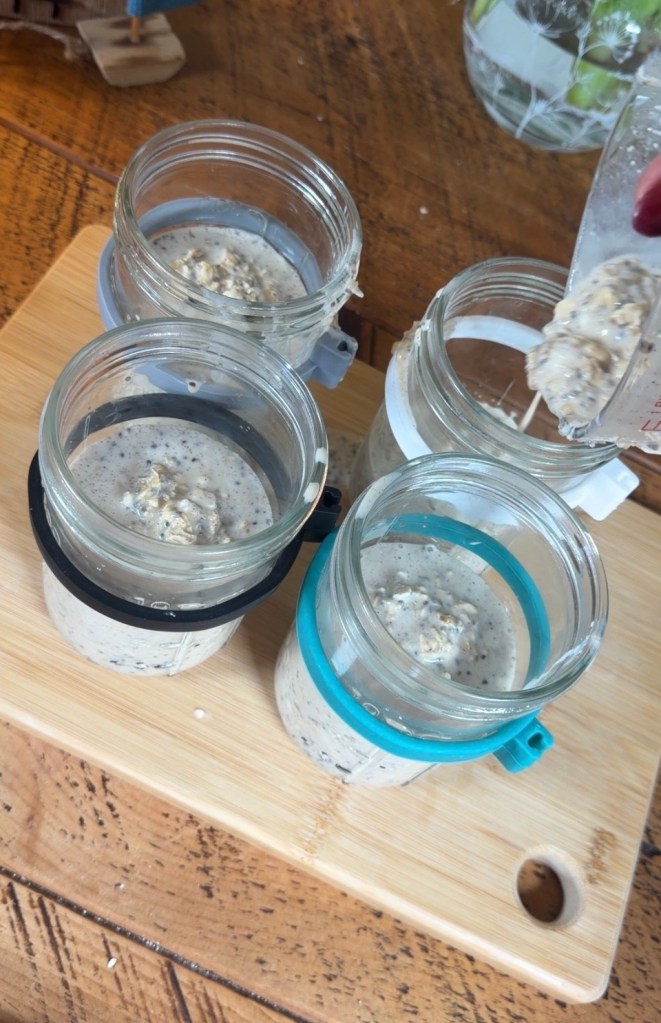
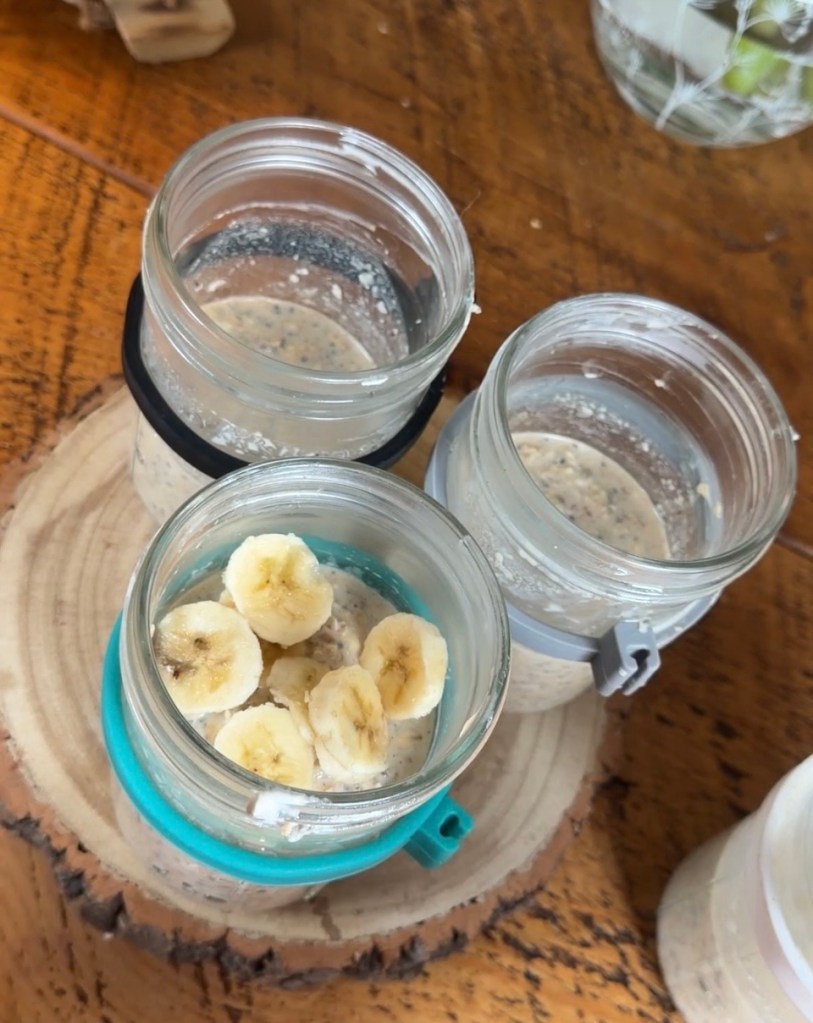
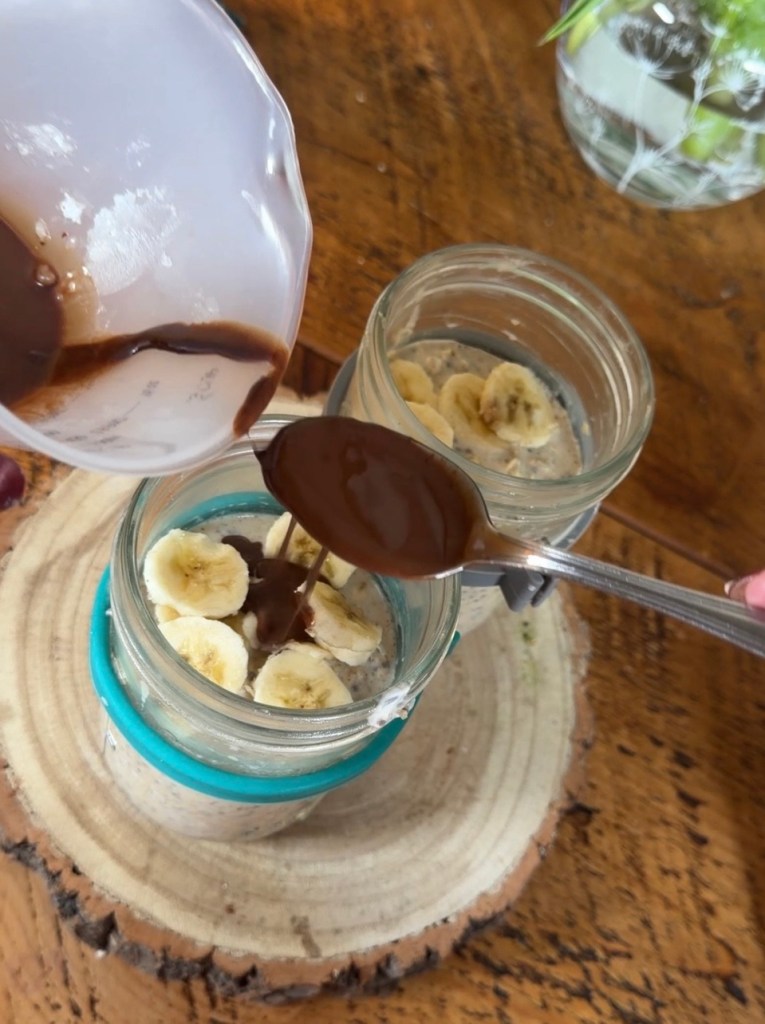
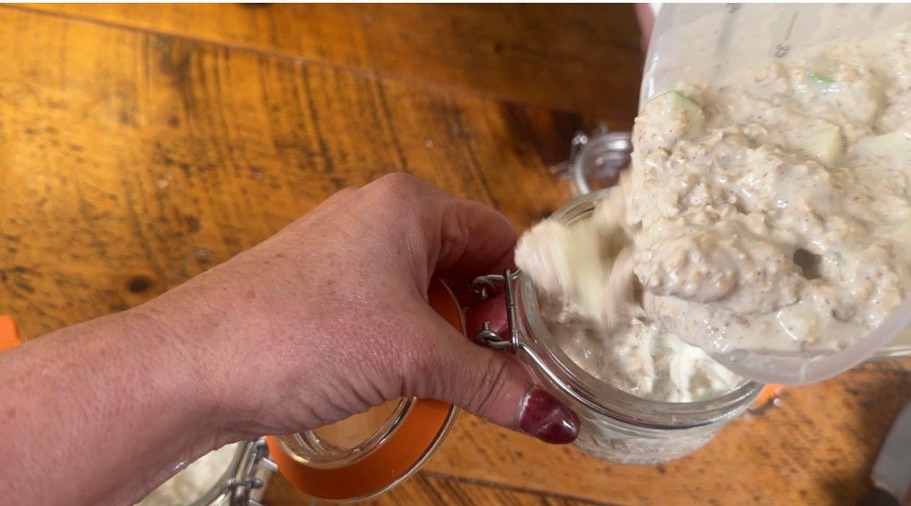
Pour half the mixture in the jars. Then place a layer of bananas on top-then spoon the rest of the oat mixture on top. Finish with more banana slices so you’ve got a pretty top.
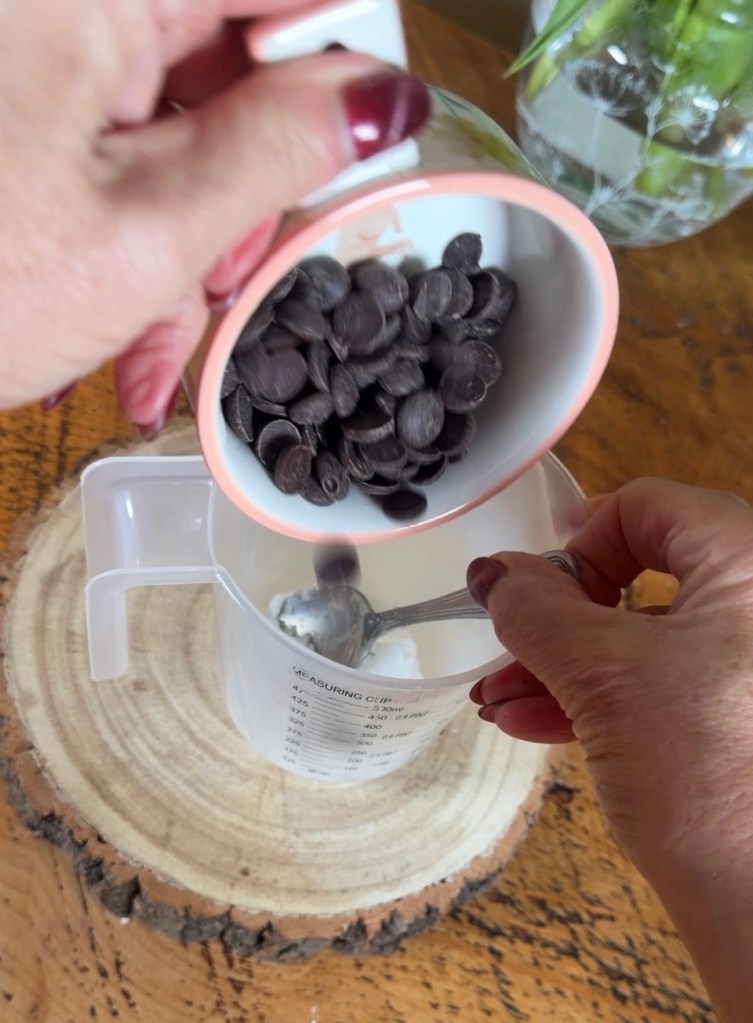
Place the chocolate chips I use these which are divine
and coconut oil to a small microwave‑safe bowl or jug Heat on Medium, stopping to stir every 20 seconds, until everything is melted and glossy – it usually takes around 45–60 seconds. You can also do this over a pan of simmering water if you prefer.
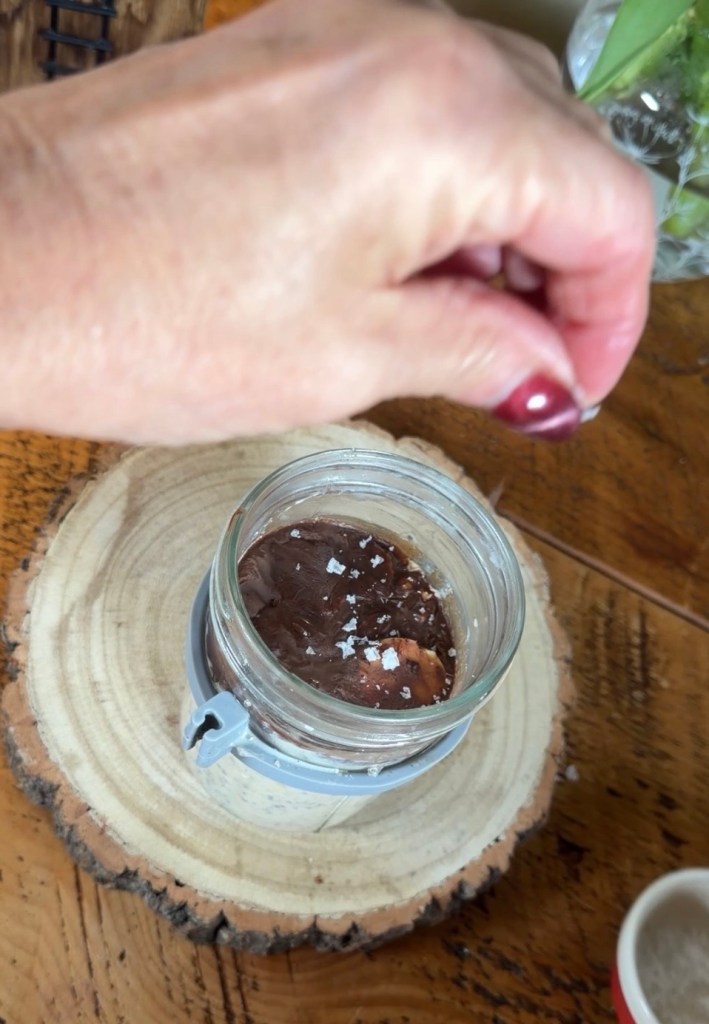
Spoon roughly 2 teaspoons of the melted chocolate over each jar, tilting and turning the jar so the chocolate covers the whole surface. This will set into that gorgeous crackly topping. I use these jars which come with a seperate pot for toppings and spoons https://amzn.to/48wm7XR
Pop the jars into the fridge, uncovered, for about 20 minutes so the chocolate can firm up. Once it’s just set, sprinkle a little flaky salt over the top (trust me, the salt makes the chocolate and banana sing),
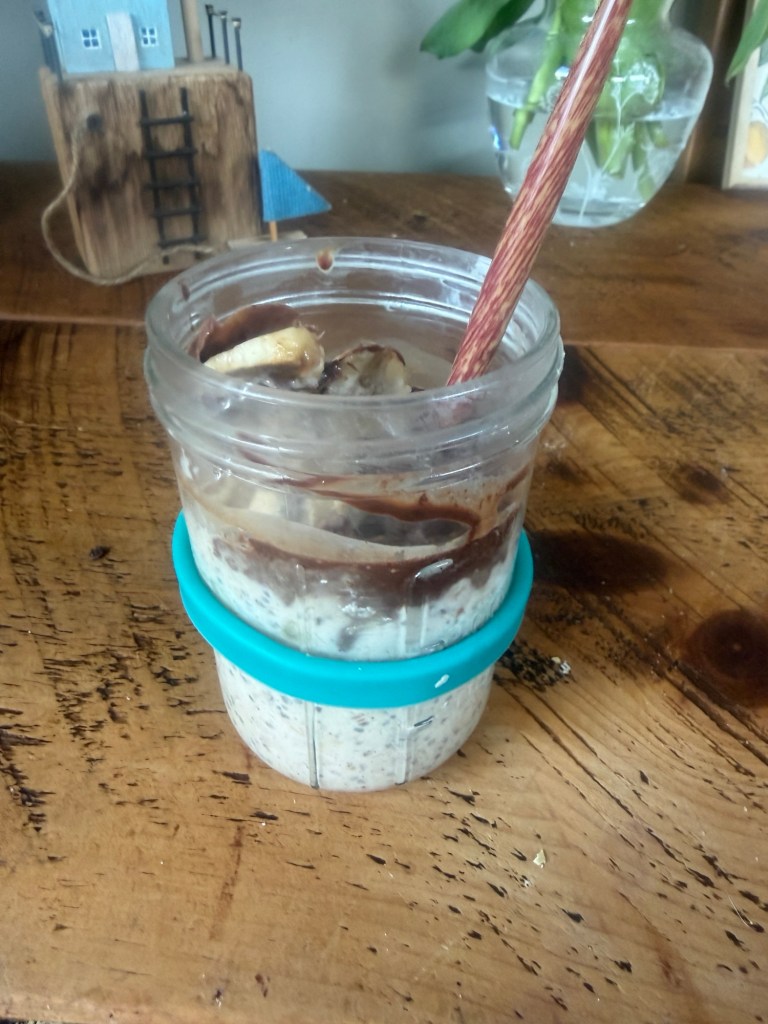
Pop the lids on and refrigerate for at least 8 hours or overnight. They’ll happily sit in the fridge for up to four days.
How to serve and tweak
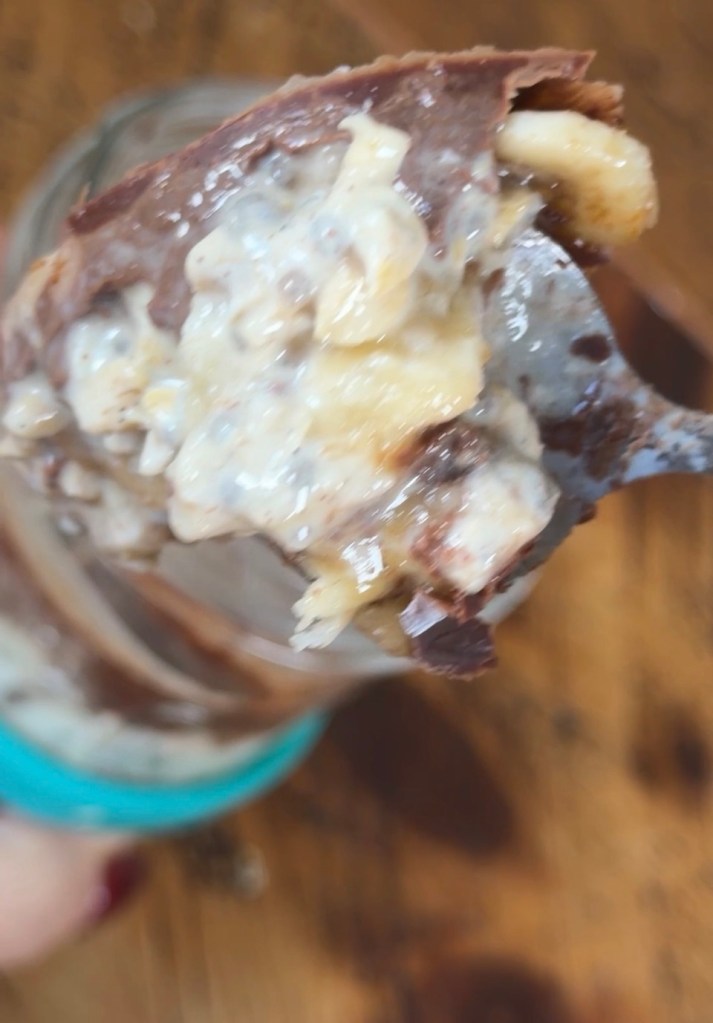
In the morning, you can eat them straight from the fridge – cold, creamy and super refreshing – or let a jar sit at room temperature for 10–15 minutes if you like them a touch softer. If you want extra drama, crack through the chocolate top with your spoon and drizzle on a bit more yogurt or a few extra chocolate chips. You can easily tweak the recipe to suit what you’ve got: • Swap almond milk for oat or dairy milk. • Use honey or agave instead of maple syrup. • Skip the coconut if you’re not a fan and add a handful of chopped nuts instead. • Use whatever chocolate you like – milk, dark, chips, chunks, even a chopped‑up bar. They’re one of those recipes that feels far more special than the effort involved. A tiny bit of prep the night before, and you get to wake up to a breakfast that looks like it came from a café.
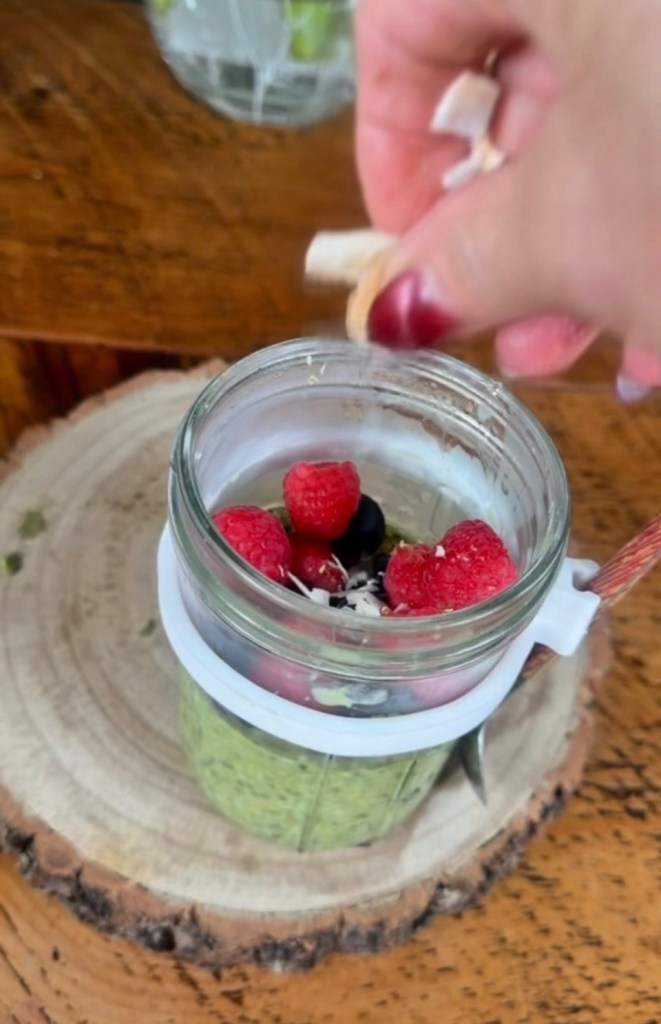
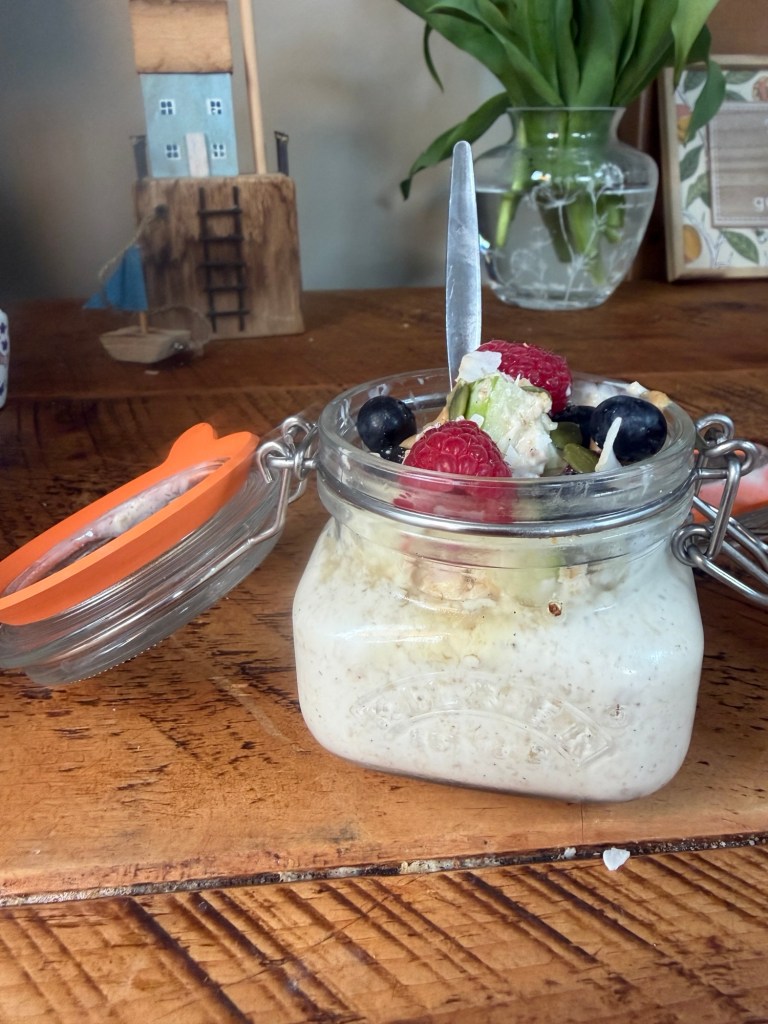
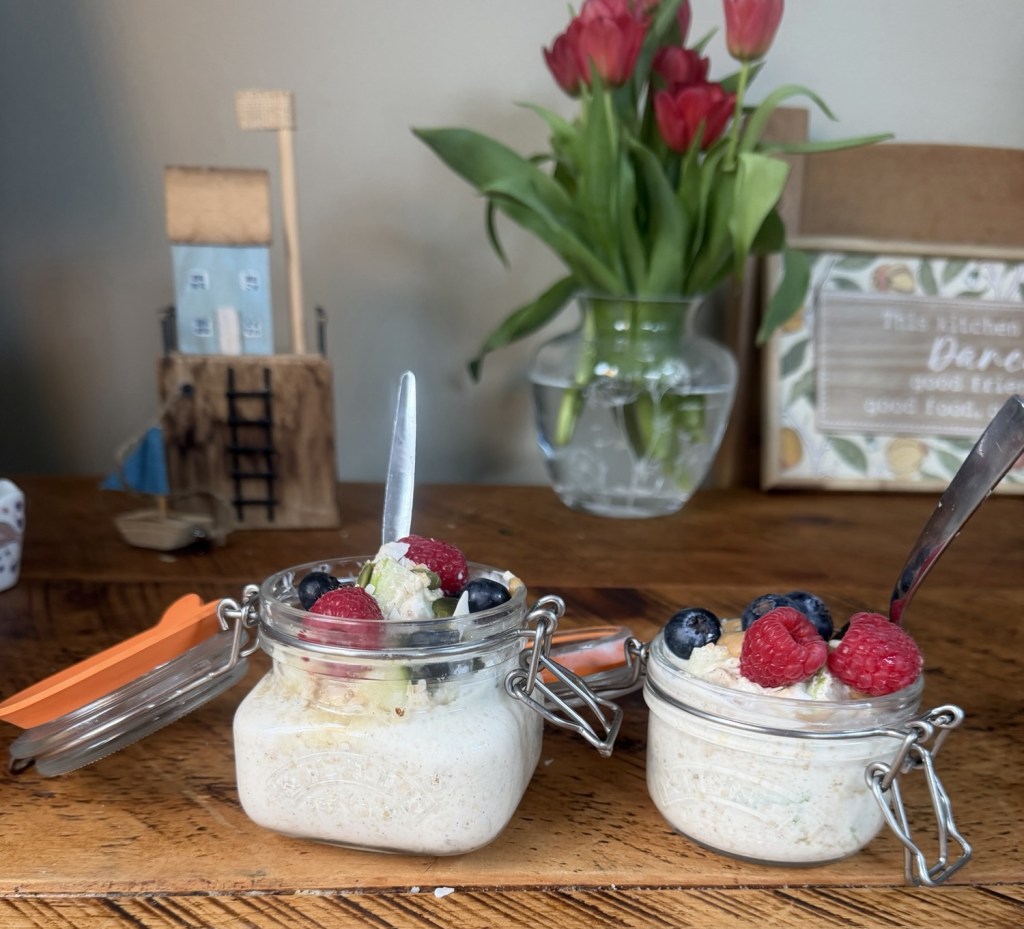
Some mornings I wake up already thinking about breakfast. On busy days, though, I need something that feels like a little hug in a bowl but doesn’t ask much of me at 7am. That’s exactly why I love these Matcha Berry Overnight Oats.
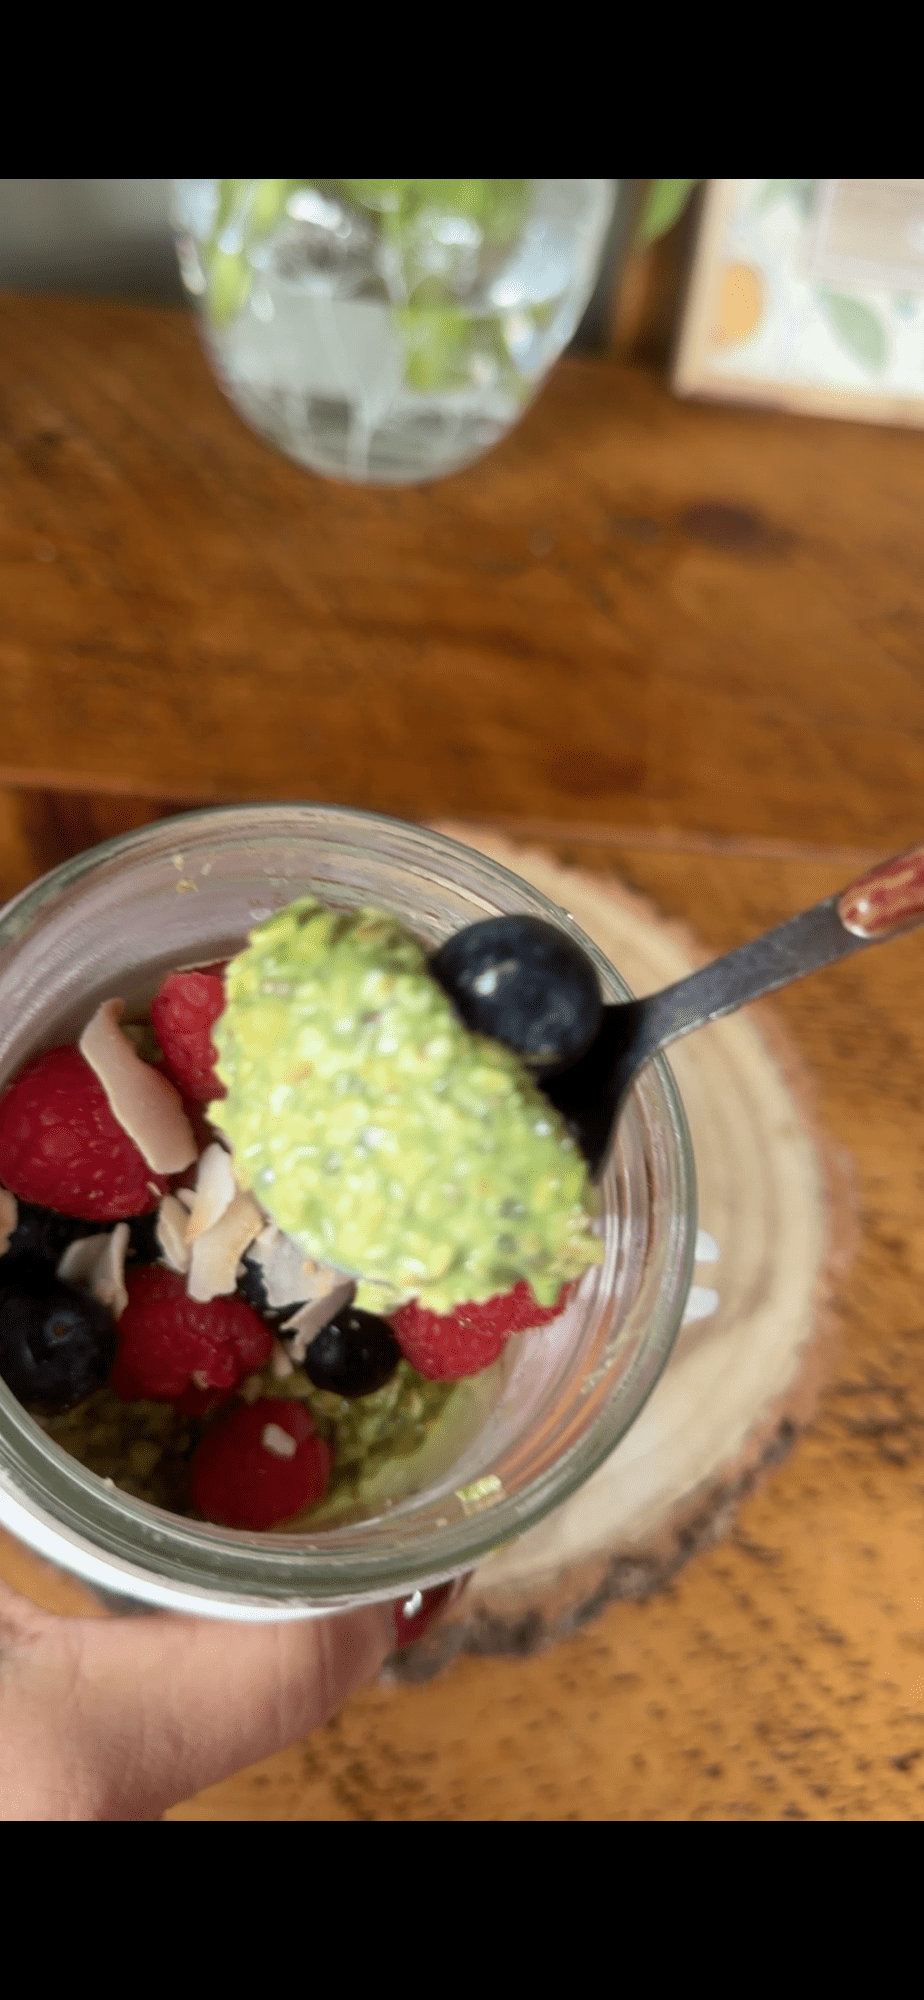
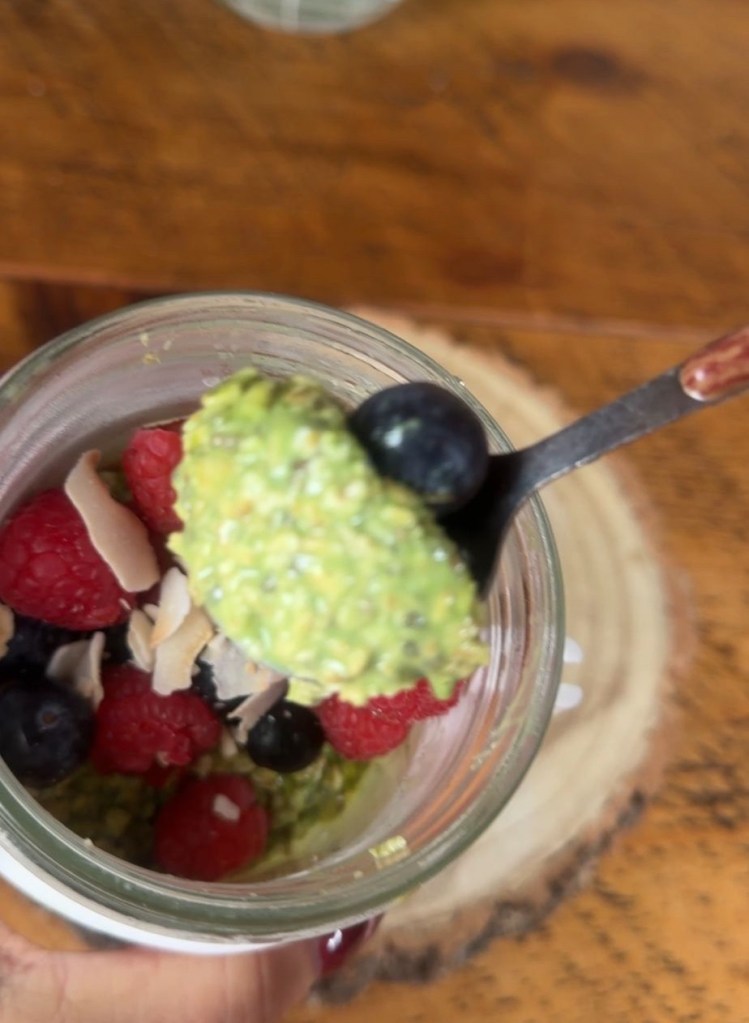
They’re creamy, gently sweet, and feel like a café treat, but all the work happens the night before when you’ve got a bit more brain power. I also love that they look beautiful – that pale green matcha base with pops of blueberries and raspberries on top. It’s the sort of breakfast that makes you pause for a moment, even if you’re rushing out the door. You just pull the jar from the fridge, stir, and you’ve instantly got something satisfying, nourishing and a tiny bit fancy.
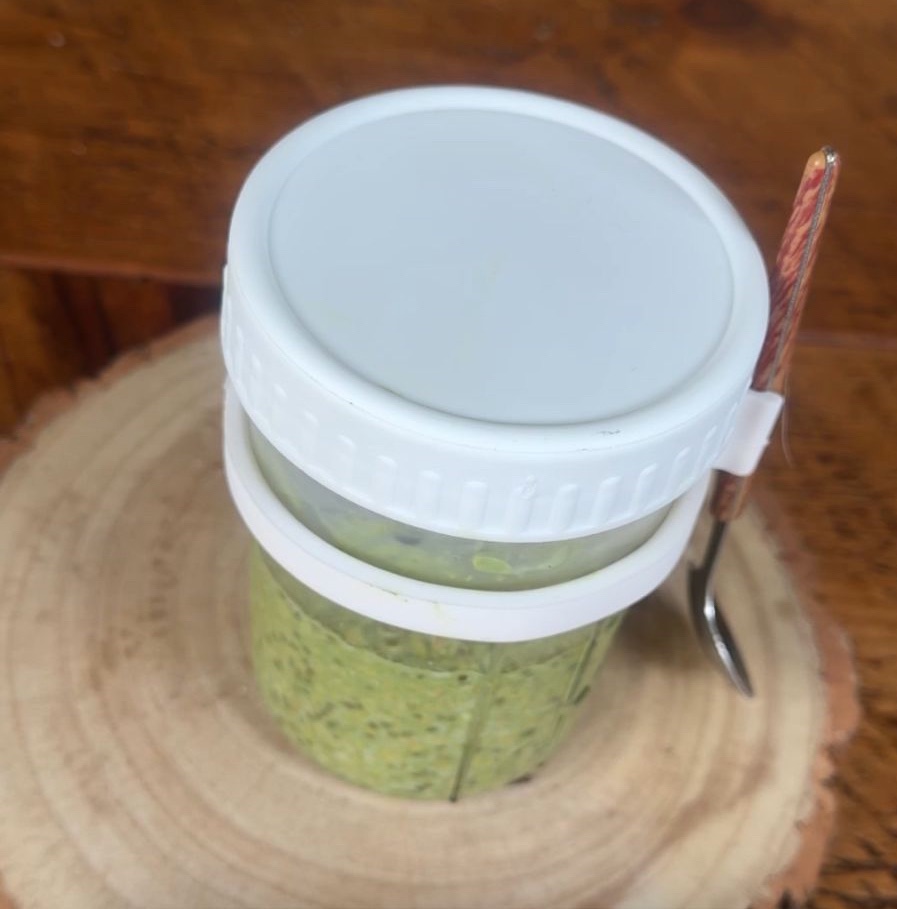
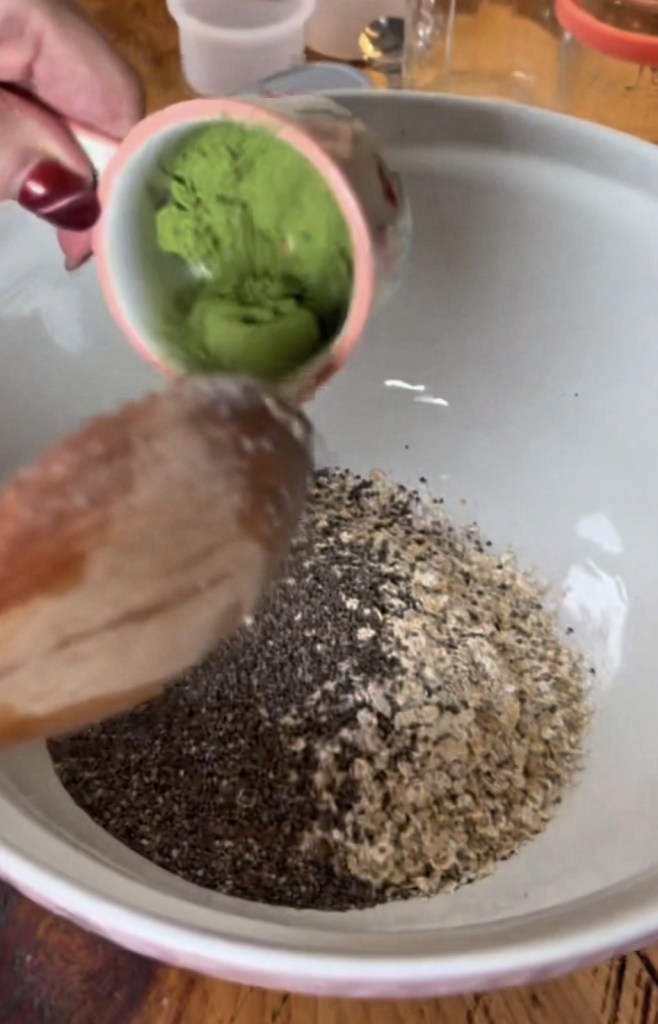
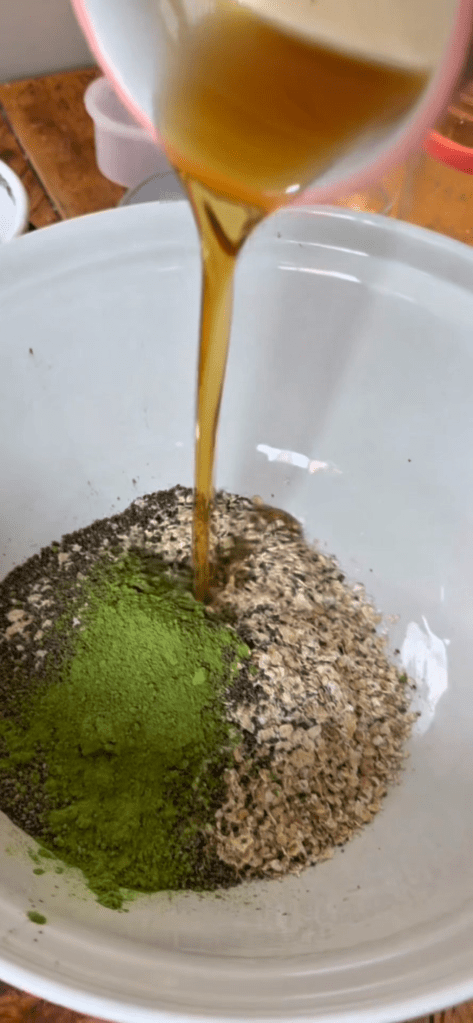
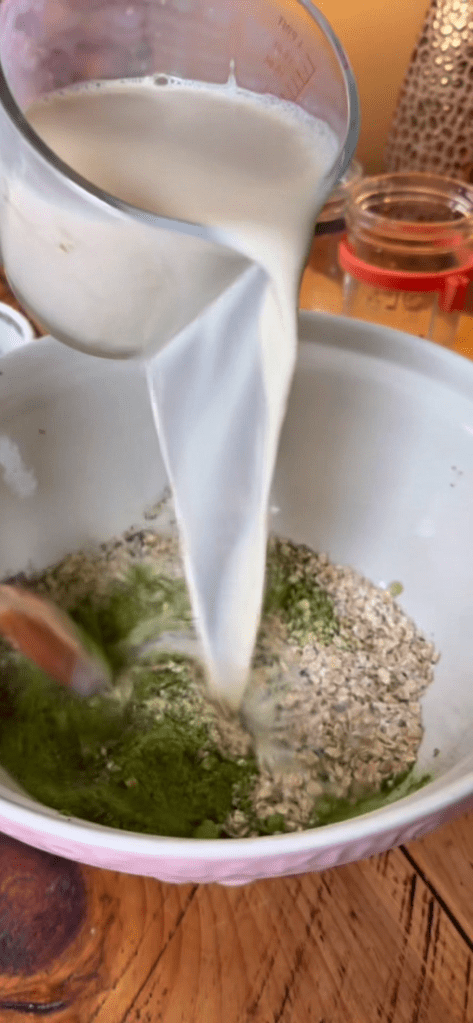
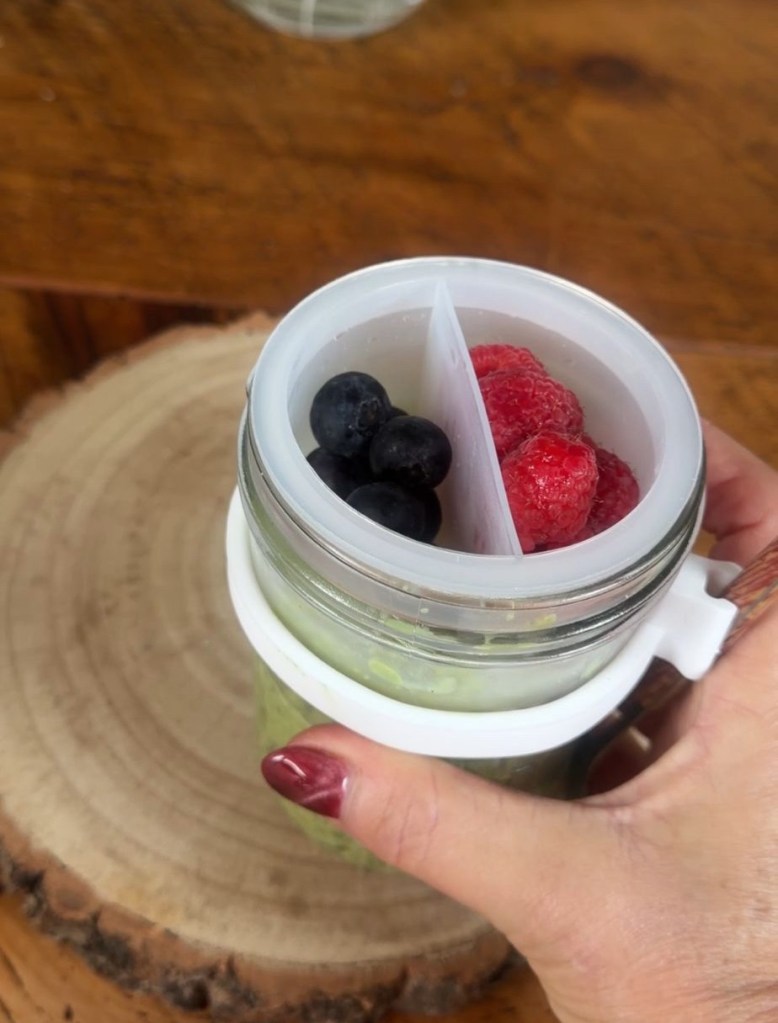
What you’ll need For one generous portion: • 160 ml skimmed milk (or any milk you like – oat, almond, soy all work beautifully) • 70 g rolled oats • 1 tsp matcha powder • 1 tbsp chia seeds • 2 tsp pure maple syrup • Pinch of salt • 30 g blueberries (a small handful) • 30 g raspberries (a small handful) • 1 tbsp flaked almonds You’ll also need a jar or lidded container – something you’re happy to shake or stir and pop straight into the fridge. I used these from Amazon which are brilliant as the have a separate container for fruit or toppings
How to make Matcha Berry Overnight Oats In the evening, when you’re pottering around the kitchen after dinner, take five quiet minutes for tomorrow-you.
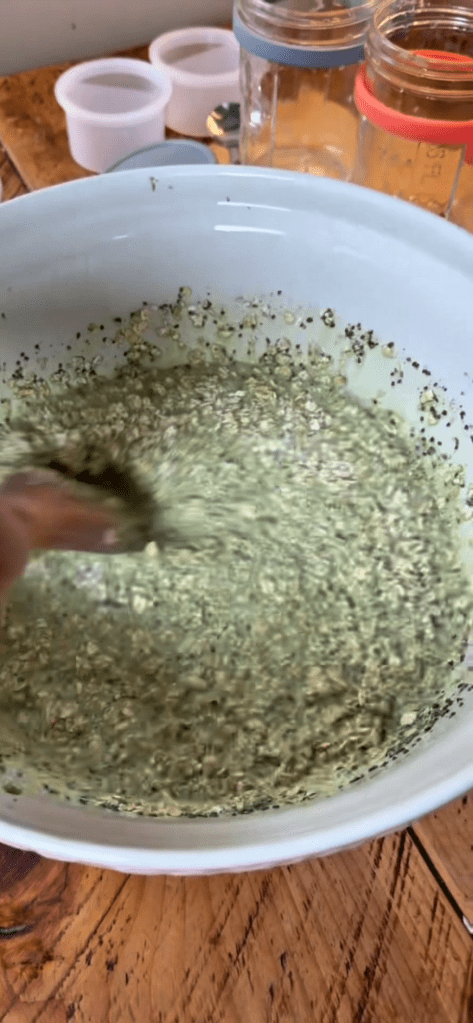
Add all the ingredients to the bowl and stir well.
The chia will look like it’s not doing much at this stage, but overnight it will swell and thicken everything into a pudding‑like texture.
Taste the mixture – if you prefer things sweeter, add an extra drizzle of maple syrup. If you like a stronger matcha flavour, you can add an extra half teaspoon.
Transfer to jars Pop the lid on and tuck it into the fridge for at least 4 hours, but ideally overnight.
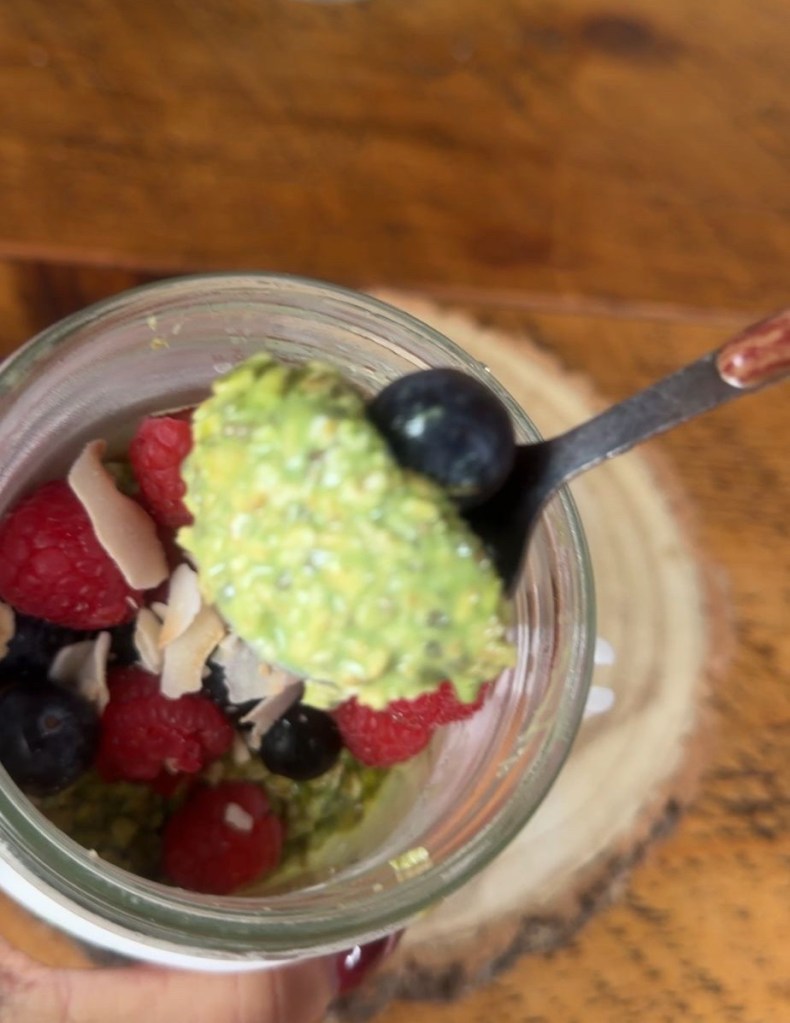
In the morning, give the oats a stir. They should be thick, creamy and spoonable.
Top with the blueberries, raspberries and flaked almonds. You can enjoy it cold straight from the jar, or let it sit out for 10–15 minutes if you prefer it closer to room temperature. It’s the kind of breakfast that feels like it took effort, but really, you barely did anything.
Let’s talk health benefits This bowl isn’t just pretty – it’s packed with ingredients that quietly support your body in lots of helpful ways. Oats: slow, steady energy Rolled oats are rich in complex carbohydrates and soluble fibre, particularly beta‑glucan. That means they digest slowly, helping to keep your blood sugar more stable and your energy levels steady through the morning. Many people find that a good portion of oats keeps them full for hours, which can help reduce mid‑morning snacking and support a more balanced appetite across the day.
Oats are also a gentle friend to your heart. The fibre they contain has been linked to helping maintain healthy cholesterol levels. On days when everything feels a bit chaotic, knowing you’ve at least given your body something solid and supportive can feel strangely grounding. Matcha: calm focus in a cup (or jar) Matcha isn’t just trendy green powder; it’s finely ground green tea leaves, so you’re consuming the whole leaf rather than just an infusion. That means a gentle dose of caffeine paired with an amino acid called L‑theanine. Together, they’re often described as giving calm, focused energy rather than the jittery buzz from coffee. A matcha breakfast can be especially lovely on busy mornings when you want to feel awake but not wired. Many people enjoy matcha for its antioxidant content too, particularly catechins such as EGCG, which are being studied for their potential benefits for cell protection and overall health.
Chia seeds: tiny powerhouses Chia seeds are tiny, but they bring a lot to the table: fibre, plant‑based omega‑3 fats, and a bit of protein. When they sit in liquid, they swell and create that thick, pudding‑like texture, which helps your breakfast feel more filling and satisfying. The combination of fibre and healthy fats can support digestion and help keep you fuller for longer. If you’re someone who often feels hungry again soon after breakfast, the addition of chia seeds can make a noticeable difference. Berries: colour, flavour and antioxidants The blueberries and raspberries aren’t just there to make things Instagram‑worthy. They add natural sweetness, a little tartness, and an array of vitamins and plant compounds. Berries are known for being rich in vitamin C and various antioxidants, which may help support immune function and protect cells from everyday wear and tear. They also add a lovely contrast in texture: juicy bites against the creaminess of the oats. That mix of textures can make a simple breakfast feel much more indulgent and satisfying. Almonds: crunch and healthy fats The flaked almonds on top bring a gentle crunch and a soft, nutty flavour that works beautifully with the matcha. Almonds offer healthy monounsaturated fats, a bit of protein, and some vitamin E. Together with the oats and chia, they help round out the bowl so you’re getting a satisfying mix of carbohydrates, fats and protein. This balance is one of the reasons this recipe works so well as a “grab and go” option – you’re less likely to crash a couple of hours later.
Ways to make it your own One of my favourite things about overnight oats is how forgiving they are. Once you’ve nailed the basic formula, you can play: • Swap the milk: Try oat milk for extra creaminess or almond milk for a nuttier taste. • Change the sweetener: Use honey, agave or even mashed ripe banana instead of maple syrup. • Add extra protein: Stir in a scoop of protein powder or a dollop of Greek yoghurt before chilling. • Play with toppings: Coconut flakes, cacao nibs, sliced strawberries or a spoon of nut butter all work beautifully with the matcha and berry flavours. Think of this recipe as your base canvas – you can tweak it to match your mood, your macros, or whatever you happen to have lingering in the fridge.
A gentle nudge to try it If mornings are usually a blur for you, consider this your sign to take five minutes tonight and set yourself up with something nourishing for tomorrow. There’s something very comforting about opening the fridge and seeing a jar of breakfast already waiting for you – like a little reminder that you looked after yourself in advance. If you do make these Matcha Berry Overnight Oats, notice how you feel afterwards: Do you stay fuller for longer? Do you feel calmer and more focused than after your usual breakfast? Those small shifts are often where the real magic is.
High-protein apple and peanut butter overnight oats are honestly one of the best ways to start your day.
They’re creamy, crunchy, slightly sweet, and packed with all the good stuff your body needs in the morning. The combo of creamy peanut butter, tangy Greek yogurt, and juicy apples gives these oats the perfect balance of protein, fibre, and flavour. Plus, they’re ridiculously easy to prep—just mix everything the night before, pop it in the fridge, and wake up to a ready-made breakfast that tastes amazing and keeps you full for hours.
Why You’ll Love Them
• The ultimate make-ahead breakfast—prep once, enjoy all week!
• Full of protein and fibre to fuel your morning and support digestion.
• Deliciously creamy and naturally sweet, with a little crunch from fresh apple. • Totally customisable—use your favourite apples or switch up the toppings.
Ingredients • 2 small apples – I used Granny Smiths • 180g porridge oats • 500ml unsweetened soy milk (or your preferred milk) • 180g plain Greek-style yogurt • 4 tablespoons smooth natural peanut butter • 2 tablespoons pure maple syrup • 1 tablespoon vanilla extract • ¼ teaspoon salt • ⅛ teaspoon ground cinnamon
Lemon juice
Method Step 1: Prep the Apples Chop one of your apples into bite-sized pieces – sprinkle with lemon juice to stop browning
Step 2: Mix It All Together In a medium bowl, whisk together the oats, soy milk, yogurt, 3 tablespoons of peanut butter, maple syrup, vanilla, salt, and cinnamon until smooth and creamy. Stir in your chopped apple.
Step 3: Chill Out Cover your bowl or divide the mixture into jars, then refrigerate overnight—or for at least 8 hours. The oats will soak up all that creamy goodness while you sleep.
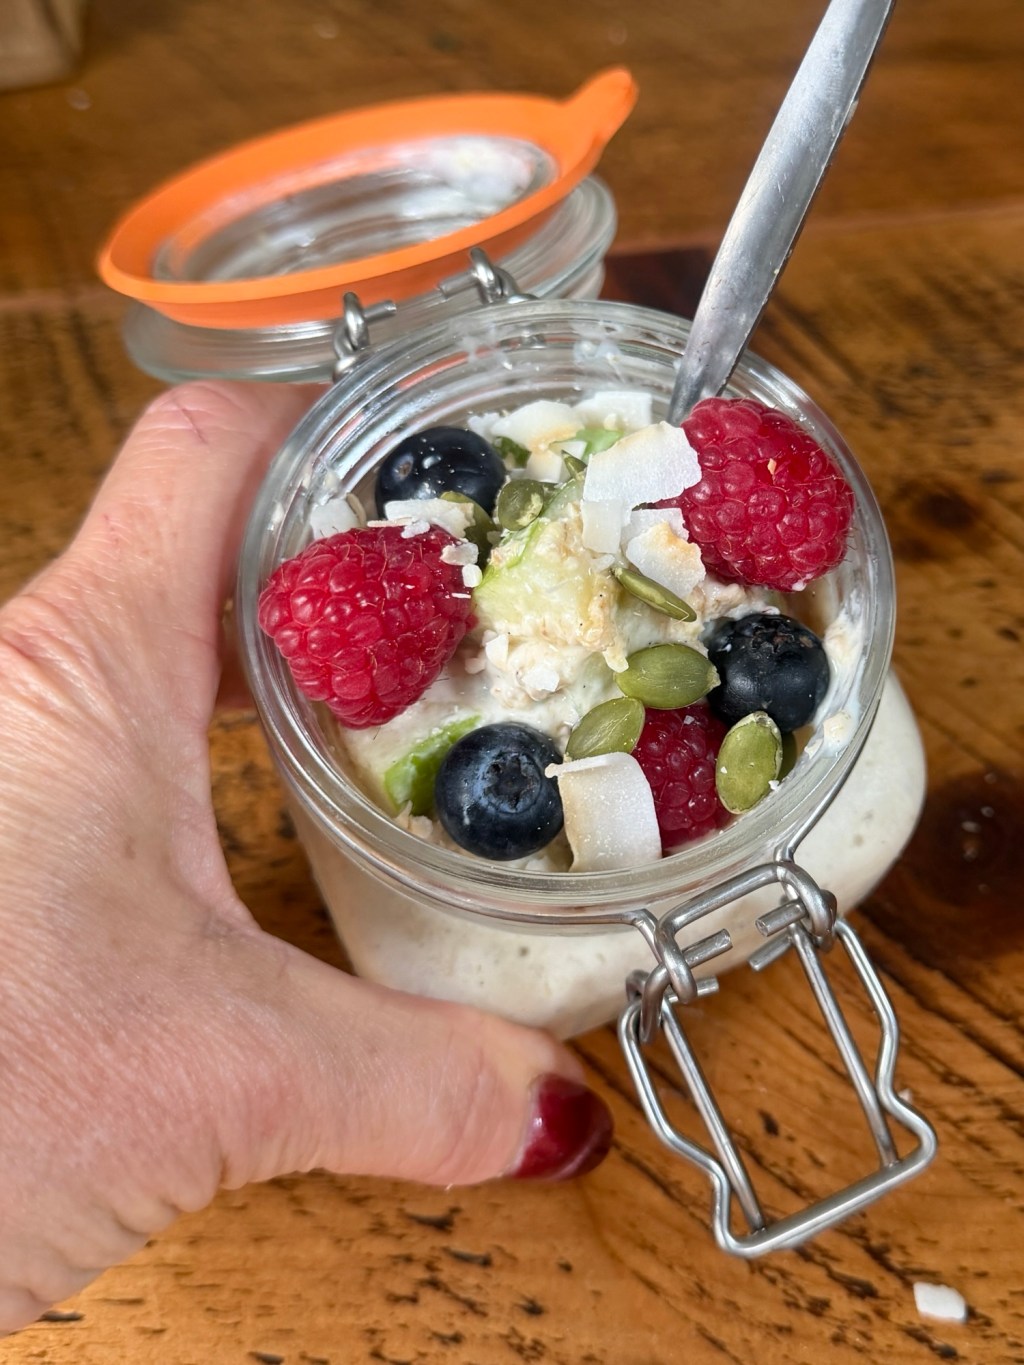
Step 4: Serve and Top It Off In the morning, give your oats a quick stir and portion them out. Slice the second apple for extra crunch, swirl through the remaining peanut butter, and add your favourite toppings—berries, pumpkin seeds, and coconut flakes are my go-tos.
Final Touch
Think of these oats as your morning power-up. Each serving packs 20g of protein, 8g of fibre, and a healthy dose of good fats. You get long-lasting energy, stable blood sugar levels, and a happy gut—all while eating something that feels like dessert! They’re great cold straight from the fridge, or warm them gently if you fancy something cozier. I like making a few jars on Sunday night so breakfast is completely sorted for the week—zero effort, maximum yum.
shopping Links .. a small commission will be paid to me
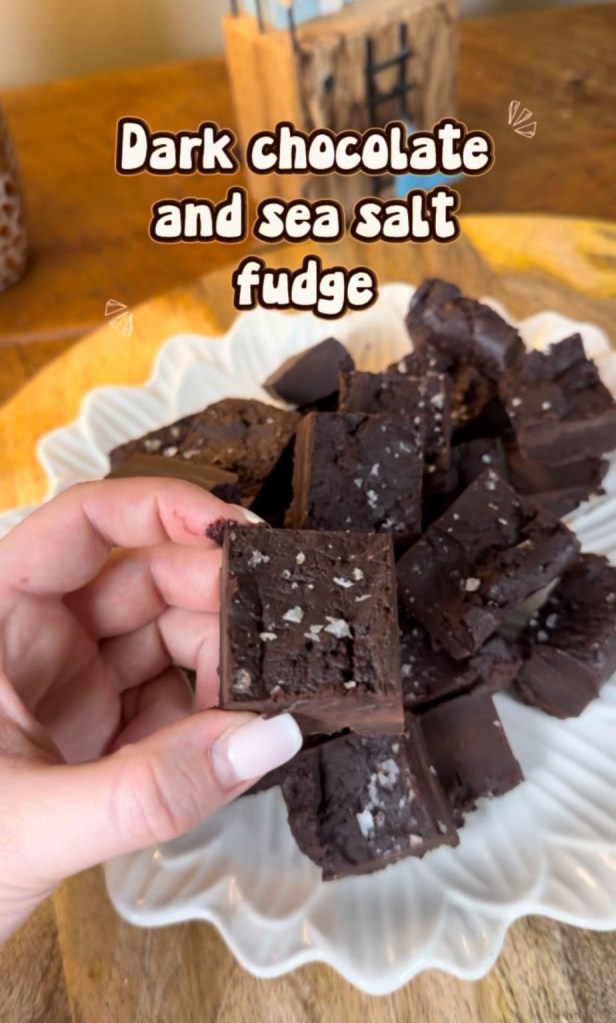
You know those recipes that feel way fancier than they actually are? This is absolutely one of them. My dark chocolate and sea salt fudge has become my go-to when I want something indulgent, quick, and impressive — and it never fails. It’s silky, rich, and has that perfect balance between sweet and salty that makes every bite irresistible. It only needs four simple ingredients (fewer than most midweek dinners!) and no special equipment at all. Honestly, if you’ve got a saucepan and a spoon, you’re good to go.
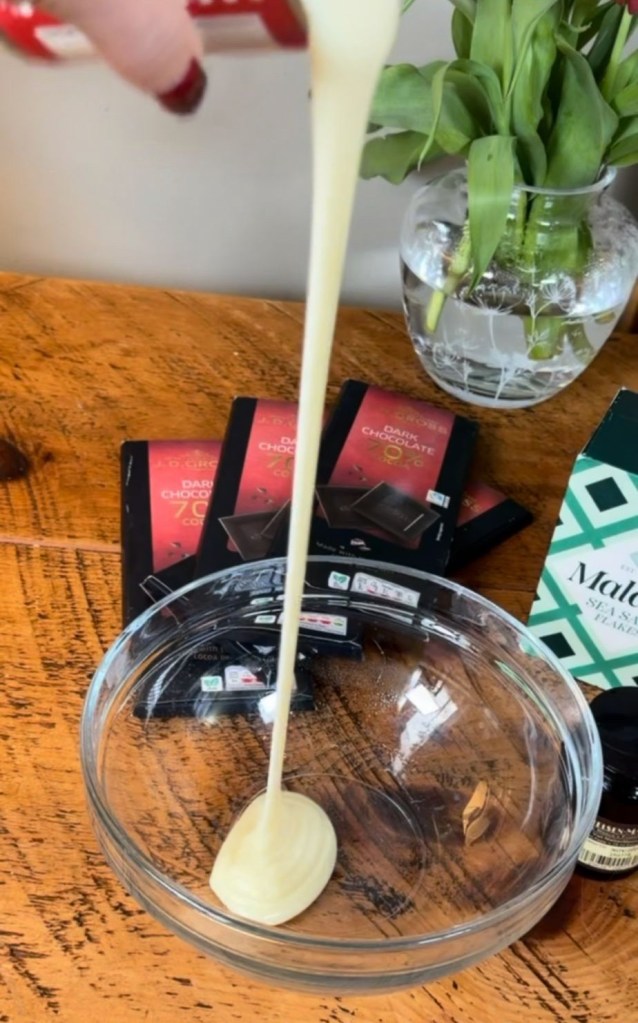
🧁 What You’ll Need: • 400g dark chocolate • 1 tin condensed milk (397g) • 2 tsp vanilla extract • Sea salt flakes (I always grab the Maldon ones — they stay nicely crisp and don’t instantly melt into the fudge)
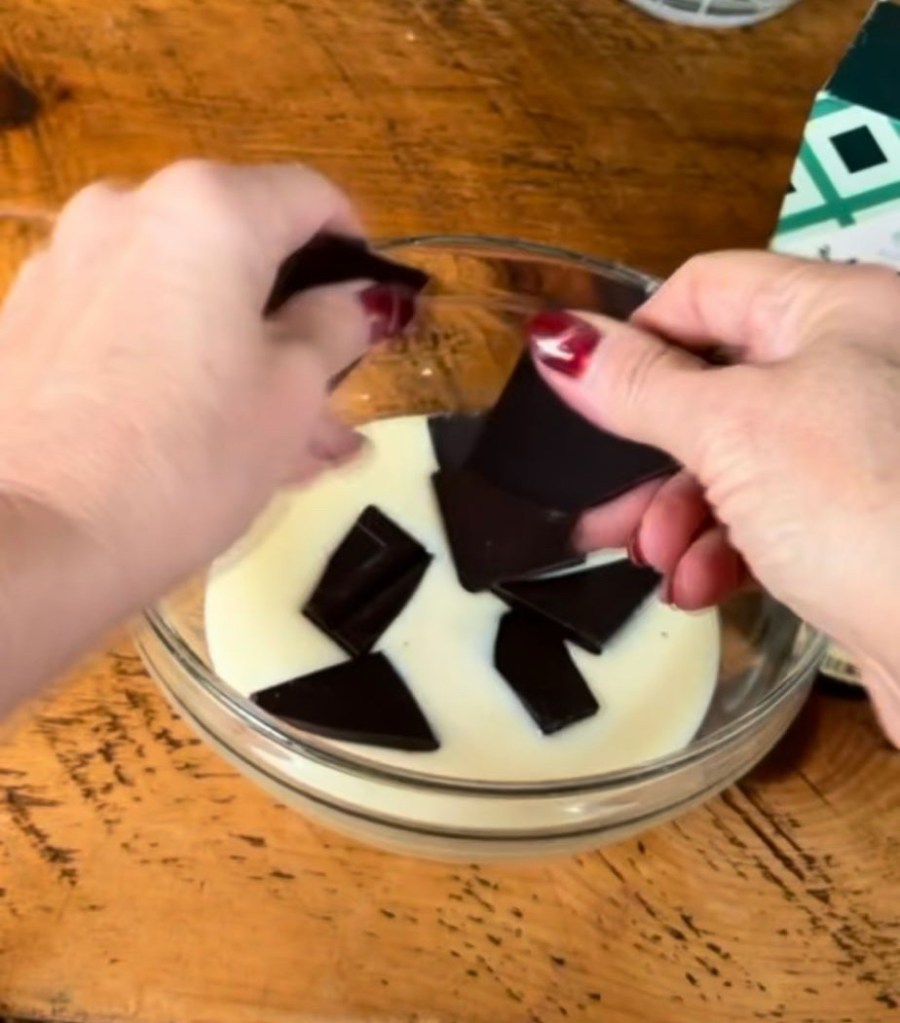
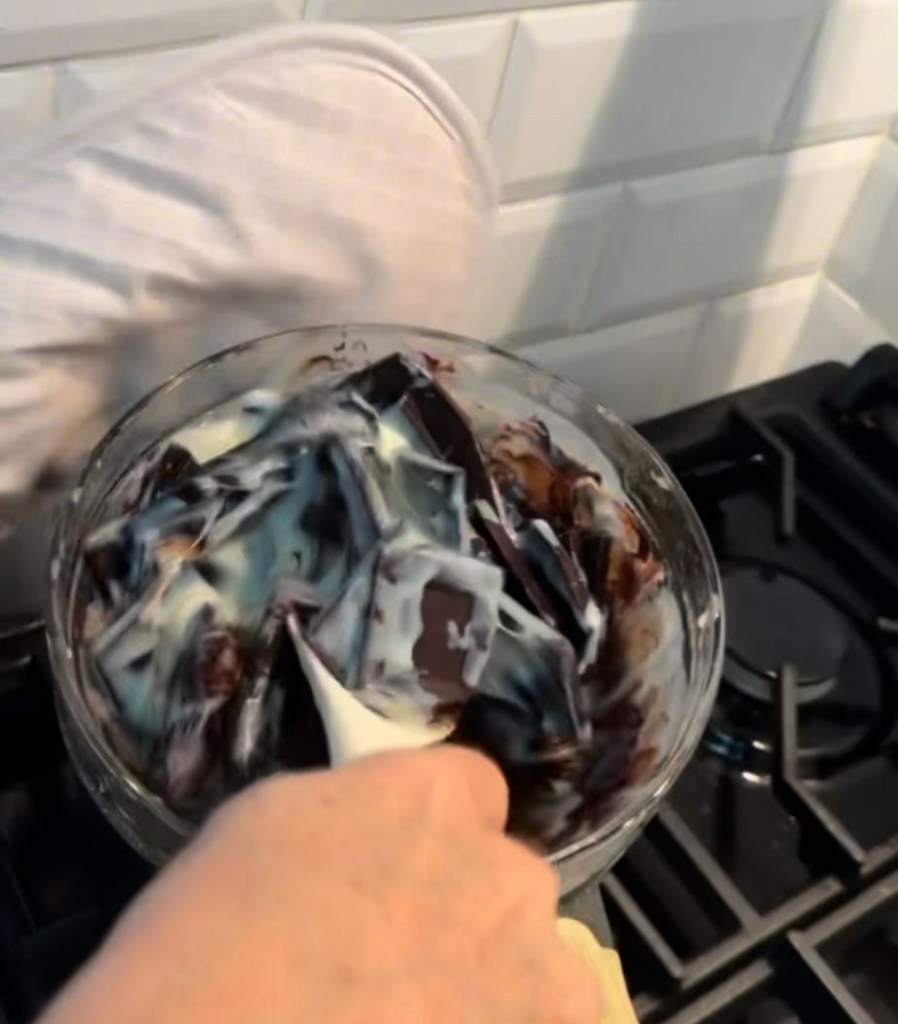
👩🍳 How to Make It: Start by breaking your chocolate into small chunks — this makes life so much easier because it melts faster and more evenly. Then add the chocolate and condensed milk to a heatproof bowl, and pop that bowl over a pan of gently simmering water.
Make sure the bottom of the bowl doesn’t touch the water — you just want the steam to gently heat it. I keep my heat on the lowest setting possible, but all cookers are different, so if you need a touch more heat, that’s fine. Just don’t rush it! Dark chocolate can be a bit temperamental, and you don’t want it to burn or turn grainy. If you’re short on time or prefer less fuss, you can also melt it in the microwave — just do short bursts (about 20–30 seconds), give it a good stir each time, and stop as soon as it’s smooth and glossy.
Once everything’s beautifully melted, stir in your vanilla extract and mix until combined.
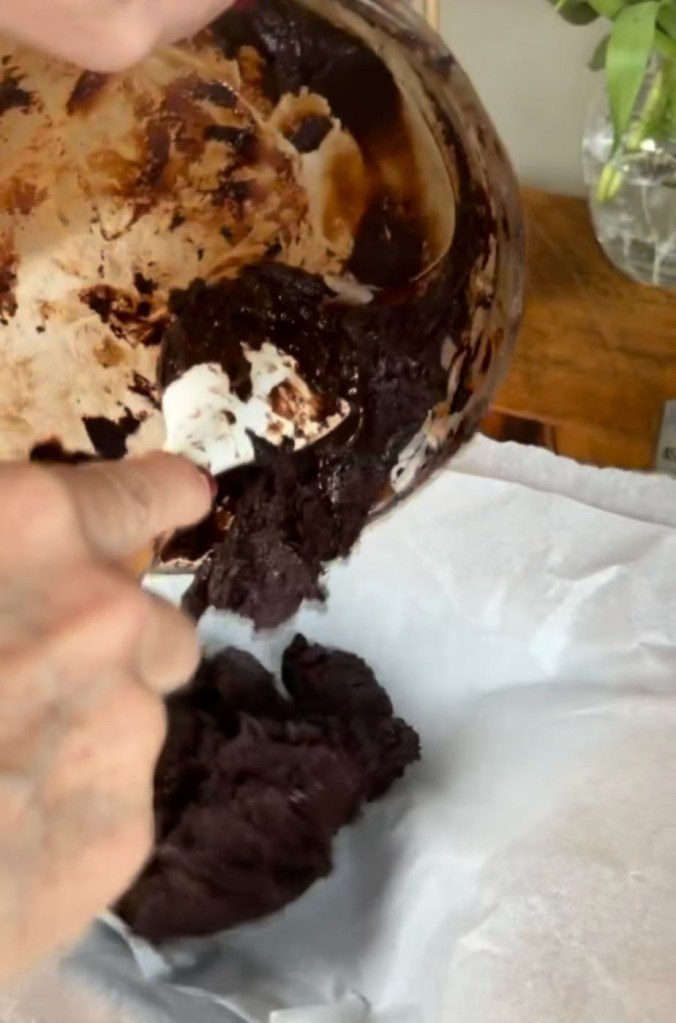
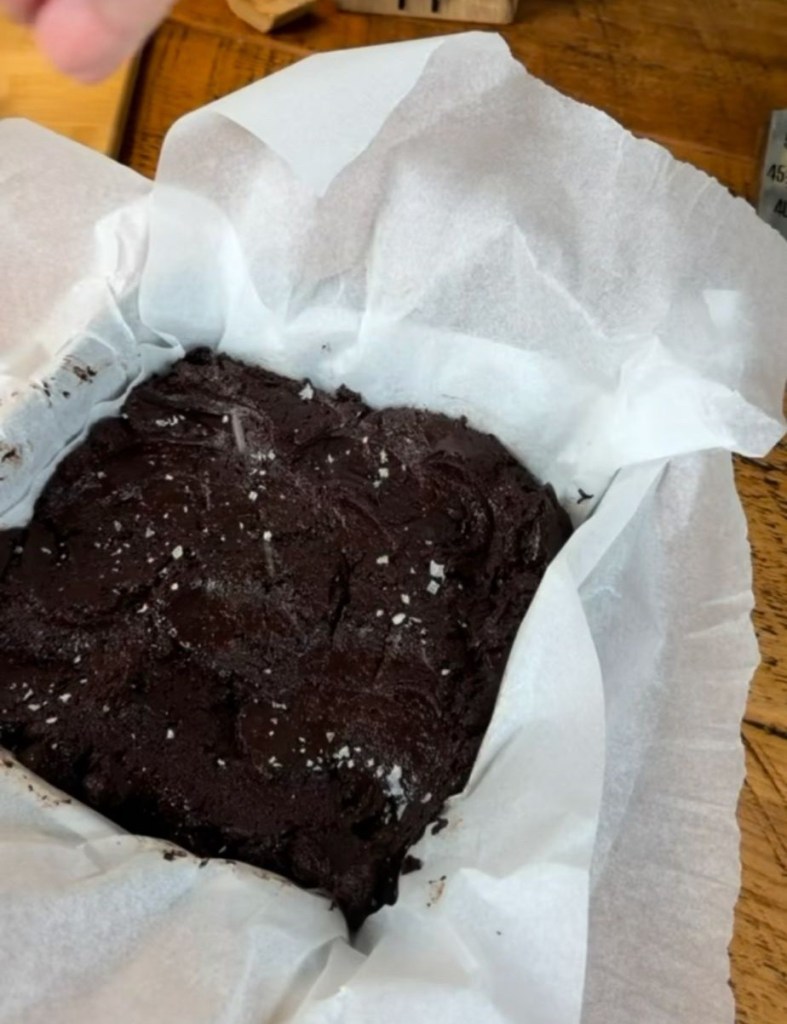
Pour the mixture into a lined tin and smooth out the top — I use the back of a spoon for this part because it gives such a lovely shiny finish.
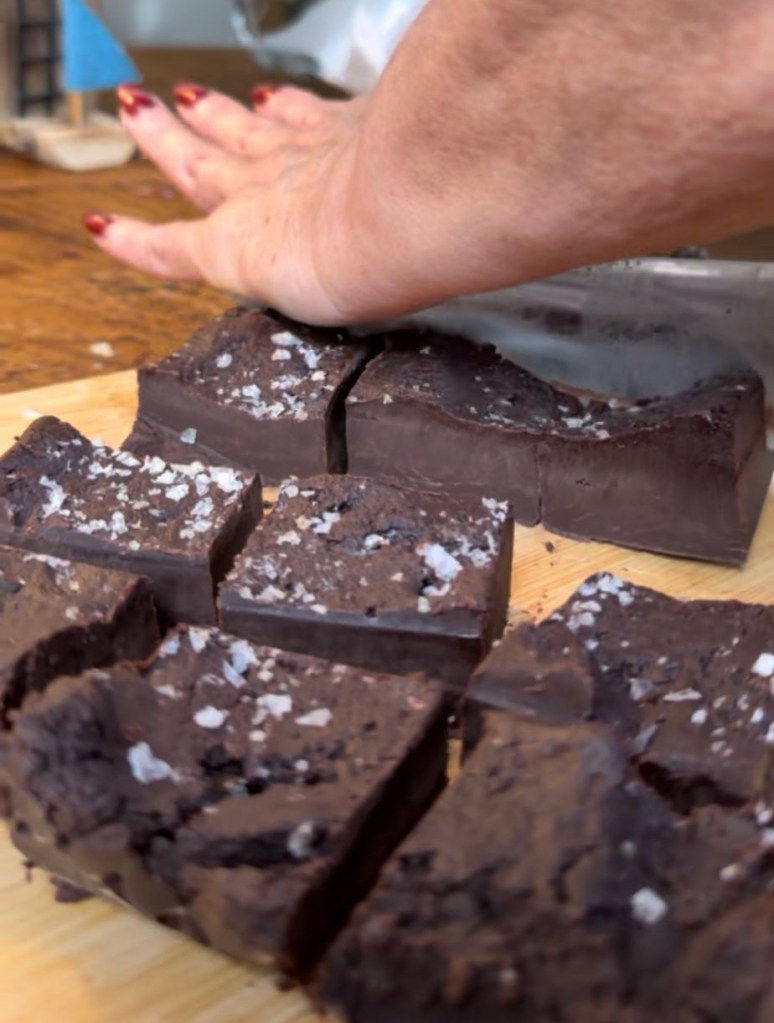
Now for the best part: the sea salt. Sprinkle those flakes over the fudge like edible confetti! You can add as little or as much as you like, but I’d say go easy until you find your perfect balance. A few flakes here and there bring out the chocolate flavour and give it that little “wow” moment when you bite into it.
Pop your tin in the fridge to chill for a couple of hours — though, let’s be honest, I usually leave mine overnight because the texture is even better the next day.
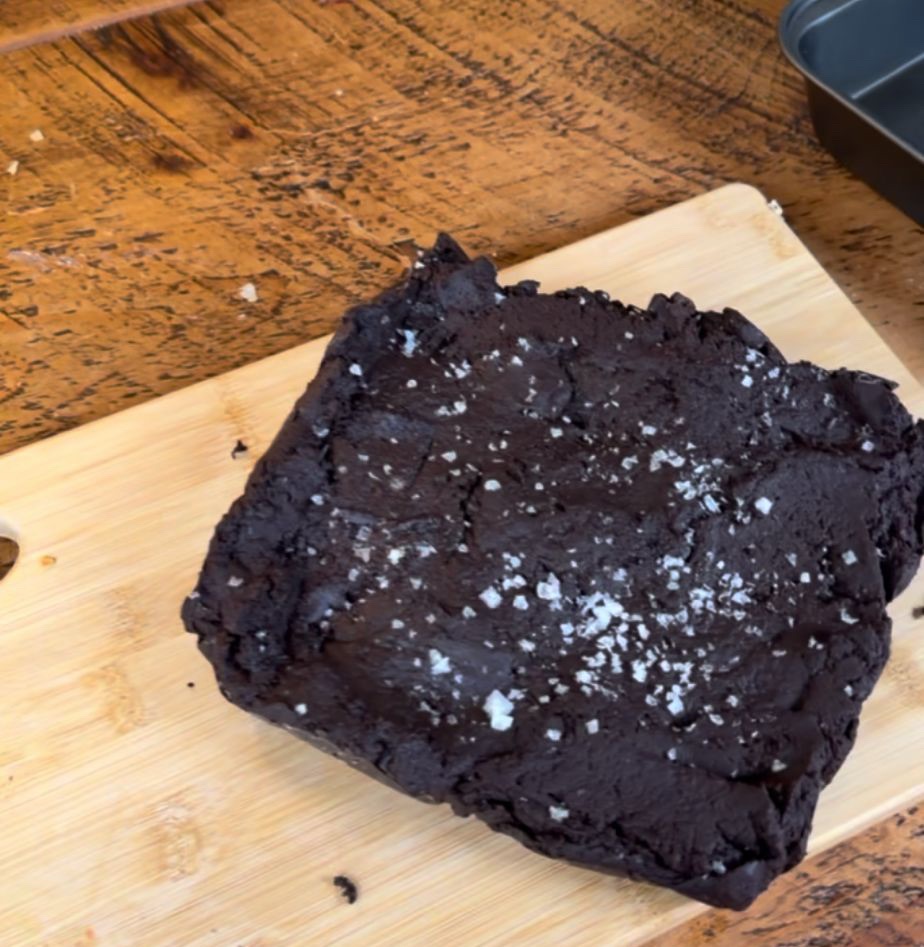
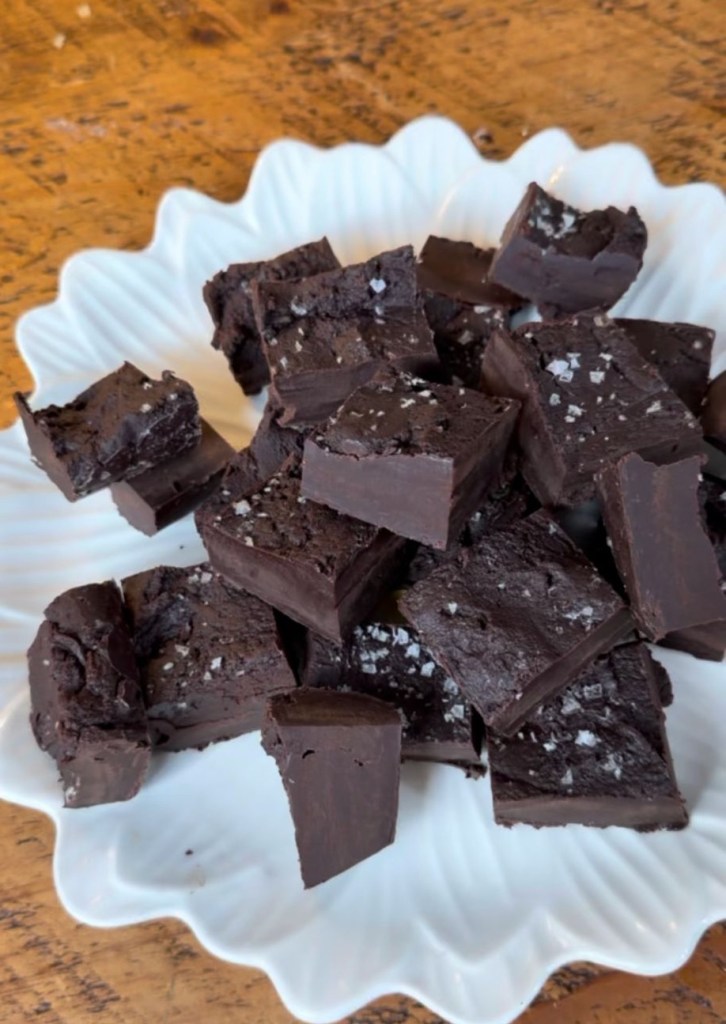
Once it’s firm, slice it into lovely little squares or bars. That’s when the magic really happens — glossy fudge pieces with crisp sea salt on top, ready to melt in your mouth. I can’t stress enough how addictive this is! It’s rich enough that you only think you’ll have one piece… but somehow half the tray disappears before you know it.
💡 Little Tips: • Try milk chocolate if you prefer something softer and sweeter. • Line your tin with parchment paper so it’s easy to lift out once set. • Store any leftovers (if you somehow have leftovers) in an airtight container — fridge or cool cupboard is perfect.
Whether you make this as a weekend treat, a homemade gift, or just because you fancy something chocolatey after dinner, it’s such a winner.
Easy, minimal ingredients, and tastes like heaven.
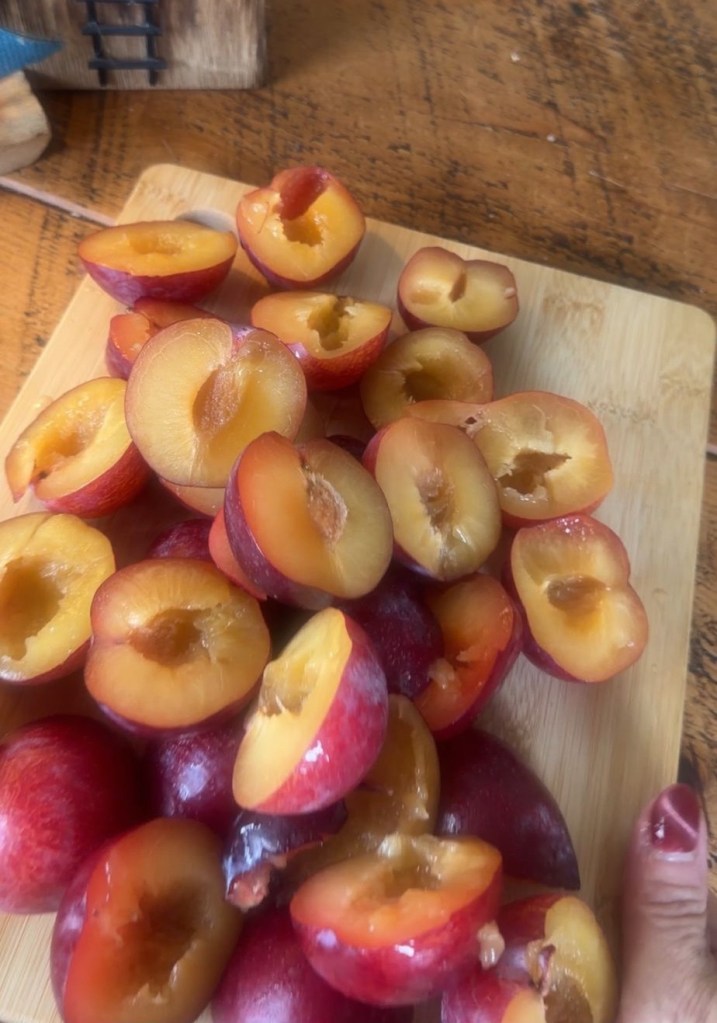
If you love jam but hate how sugary most shop‑bought jars are, this healthy chia plum jam is going to be your new best friend. It’s fruity, tangy, lightly sweet and thickened naturally with chia seeds instead of pectin. You can whip it up in about 15 minutes on the hob, and it feels like such a win when you spread it on toast knowing what actually went into it. This is the kind of recipe I love for busy mornings: a little bit of chopping, a little bit of stirring, and then the chia seeds do all the clever thickening work while you get on with your day.
Why Chia Plum Jam Is a Healthier Choice Traditional jam is usually just fruit plus a lot of sugar. That’s why it’s so thick and sticky, but it also means a big sugar hit for breakfast. With chia jam, we flip that on its head. • Much less sugar Instead of a huge amount of added sugar, the sweetness mainly comes from the plums themselves, with just a spoon or two of honey, maple syrup or sugar if you want it sweeter. You’re getting flavour without turning your breakfast into dessert. • High in fibre and good fats Chia seeds are little powerhouses – they’re packed with fibre and plant‑based omega‑3 fats, which can help keep you fuller for longer and support digestion. The fibre also helps slow down the release of sugars from the fruit, which is friendlier for blood sugar balance. • All the goodness of plums Plums bring vitamins, antioxidants and natural fibre to the party. Leaving the skins on means you keep even more of that goodness, and you also get a lovely rich colour in the jam.
Tips and Variations Completely no‑added‑sugar version If your plums are nice and ripe, you might not need any added sweetener at all. Just leave out the honey/maple and sweeten only if you find it too tart after cooking. • Extra flavour ideas Add a pinch of cinnamon, mixed spice or vanilla for a cosy flavour. A tiny pinch of salt can also make the fruit taste sweeter and more rounded. • Smoother texture If you prefer a smoother jam, you can lightly mash the plums with a fork or potato masher as they cook. For an ultra‑smooth finish, blitz the cooked fruit with a stick blender before stirring in the chia seeds. • Scaling the recipe You can easily double or triple the recipe. Just keep roughly the same ratios: for every 300 g fruit, use about 2 tablespoons chia seeds and adjust sweetener to taste.
Because chia seeds swell and naturally gel as they sit in the cooked fruit, you don’t need pectin, special sugars or any jam‑making wizardry. It’s pretty much chop, simmer, stir, done.
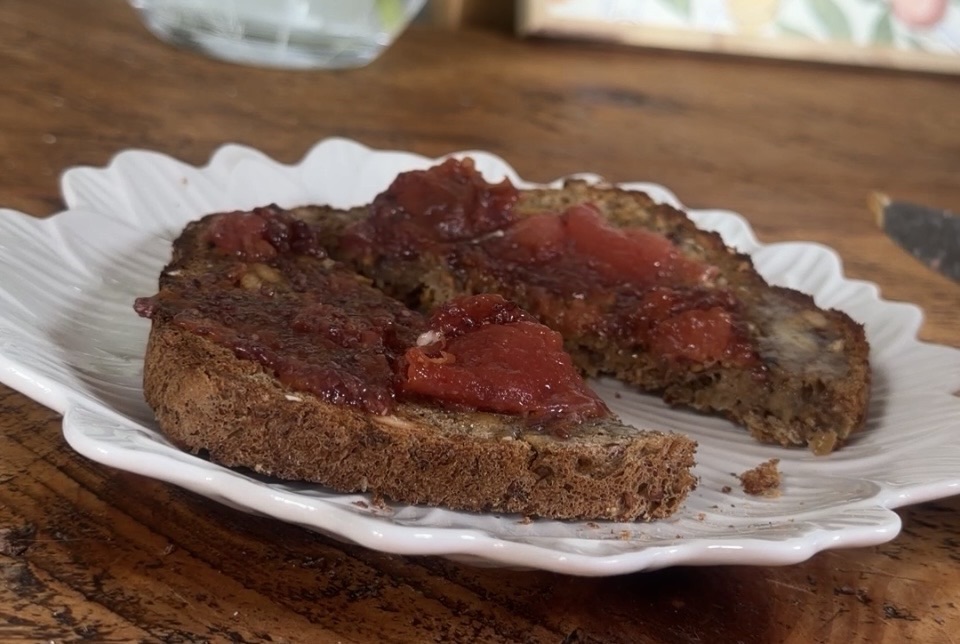
How To Use Chia Plum Jam Honestly, once you’ve got a jar of this in the fridge, it disappears very quickly. Here are a few ideas: • Swirled into Greek yogurt or Skyr • On hot buttered toast or crumpets • Dolloped over porridge or overnight oats • As a filling for crepes or pancakes • Stirred through cottage cheese or ricotta on toast • As a quick layer in a jam tart or dessert pot It also makes a cute homemade foodie gift if you pop it into a little jar with a label.
Healthy Chia Plum Jam (No Pectin, Low Sugar) Makes about 1 small jar (250–300 ml) Ingredients • 300 g ripe plums, washed, stones removed and roughly chopped • 1 tablespoon lemon juice (freshly squeezed) • 1–2 tablespoons honey or maple syrup (or 1–2 tablespoons golden caster sugar, to taste) • 2 tablespoons chia seeds (about 20–25 g) • 2–4 tablespoons water, only if needed (if your plums are not very juicy)
Method
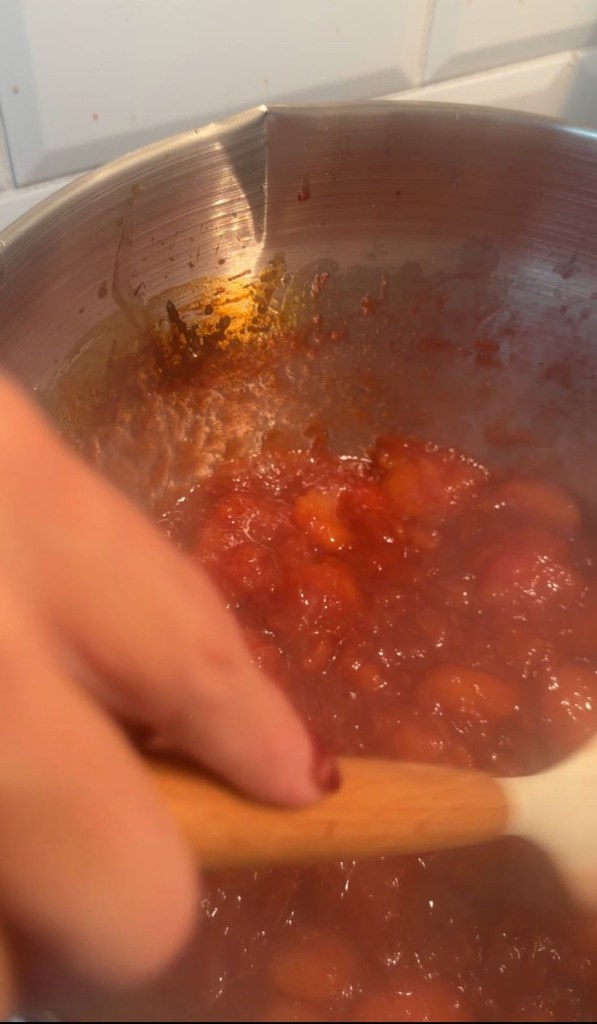
Prepare the plums Wash the plums, remove the stones and roughly chop the flesh. There’s no need to peel them – the skins soften as they cook and add colour and fibre.
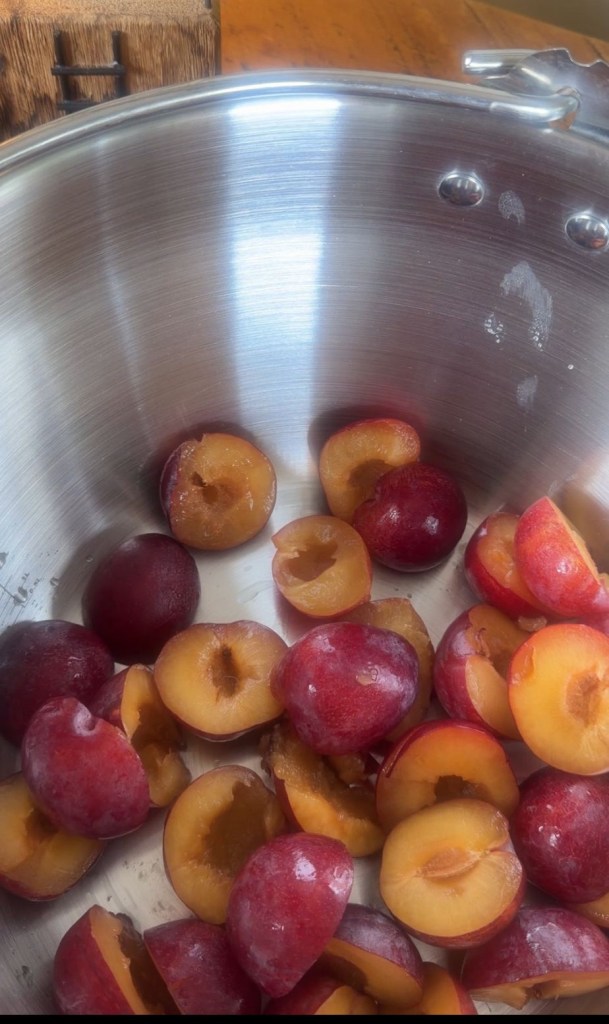
Start cooking the fruit Add the chopped plums to a small saucepan along with the lemon juice and your chosen sweetener (start with 1 tablespoon; you can add more later if you like it sweeter).
Simmer until jammy Place the pan over a medium heat. Gently simmer for about 8–10 minutes, stirring occasionally, until the plums break down and look soft and saucy. • If the mixture looks very dry or starts catching on the bottom, add 2–4 tablespoons of water to loosen it. • If it looks too runny, just keep cooking for a couple more minutes to let some of the liquid evaporate.
Taste and adjust sweetness Take the pan off the heat and carefully taste a small spoonful (it will be hot). Add a little extra honey/maple/sugar if you’d like it sweeter and stir through.
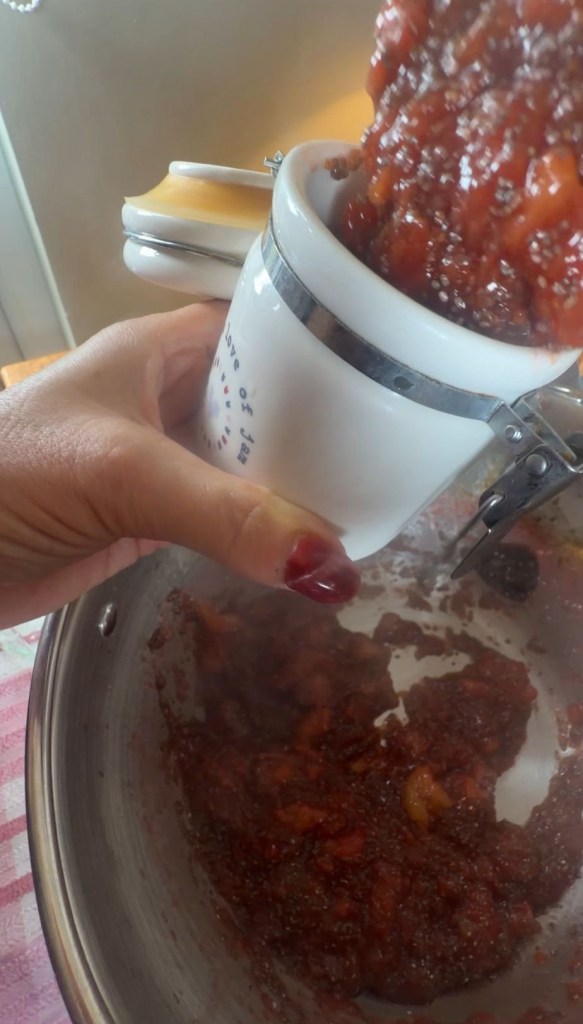
Stir in the chia seeds Sprinkle the chia seeds over the warm plum mixture and stir very well so they’re evenly distributed. The jam will still look runny at this stage – that’s fine.
6. Let it thicken Leave the mixture to sit for 15–20 minutes at room temperature. The chia seeds will swell and thicken the jam. Give it an occasional stir so it thickens evenly. • If after resting it’s too thick for your liking, stir in a spoonful of water. • If it’s still a bit runny, you can stir in an extra teaspoon of chia seeds and let it sit a little longer.
7. Cool and store Once you’re happy with the consistency, transfer the jam to a clean jar or container. Let it cool completely, then store in the fridge. Use within about 1 week.
Tips and Variations • Completely no‑added‑sugar version If your plums are nice and ripe, you might not need any added sweetener at all. Just leave out the honey/maple and sweeten only if you find it too tart after cooking. • Extra flavour ideas Add a pinch of cinnamon, mixed spice or vanilla for a cosy flavour. A tiny pinch of salt can also make the fruit taste sweeter and more rounded. • Smoother texture If you prefer a smoother jam, you can lightly mash the plums with a fork or potato masher as they cook. For an ultra‑smooth finish, blitz the cooked fruit with a stick blender before stirring in the chia seeds. • Scaling the recipe You can easily double or triple the recipe. Just keep roughly the same ratios: for every 300 g fruit, use about 2 tablespoons chia seeds and adjust sweetener to taste.
Shopping links to help – I may get a small commission
Jam making starter kit everything you need including jars
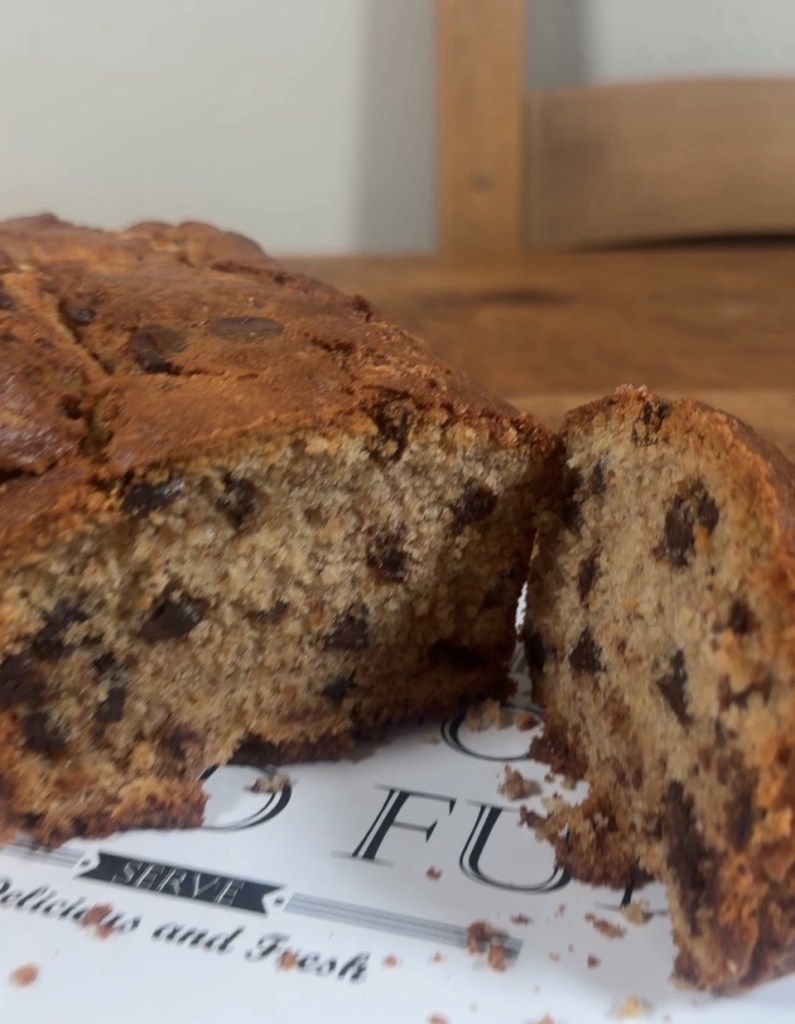
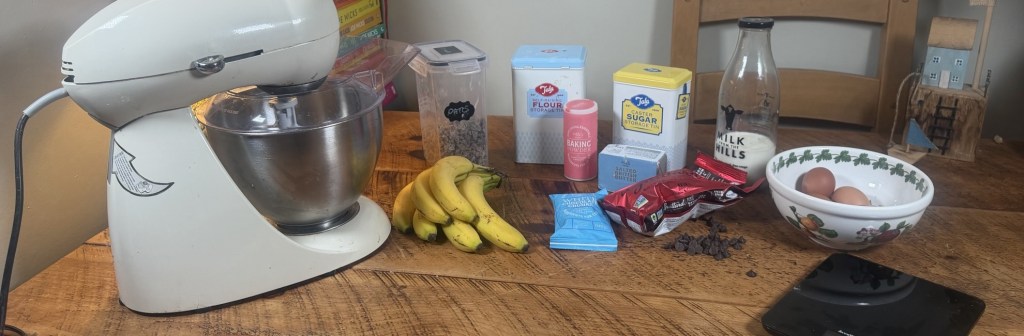
You know those recipes that sneak into your life and suddenly become your thing? This banana bread is exactly that – simple, reliable, and just a little bit extra thanks to the mix of chocolates and optional dates.
It’s the perfect bake for when your bananas have gone spotty and you fancy something cosy with a cuppa, without spending all afternoon in the kitchen. One bowl, minimal effort, maximum payoff. It’s a great “anytime” loaf: Sunday baking, after-school snacks, packed lunches, or a little treat with your morning coffee. The ripe bananas keep it soft and moist, the white and dark chocolate chips give you pockets of sweetness and richness, and the chopped dates (if you use them) add lovely chewy, caramel-like bites. It feels like a classic banana loaf that’s had a little glow up – still homely and comforting, but just special enough that people will ask you for the recipe.
Ingredients • 100g softened butter • 175g caster sugar • 2 large eggs • 2 ripe bananas, mashed (the spottier the better) • 225g self-raising flour • 1 tsp baking powder • 2 tbsp milk • 100g white chocolate chips • 100g dark chocolate chips • 100g chopped dates (optional, but lovely for extra chew and sweetness)
Method
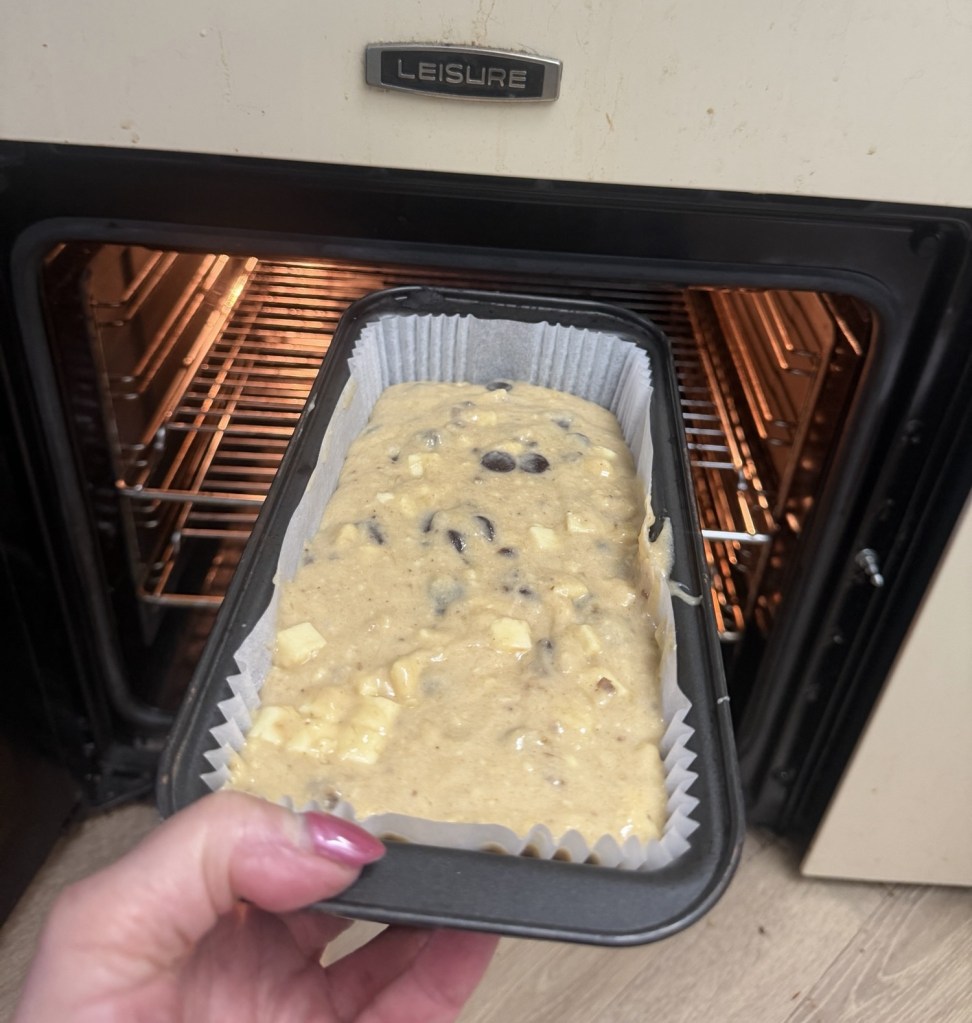
Get your tin and oven ready Preheat your oven to 180C / 160C fan / Gas Mark 4. Lightly grease a 2lb loaf tin, then line the base and sides with baking parchment. This makes it much easier to lift the loaf out later without it sticking or breaking.
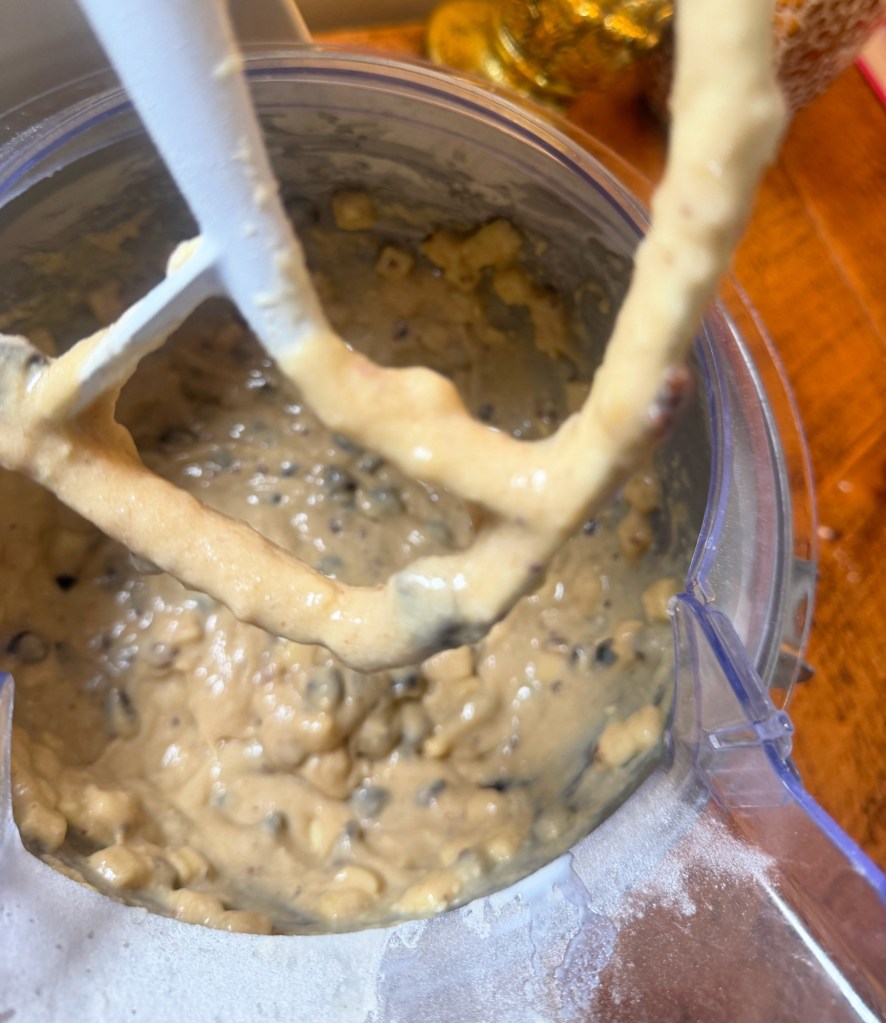
Mash the bananas Peel your ripe bananas and pop them into a small bowl. Mash with a fork until mostly smooth, with just a few little lumps. The riper the bananas, the sweeter and more flavourful your loaf will be.
Mix everything in one bowl In a large mixing bowl, add the softened butter and caster sugar. Beat them together until well combined and a bit lighter in texture. Add the eggs, mashed bananas, self-raising flour, baking powder and milk straight into the same bowl. Using an electric hand mixer or a wooden spoon, beat everything together for about 2 minutes, until you have a smooth, thick batter and everything is well blended.
Fill the tin Spoon the mixture into your prepared loaf tin. Use the back of a spoon or a spatula to level the surface so it bakes evenly and looks neat once it’s risen.
Bake your banana bread Place the tin in the preheated oven and bake for about 1 hour. Ovens do vary, so start checking from around 50 minutes.
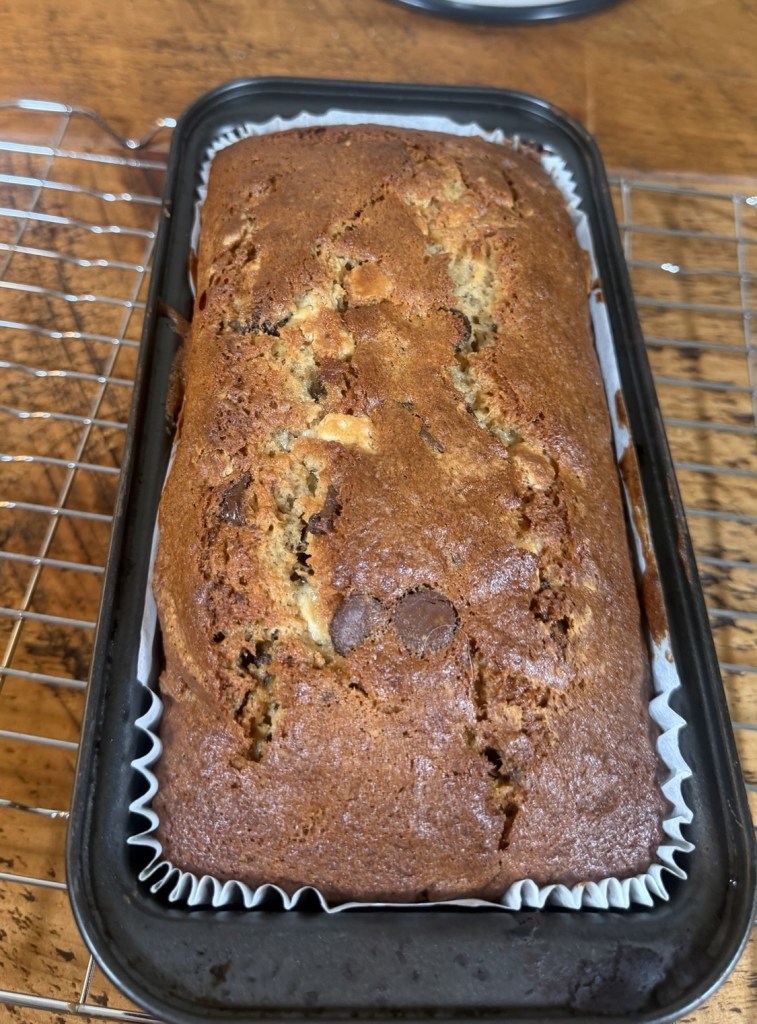
The loaf is ready when it’s well risen, a lovely golden brown on top and a fine skewer inserted into the centre comes out clean. Don’t worry if you see a little melted chocolate on the skewer – you just don’t want any raw batter.
Cool it down (the hardest part!) Take the tin out of the oven and leave the banana bread to cool in the tin for a few minutes so it can firm up a little. Then carefully lift it out using the parchment, peel off the paper and transfer the loaf to a wire rack to cool completely – or at least until it’s just slightly warm.
Serving ideas and little tips • The absolute best moment is slicing it while it’s still a touch warm, when the chocolate chips are soft and a bit melty and the crumb is tender and moist. • It’s delicious on its own, but a thin swipe of butter on a warm slice takes it into full comfort-food territory. • The loaf keeps well for a few days in an airtight container, and the flavour actually deepens by the next day. • Older slices are lovely lightly toasted under the grill and served with butter for a cosy breakfast or snack.
• You can easily tweak it: swap the dates for chopped nuts (like walnuts or pecans), or stick to just white or just dark chocolate depending on what you have in the cupboard. This is one of those low-effort, high-reward bakes that makes your kitchen smell amazing, looks impressive sliced on a board, and tastes like a warm, homemade hug. Make it once and there’s a good chance you’ll become “the banana bread person” among your friends and family – and you won’t mind one bit.
Shopping links .. i may get a small commission if you purchase
kenwood mixer – this is the newer sleeker version than my old workhorse but they are classics ! https://amzn.to/3Qef1AV
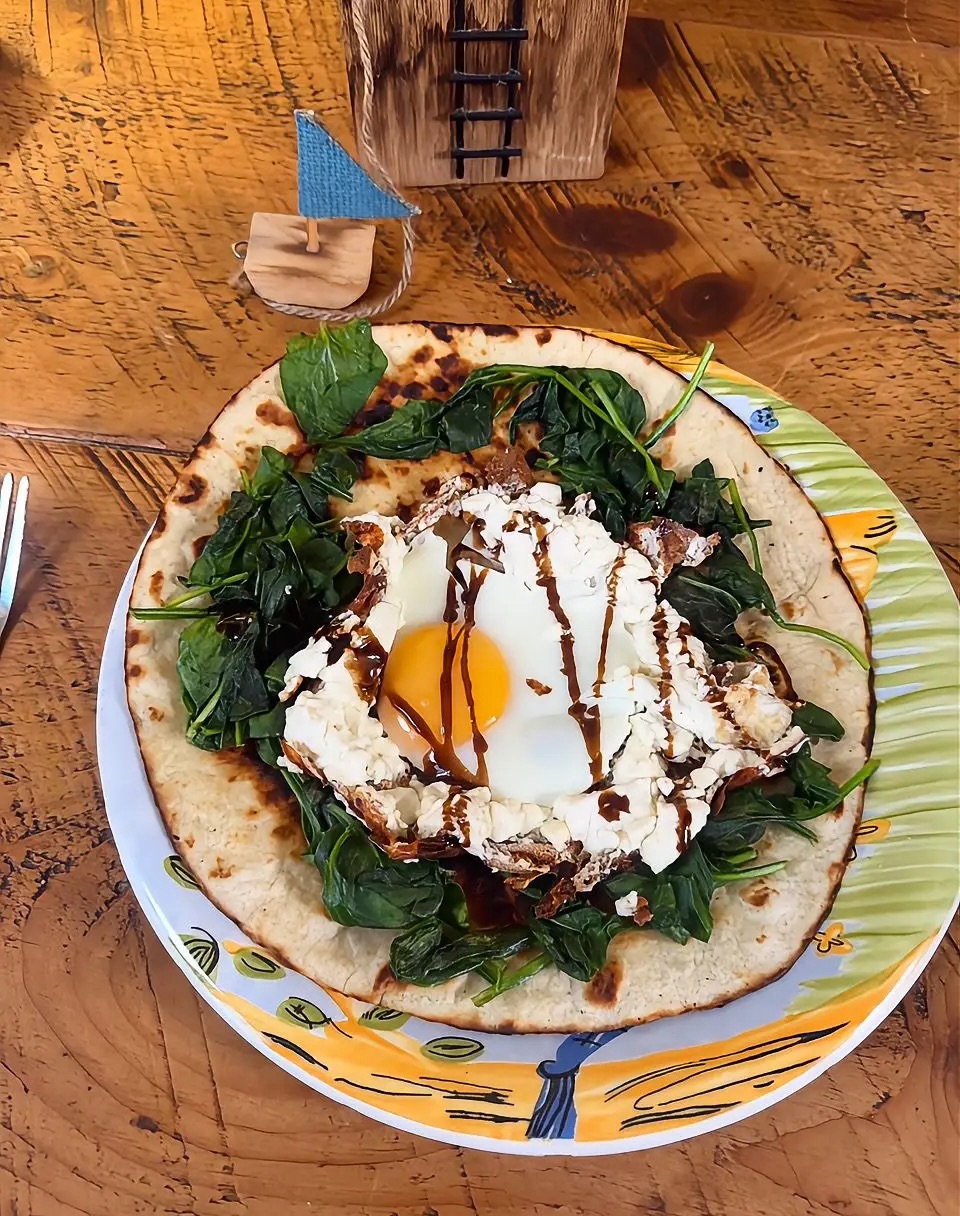
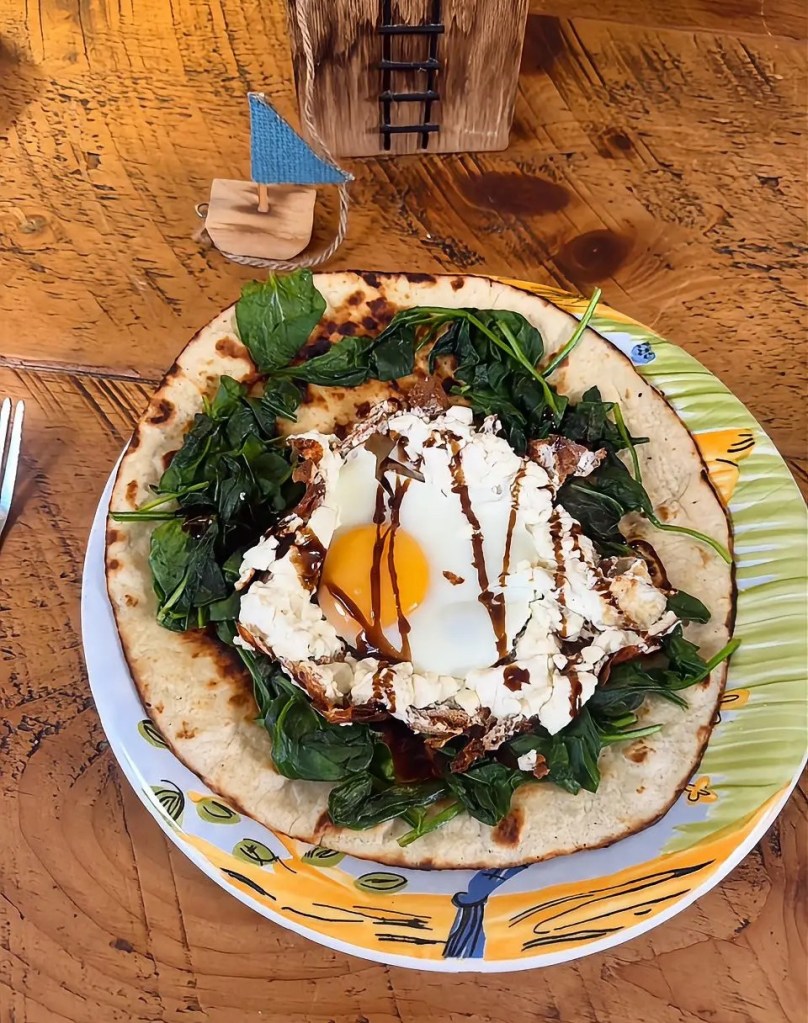
Okay, hands up if mornings always feel like a race against the clock 🙋♀️ Because same. I swear I blink and it’s suddenly time to leave the house. But I refuse to start my day with a sad granola bar when something this easy and delicious exists!
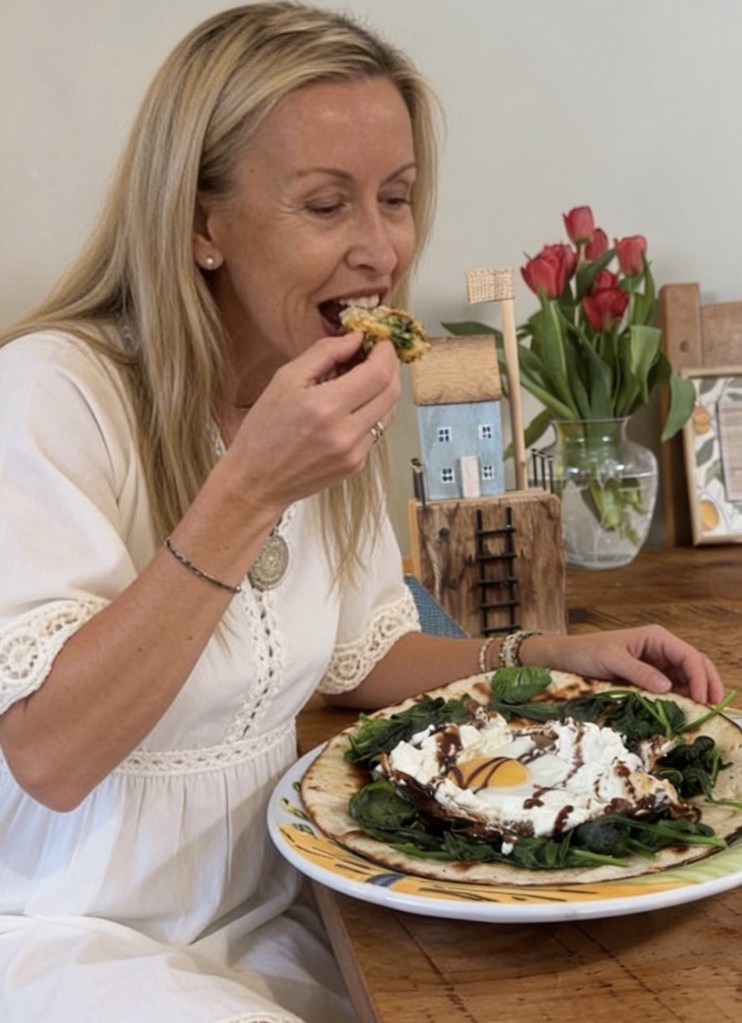
This feta and egg breakfast wrap has been my current obsession — it’s super quick, tastes amazing, and makes me feel like I’ve got my life vaguely together (even when I definitely don’t 😅).
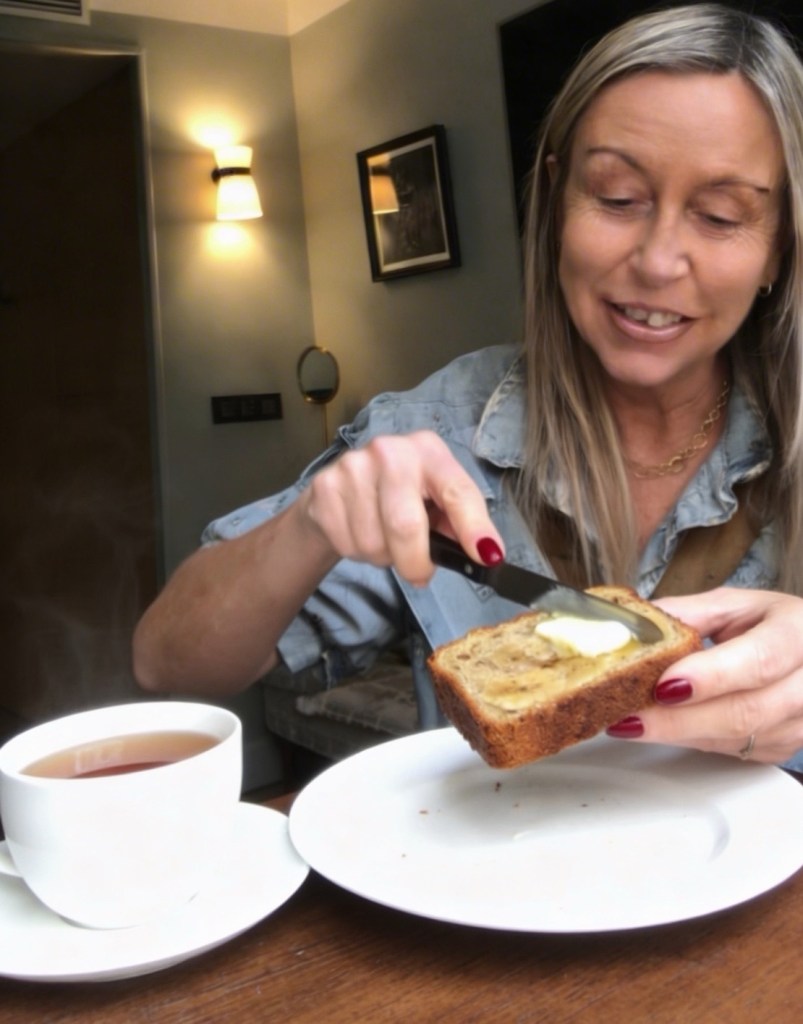
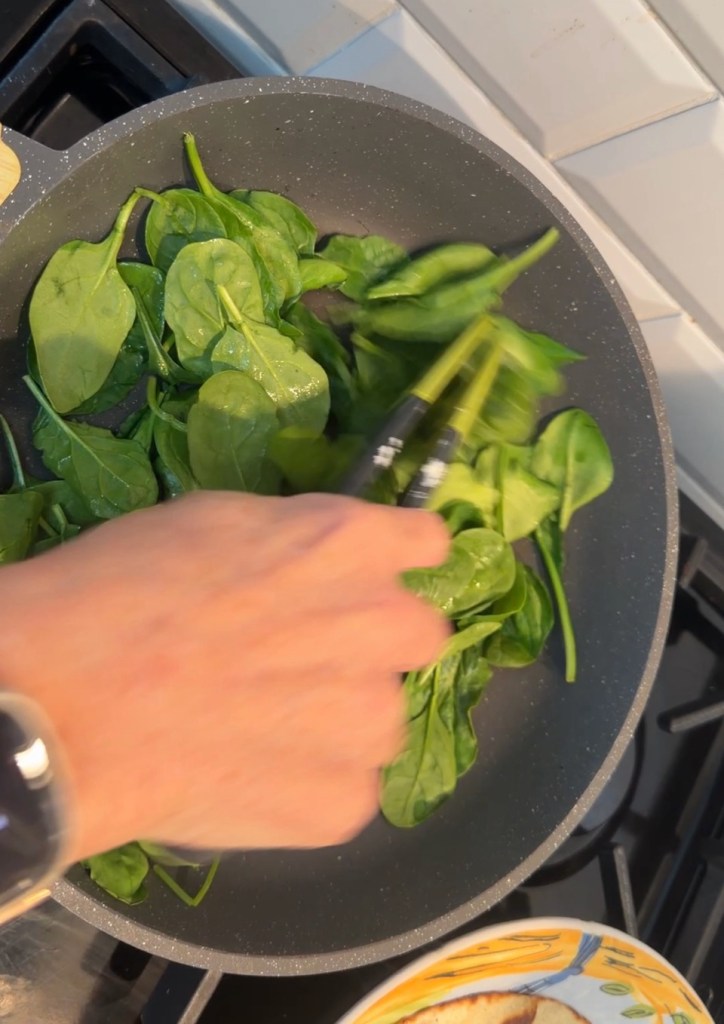
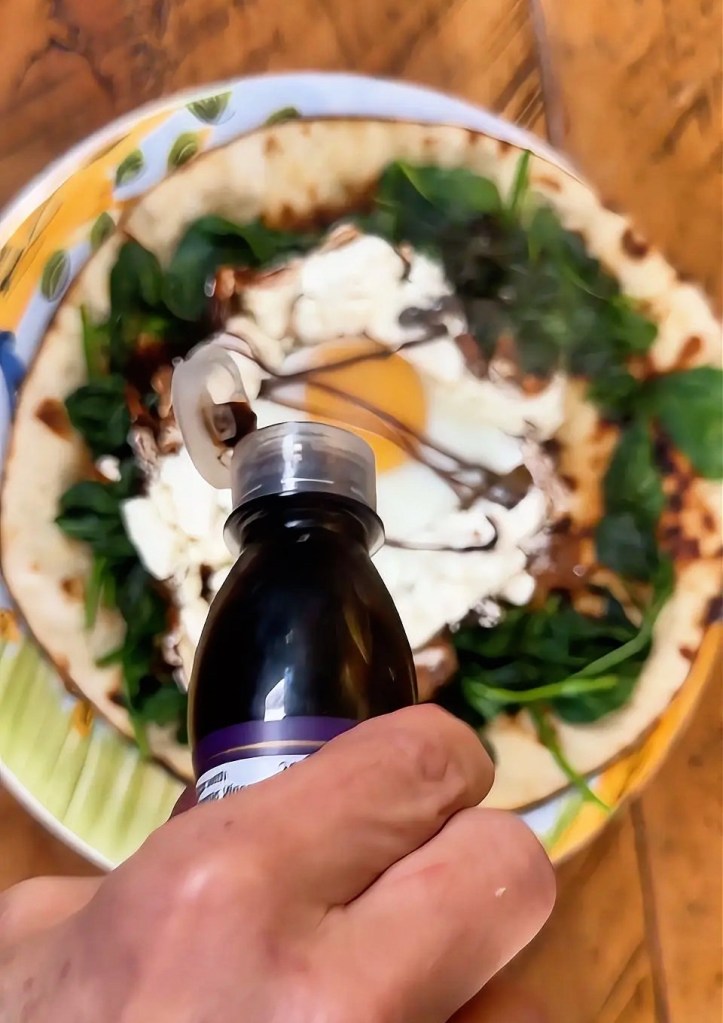
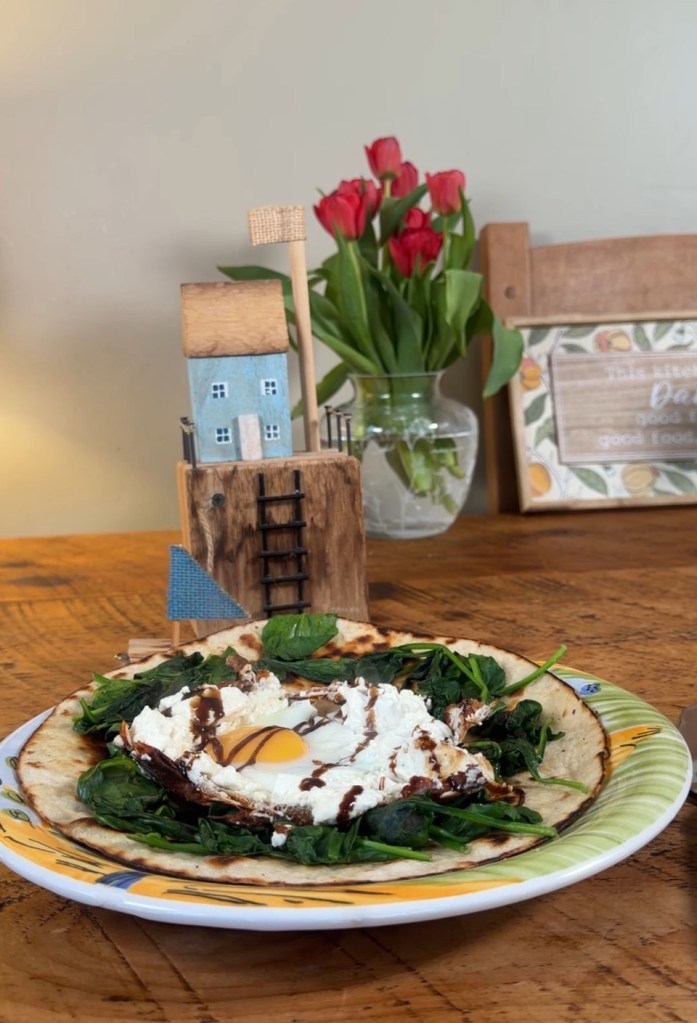
What You’ll Need • 1 tsp avocado oil • 1 tortilla wrap • 1 cup spinach • 1 egg • 2 tbsp crumbled feta cheese • Optional: a drizzle of balsamic glaze, because fancy breakfasts at home are the vibe ✨
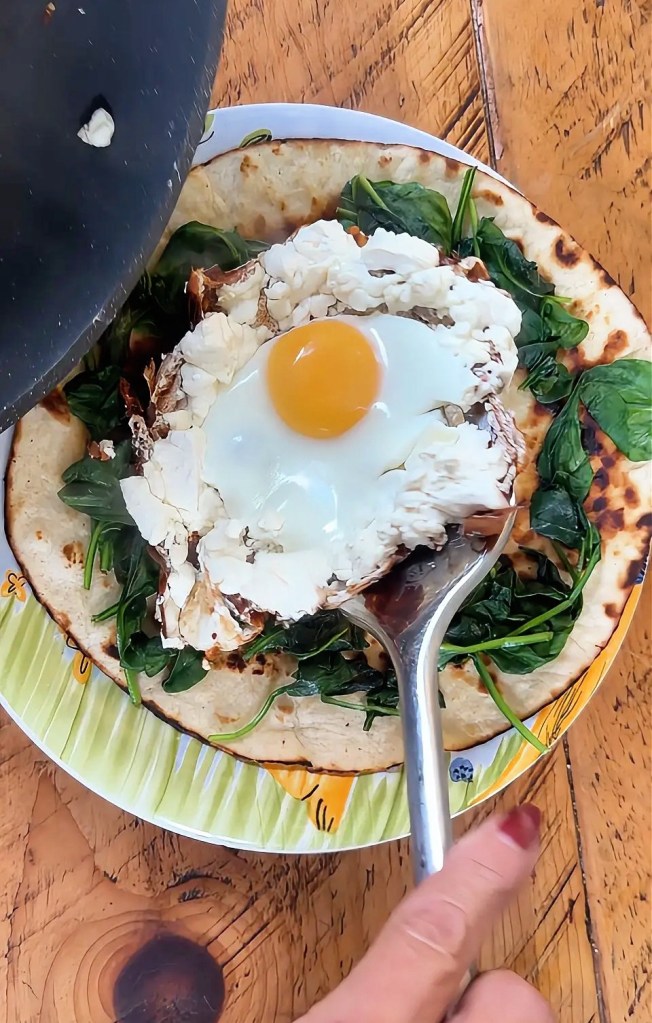
Let’s Make It! Heat a little avocado oil in a pan and warm your tortilla for about a minute each side, just to soften it up. Take it out, then throw in your spinach — it’ll wilt in no time.
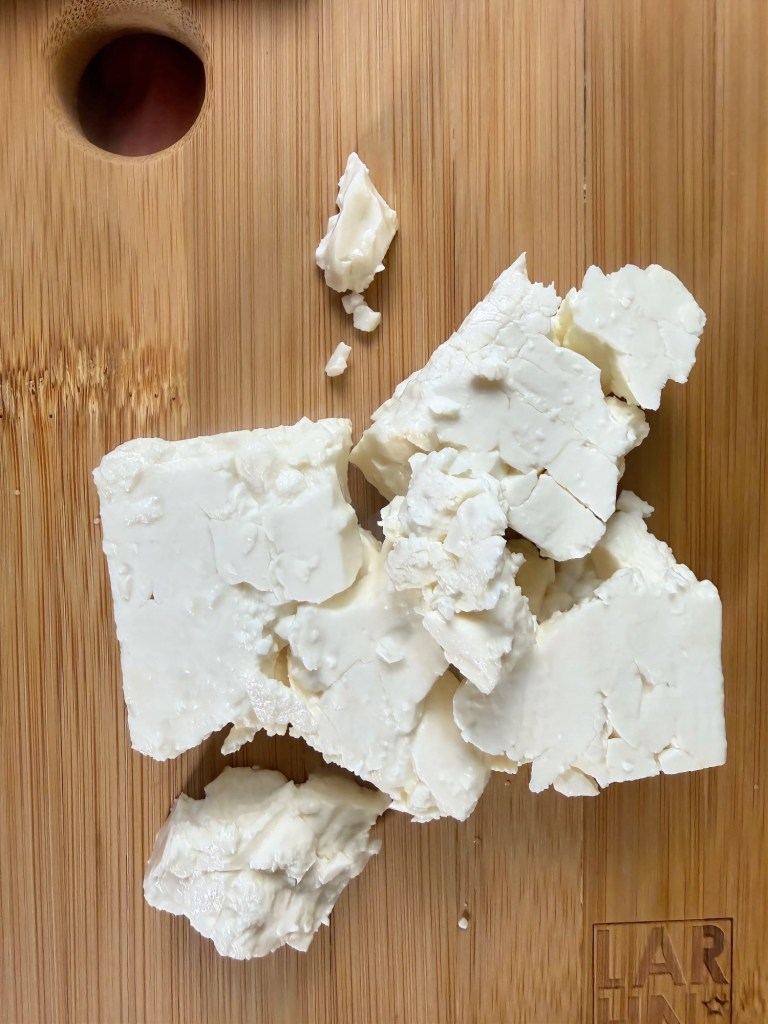
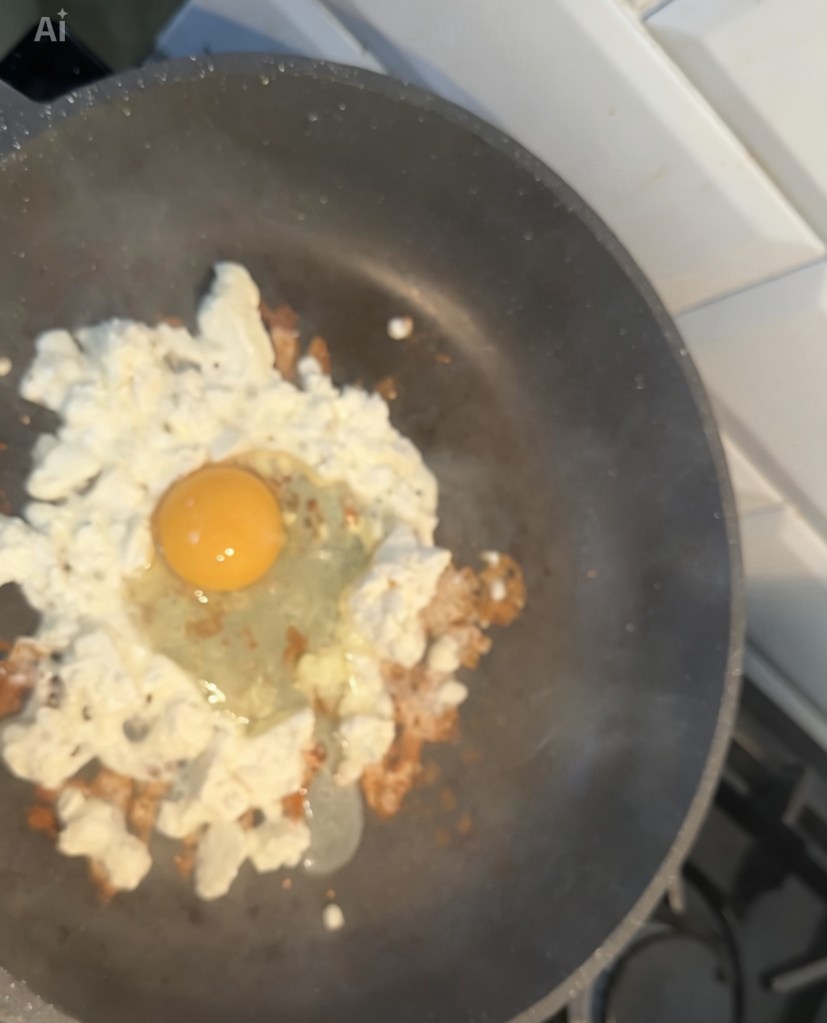
Next bit’s the fun part: sprinkle your feta
in a circle (leave a tiny hole in the middle), crack your egg right in the centre, pop the lid on, and let it cook for about two minutes.
You get this gorgeous melty, golden egg situation that smells so good.
Slide it all onto your tortilla, drizzle with balsamic glaze, fold it up, and that’s breakfast done! 🥙
Why You Need This Wrap in Your Life It’s seriously foolproof — five minutes, one pan, and no weird ingredients. Plus, it’s healthy-ish but still hits that “oooo yum” comfort food note. You can totally mix it up too: swap feta for cheddar, add avocado slices, or maybe a bit of chilli if you like a kick.
I’ve been making this non-stop lately and honestly can’t get enough. It’s the kind of breakfast that looks fancy but takes less effort than making toast 😂 Would you try this? Or are you more of a sweet breakfast person? Let me know in the comments because I love getting new breakfast ideas from you all!
shopping links – i may get a small commision if you buy
Steam curled up from the paper cup in my hand as I took that first comforting sip of herbal tea, a tiny plate of handmade treats balanced on my lap. Lance sat beside me, his own cup and cakes resting on a crinkly white paper plate, and for a moment it felt like we were on a cosy date night, gently landing back in the real world after being bathed in waves of sound. That simple scene – tea, cake, and a soft, candlelit glow – perfectly sums up how we ended the evening: grounded, nourished, and very grateful for Mija’s magic.
Arriving at Sound Bliss We arrived at Grappenhall Independent Methodist Church just before 7 pm, arms full of our own mats and blankets, ready to create a little nest for the evening. The space was set up beautifully but kept wonderfully intimate: fairy lights tracing the edges of the room, candles glowing at floor level, and vases of bright yellow daffodils adding a soft, spring-like touch. In the centre, a circle of frosted crystal singing bowls sat on a patterned rug, surrounded by twinkling lights and little lotus candle holders. On the wall behind, a large heart artwork carried words like kindness, joy, gentleness, and love, quietly setting the intention for the night. With everyone spreading out their mats and blankets, the room felt less like a formal class and more like a gathering of friends coming together to rest and recharge. Held by Mija’s Presence Mija, who also teaches us yoga, has such a gentle, grounded presence that you instantly feel at ease around her. She welcomed each person personally, making sure everyone was comfortable and had what they needed to relax. There’s something very special about the way she holds space – calm, warm, and quietly reassuring, without any pressure to “do” anything perfectly. Before we settled down, she explained what to expect from the sound bath and encouraged us to simply receive, letting the vibrations do their work. Her intention for the evening felt clear: to offer a pocket of peace in the middle of busy lives.
The Sound Bath Experience Once everyone was lying down on their mats, snuggled under blankets, the lights dimmed and the room dropped into a deep, shared silence. Mija moved into the centre of the circle of bowls, surrounded by candles and subtle rainbow colours reflecting on the walls. When she began to play, the first tones were gentle and pure, like a soft exhale rolling across the room.
The sound unfolded in waves: deep, resonant notes that you could feel humming through your chest, shimmering higher tones that seemed to float just above your body, and occasional accents from other instruments. With eyes closed, it felt as if the sound was moving through every part of the body, loosening tension we hadn’t even realised we were holding. Time became a bit blurry; there were moments where it felt like we were outside of it altogether. Mija walking between us playing instruments and chimes reminiscent of the wind and sea
For me, the experience was deeply soothing, almost like being cradled in sound. For Lance, it brought a sense of stillness and clarity – he later described it as “meditation with a soundtrack your whole body can hear.” Thoughts would rise up and then drift away again on the vibrations, leaving behind a calm, spacious feeling.
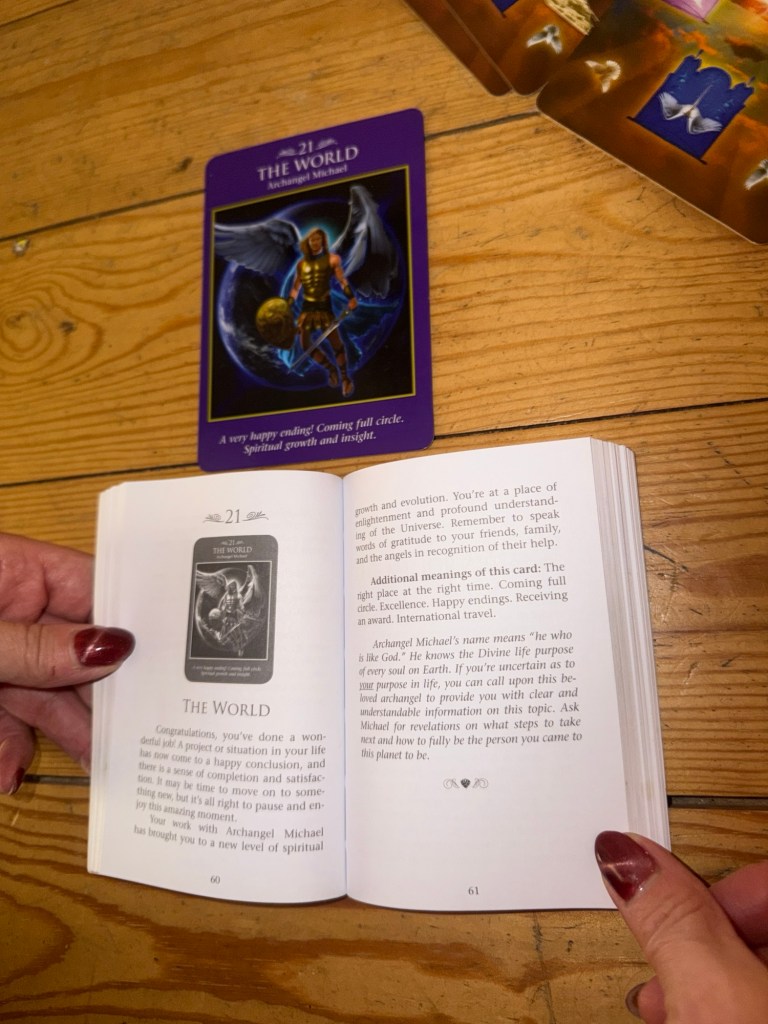
Oracle Cards and Gentle Reflection After the sound gradually faded, we were guided to come back slowly – stretching, moving fingers and toes, and eventually sitting up. Laid out on the floor were oracle card decks, carefully arranged so everyone could choose a card that spoke to them. I loved this part; it turned the evening into not just a relaxation session, but a little ritual of reflection and guidance. Each card felt like a tiny mirror, offering insight or reassurance. It was fascinating to see how many people picked messages that lined up perfectly with what they were going through in life.
Tea, Handmade Treats, and Coming Back to Earth Only once we were fully back in the room did Mija bring out the beautiful snacks in, all lovingly prepared by her. On my plate was a glossy date stuffed with peanut butter and dipped in chocolate – rich, gooey, and ridiculously good – alongside a square of vegan blueberry cake, delicately decorated with edible flowers. They looked almost too pretty to eat, but we managed.
Sipping herbal tea and nibbling on these treats was the perfect way to ground after the sound bath. It gave everyone time to chat quietly, share how the experience had felt, and let our bodies catch up with the deep relaxation we’d just dropped into. For Lance and me, that little tea-and-cake moment sealed the evening as something really special – not rushed, not transactional, just thoughtful and heart-led from beginning to end. Why This Sound Bath Meant So Much Walking out into the cool night air afterwards, wrapped up in our blankets and mats, we both felt softer around the edges – calmer, clearer, and more connected to ourselves and each other. The combination of Mija’s nurturing presence, the intimate setting, the powerful sound journey, and those lovingly made snacks created an experience that felt truly holistic.
If you’re curious about sound bathing, I’d absolutely recommend trying a session with Mija if you can. Bring your comfiest mat and blanket, leave your to-do list at the door, and let yourself be held by the sound, the space, and the small, beautiful details that make the evening feel so special.
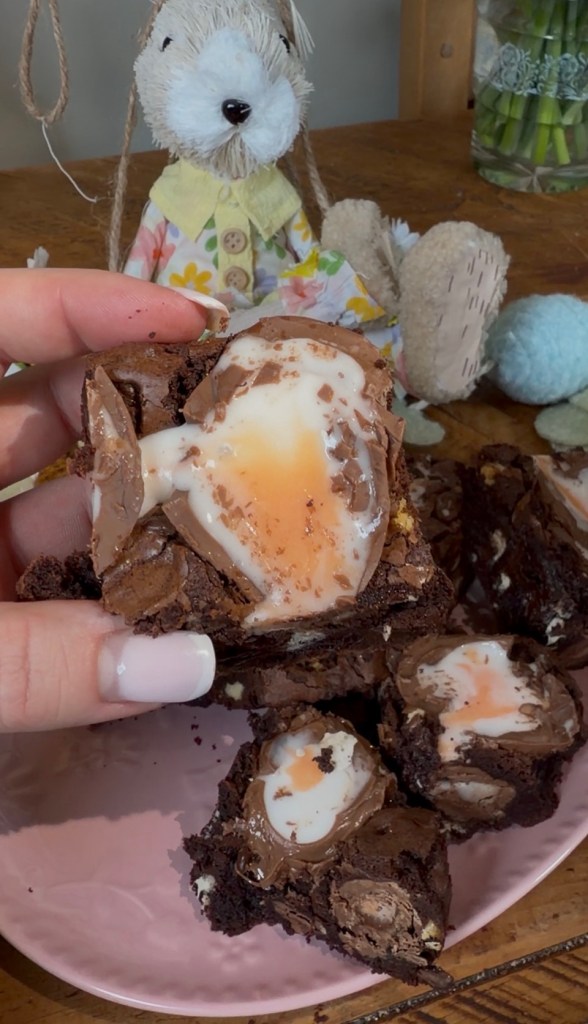
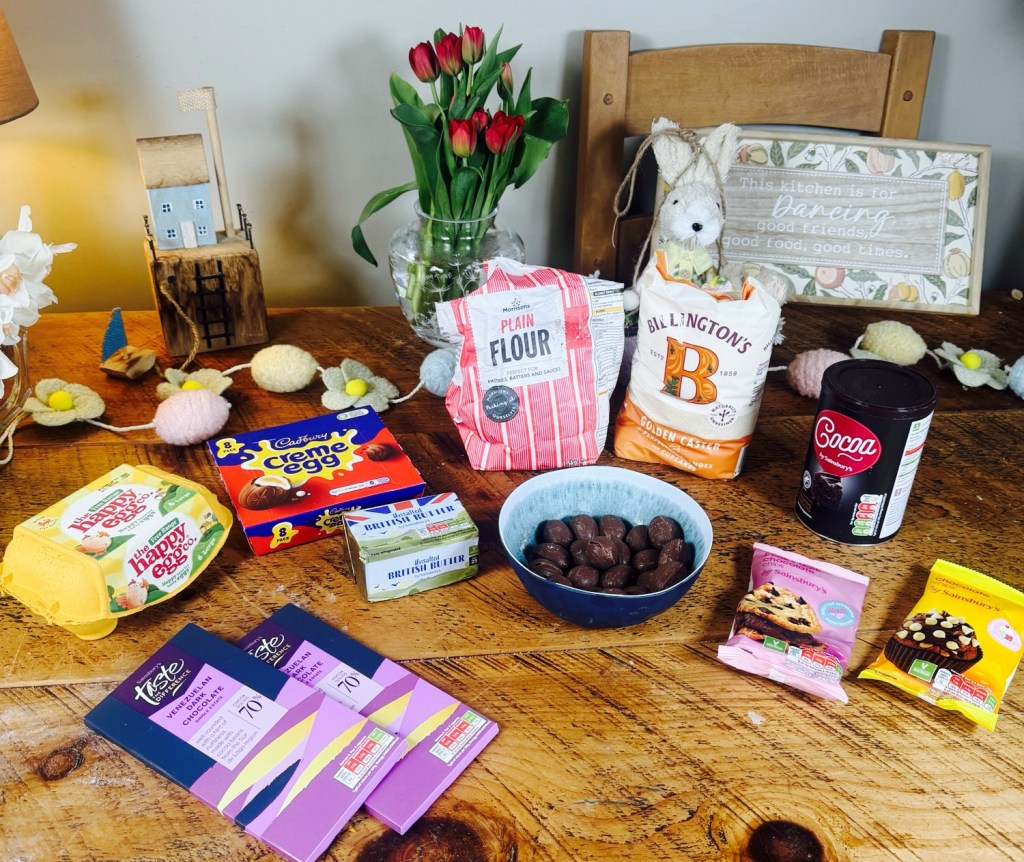
If there’s one thing I have to bake every Easter, it’s these Gooey Mini Creme Egg Brownies. They’re rich, fudgy, a little bit messy, and absolutely loaded with chocolate – basically everything you want from an Easter treat in one tray.They’re the kind of brownies you pop down on the table and everyone quietly hovers, “just waiting” for you to say it’s okay to dig in. Whether you’re baking for family, friends, or just because you fancied something chocolatey with a cuppa, these are such a simple little joy.
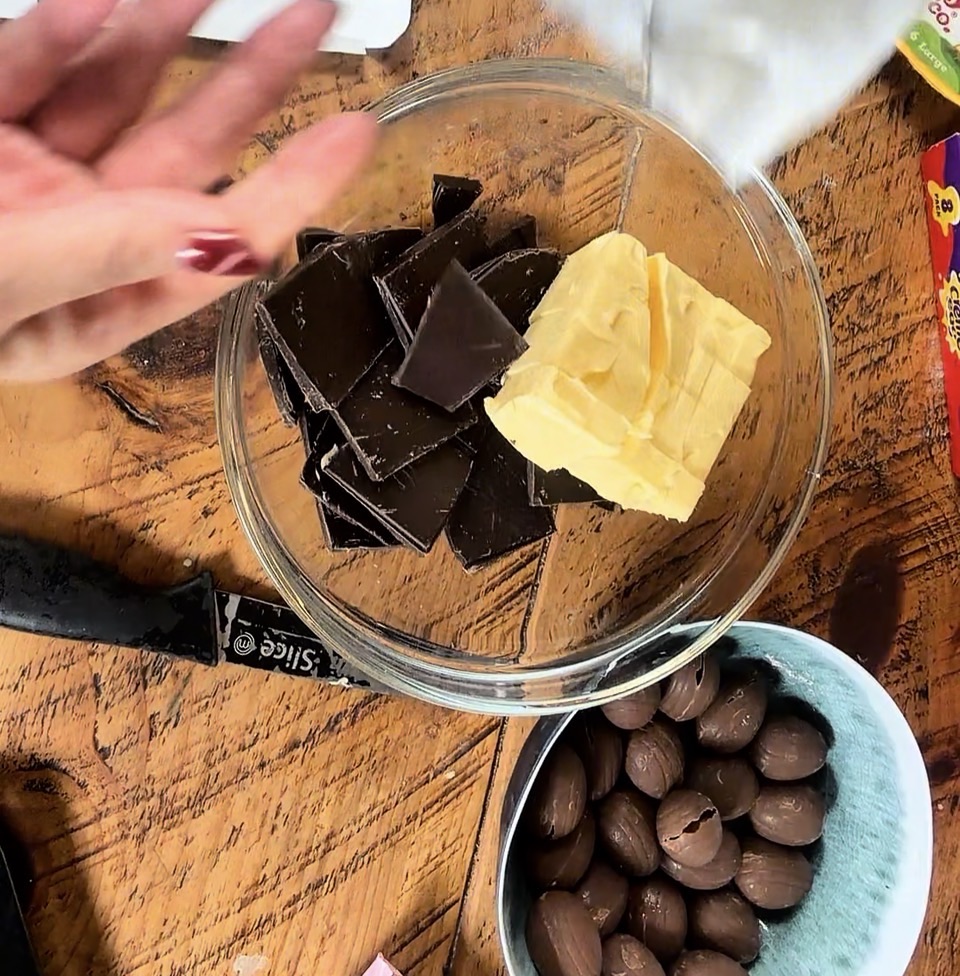
Ingredients You’ll need: • 200 g unsalted butter • 200 g dark chocolate • 3 large eggs • 275 g caster sugar • 100 g plain flour • 50 g cocoa powder • 100 g white chocolate chips • 100 g milk chocolate chips • 3 bags mini Creme Eggs, frozen and unwrapped (foil removed) • Extra Creme Eggs (halved) for the top – optional, but very hard to resist A quick tip: freezing the mini Creme Eggs first helps them keep that lovely gooey centre instead of disappearing completely into the batter.
How to Make Them
Get everything ready Preheat your oven to 180ºC (160ºC fan). Line a 9” square baking tin with parchment paper – I like to leave a bit hanging over the edges so you can lift the brownies out easily later.
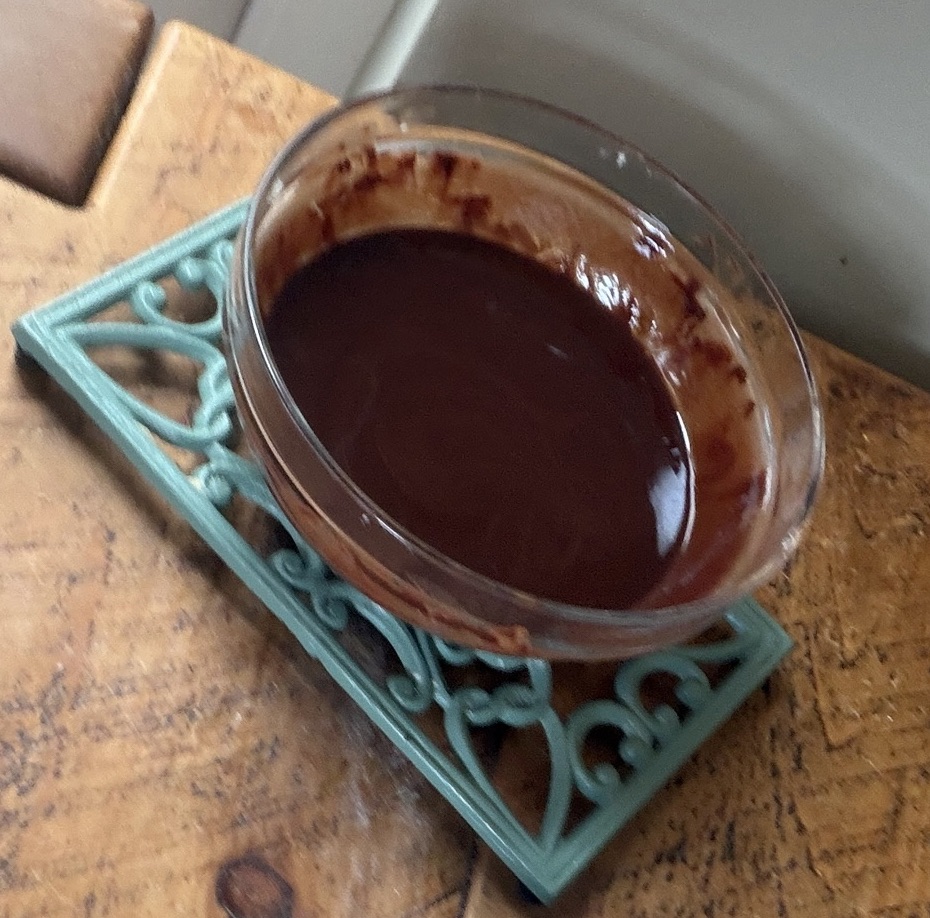
Melt the butter and chocolate Pop the butter and dark chocolate into a heatproof bowl. Gently melt it over a pan of simmering water, or microwave in short bursts, stirring in between, until it’s smooth and glossy. Set it aside to cool down a little – you want it closer to room temperature so it doesn’t cook the eggs.
3. Whisk the eggs and sugar In another bowl, whisk the eggs and caster sugar together. Keep going for a few minutes until the mixture turns pale, thick and mousse‑like, and almost doubles in volume. This step gives you that lovely shiny top and a gorgeous texture, so it’s worth the extra minute or two.
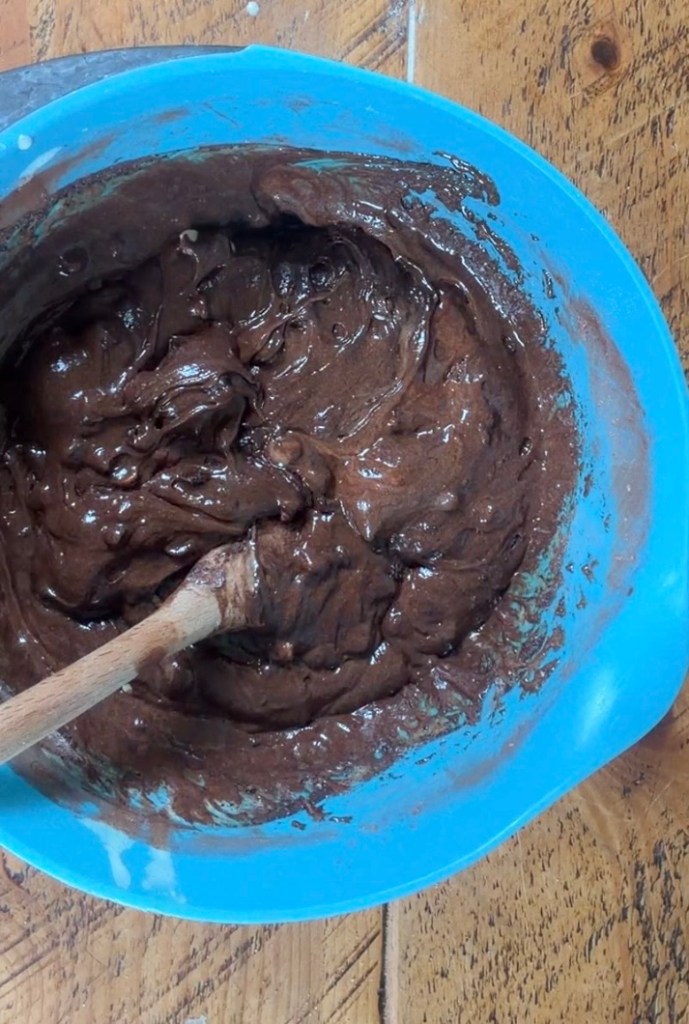
4. Bring the two together Pour the cooled melted chocolate mixture over the whisked eggs and sugar. 5. Gently fold everything together with a spatula until it looks smooth and combined. Take your time here – you don’t want to knock out all the air you’ve just whipped in.
6. Add the dry ingredients Sift the plain flour and cocoa powder over the top of the mixture. Fold again until you can’t see any streaks of flour. It should look thick, glossy and very tempting already.
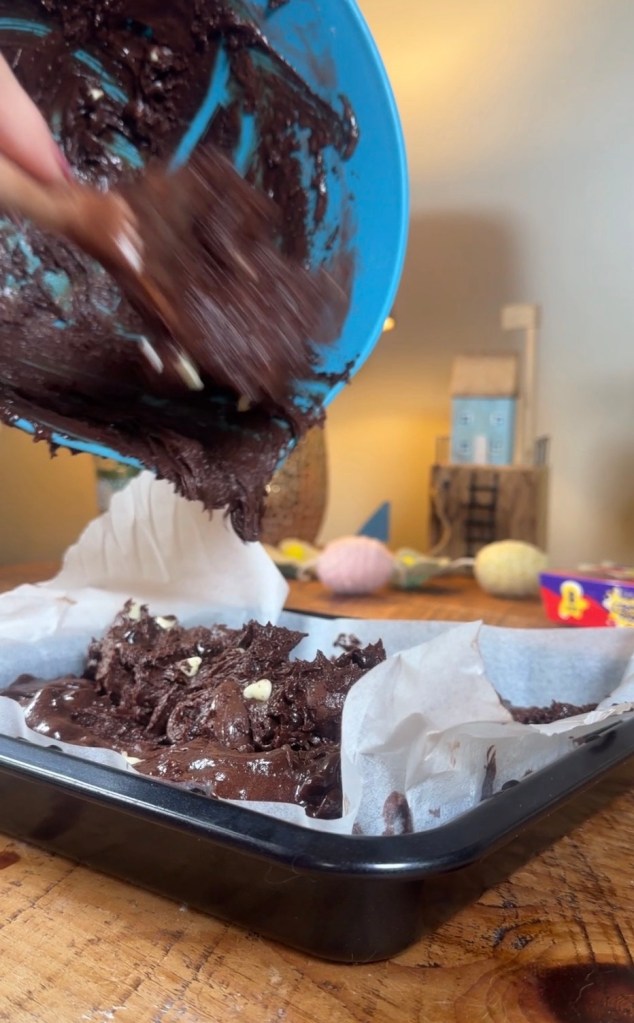
7. Stir in the chocolate and Creme Eggs Now for the fun part. Fold through the white chocolate chips, milk chocolate chips and the frozen mini Creme Eggs. You should have a gloriously chunky, chocolate‑packed batter.
8. Time to bake Pour the batter into your lined tin and level the top.
9. Bake in the preheated oven for around 25–30 minutes.
The edges should look set, but the middle should still have a slight wobble – that’s your fudgy centre in the making.
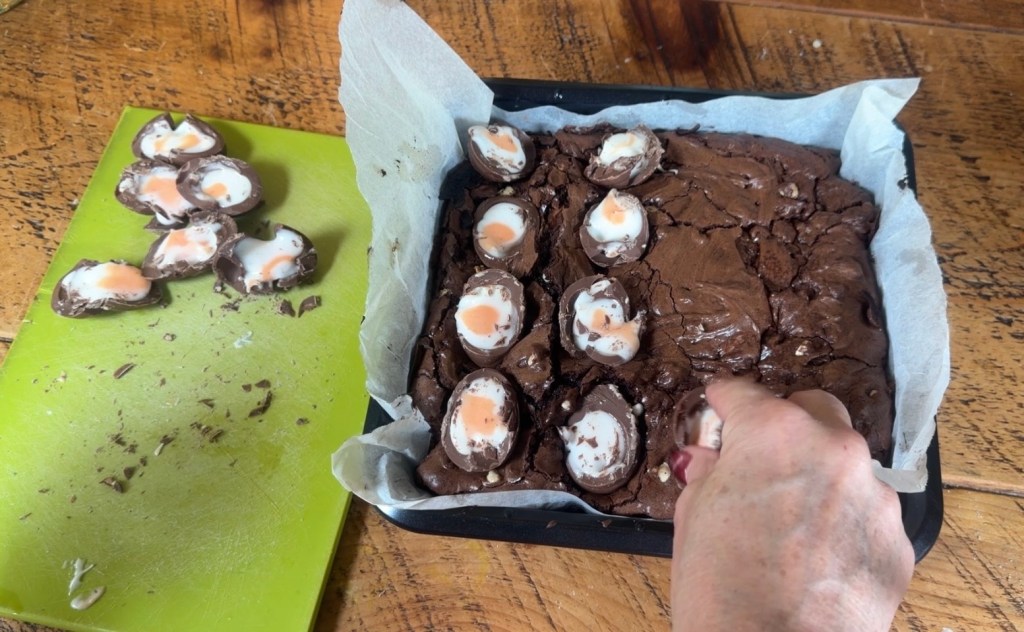
10. Add the extra Creme Eggs When the brownies come out of the oven, gently press the halved Creme Eggs onto the top. They’ll soften and sink in slightly, giving you that picture‑perfect, gooey Easter brownie look.
Let them set (the hardest part!) Leave the brownies to cool completely in the tin.
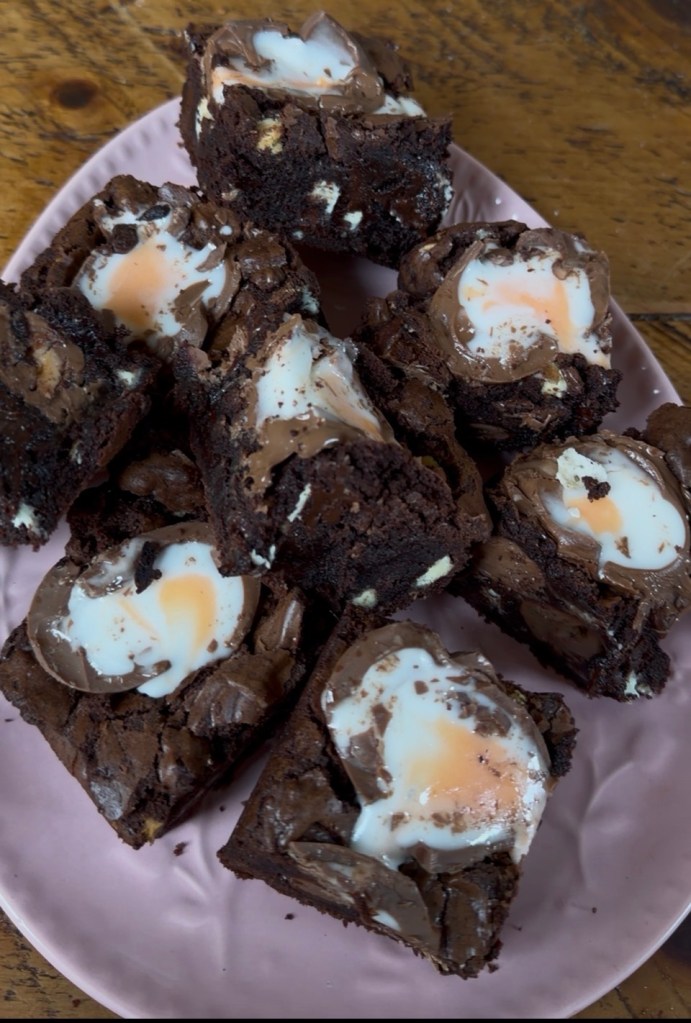
If you want really neat slices, pop the whole tin into the fridge for a couple of hours so the chocolate can firm up. Once chilled, lift them out using the parchment and slice into squares or chunky bars. Serve at room temperature for maximum gooeyness.
How to Serve This is where you can have a bit of fun: • Warm a slice gently and add a scoop of vanilla ice cream. • Pile them up on a plate or stand as a centrepiece for your Easter table. • Wrap a few pieces in parchment and ribbon as a sweet little gift for a neighbour, friend, or family member. They’re rich, indulgent, and feel just that little bit special – exactly what an Easter bake should be.
Storing Your Brownies • Keep them in an airtight container at room temperature for up to 3 days. • If your kitchen is warm, you can store them in the fridge and bring them out a little before serving. • They also freeze really well: wrap slices individually and freeze for up to a month. Perfect for when you fancy a sneaky treat with a cup of tea.
A Little Easter Tradition These brownies are one of those recipes that easily turn into a little ritual – you make them once, someone asks for them again next year, and suddenly they’ve become “your” Easter bake. If you do try them, I’d love to know how they went for you – did they make it to the table, or did everyone start picking at the tray while they were still warm?