Blog

  • One-Pan “Marry Me” Chicken Rigatoni (The Pasta They’ll Never Forget)

    One-Pan “Marry Me” Chicken Rigatoni (The Pasta They’ll Never Forget)

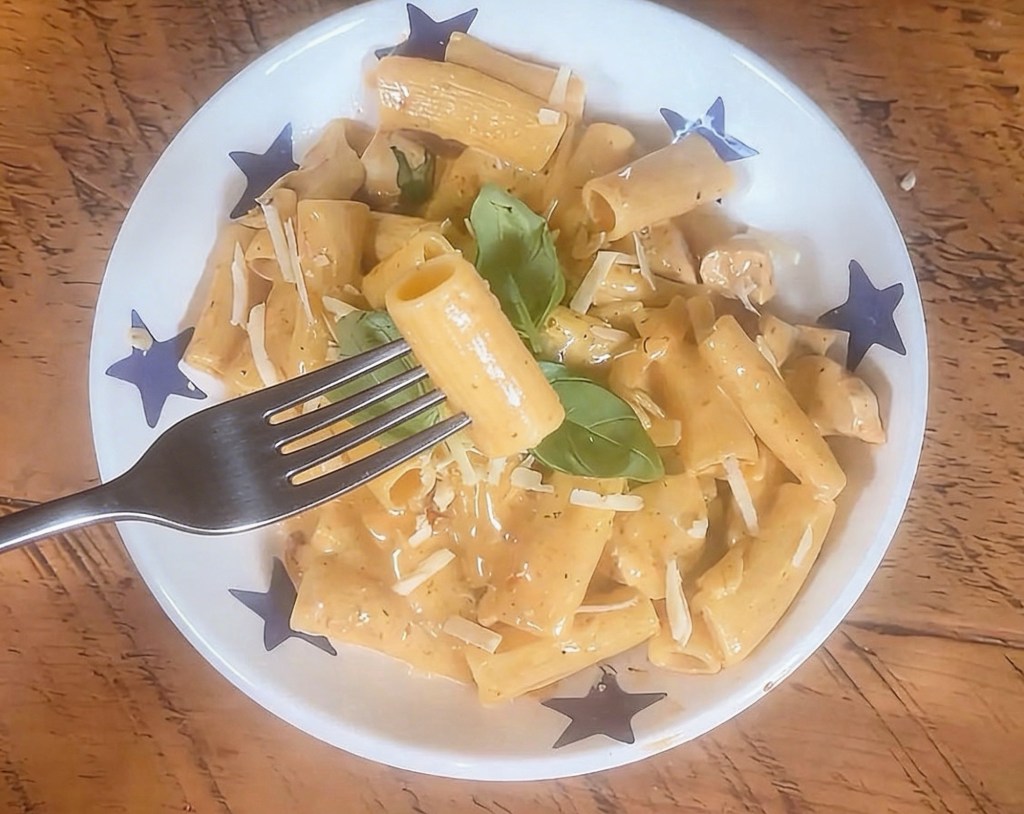
    You know those pastas that are so good they go a bit quiet at the table because everyone’s too busy eating? That’s exactly the vibe with this Marry Me Chicken Rigatoni. It’s rich and creamy, but still bright and tangy, with juicy chicken, sun-dried tomatoes, garlic and Parmesan all wrapped around chunky rigatoni that catches every last bit of sauce. It looks like something you’d order out, but it’s actually just a big cosy one-pan pasta that you can absolutely pull off on a weeknight.
    This is the kind of recipe that quickly becomes a “signature dish” – perfect for at-home date nights, having friends round, or just spoiling yourself after a long day. The sauce comes together in the same pan you cook the chicken in, which means all those golden, flavour-packed bits on the bottom get whisked into the sauce. The rigatoni is important: the ridges and tubes hold the sauce beautifully so you’re never stuck with dry pasta and a puddle of sauce at the bottom of the bowl. Add some garlic bread and a glass of something nice and you’re fully in “fakeaway Italian restaurant” territory.

    This is a proper cosy one‑pan pasta, so once you start, everything happens in the same dish – minimal effort, maximum comfort.

    Prep time: 10 minutes
    Cook time: 20 minutes
    Serves: 3–4

    Ingredients

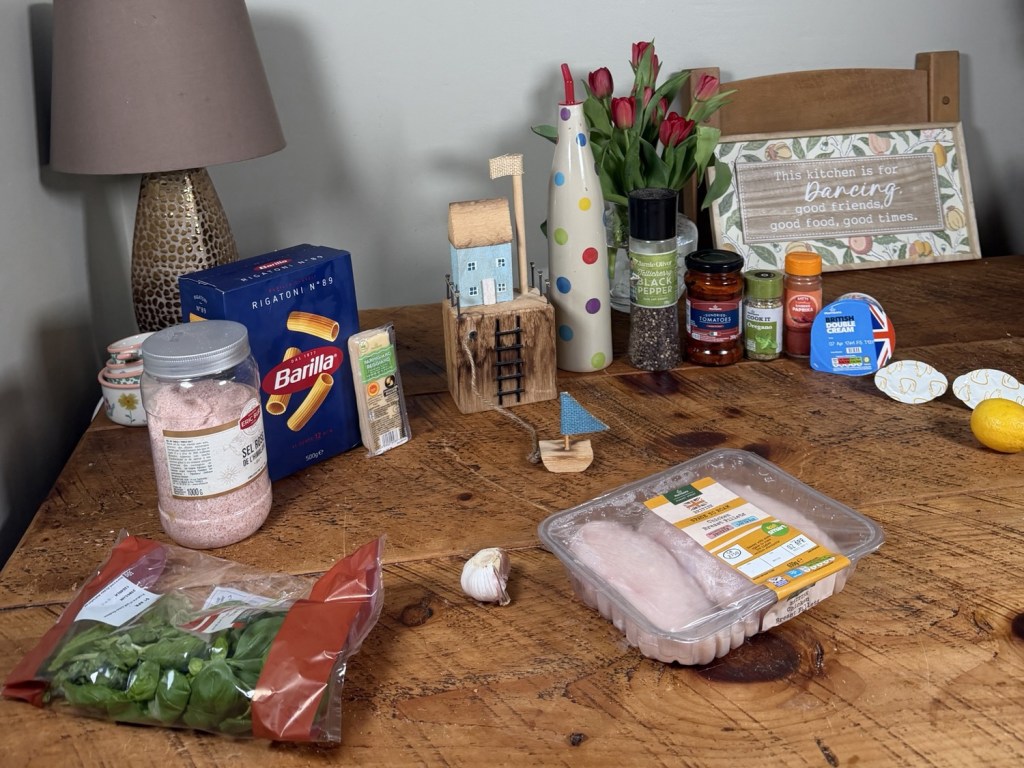
    2 large chicken breasts

    • Salt and black pepper
    • 1 tbsp olive oil
    • 3 garlic cloves, finely chopped
    • 60–80 g sun‑dried tomatoes in oil, drained and finely chopped
    • 1 tsp dried oregano
    • 1 tsp paprika
    • 250 g dried pasta (penne/spirals/rigatoni all good)
    • 600–650 ml chicken stock
    • 150 ml double cream
    • 40–50 g grated Parmesan cheese
    • Optional: pinch of chilli flakes, handful of fresh basil, squeeze of lemon

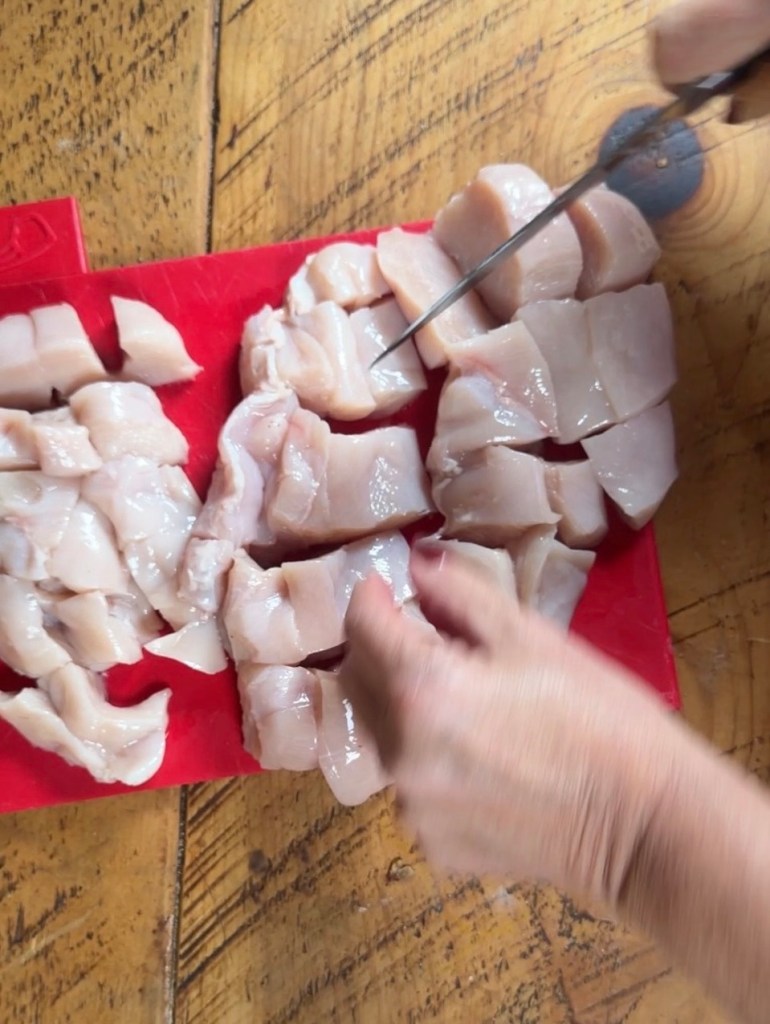
    1. Season and brown the chicken
      Season your chicken pieces generously with salt and pepper. Heat the olive oil in a large deep frying pan or casserole over medium–high heat, then add the chicken and fry for about 5 minutes until it’s starting to colour on all sides. You don’t need it fully cooked yet, just nicely sealed and golden in places.
    2. Build the flavour base
      Reduce the heat slightly so nothing burns. Add the chopped garlic, sun‑dried tomatoes, dried oregano and paprika straight into the pan with the chicken. Stir everything together and let it cook for 2–3 minutes until it smells amazing, the garlic has softened and the spices are toasty and fragrant.
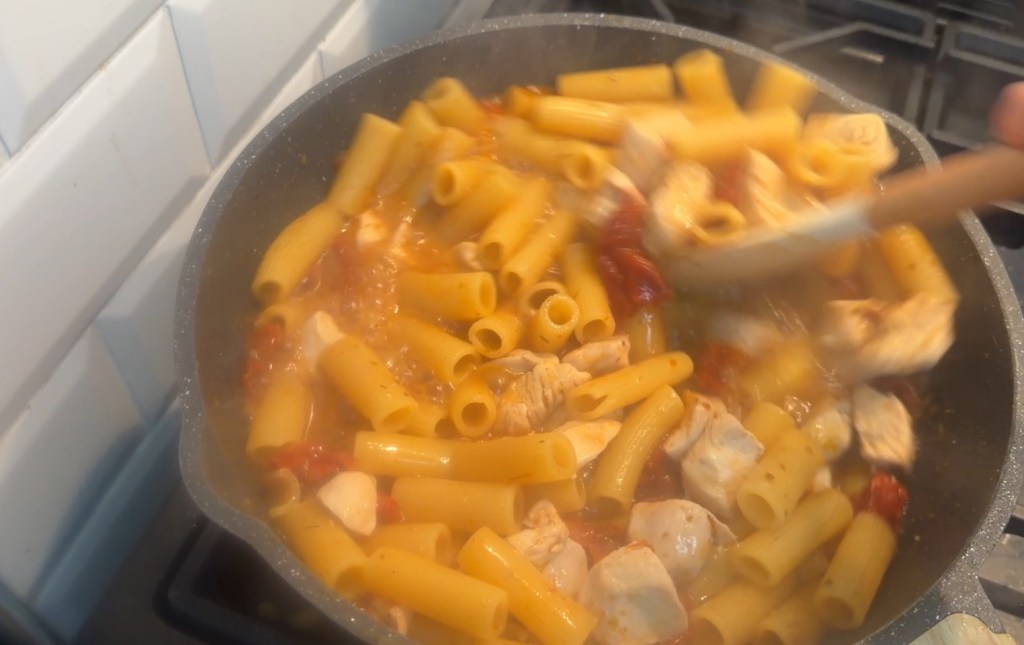
    1. Add dry pasta and stock
      Tip the dry rigatoni straight into the pan with the chicken and flavour base. Pour in the chicken stock and stir well so the pasta is mixed through and everything is mostly submerged. Bring it up to a gentle boil, then lower the heat to a steady simmer.
    2. Let the pasta cook in the pan
      Pop a lid on and cook for about 10–12 minutes, stirring occasionally so the pasta doesn’t stick to the bottom. The rigatoni will slowly soak up the stock and all those garlicky, tomato‑y flavours. You’re aiming for the pasta to be al dente and most of the liquid to be absorbed.

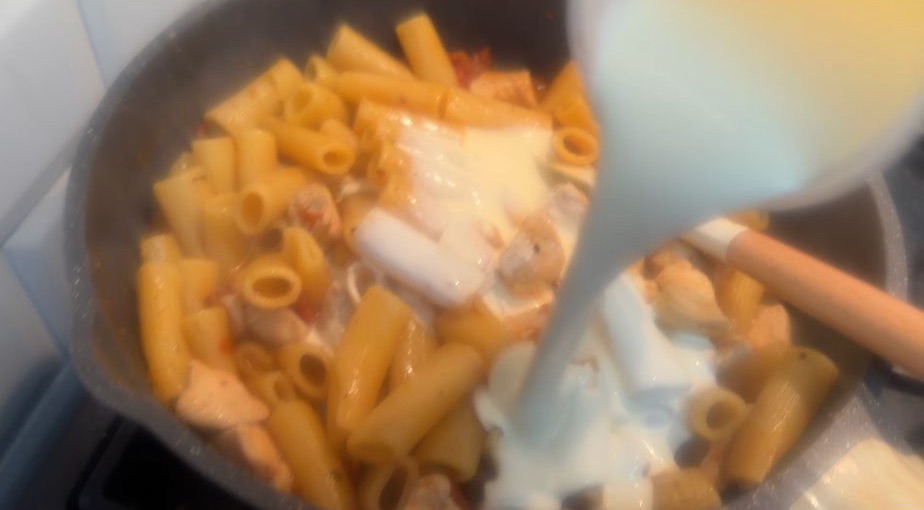
    5. Add the cream and thicken the sauce
    Pour in the double cream and stir it through. Simmer for a further 2–3 minutes, lid off, until the sauce turns thick, silky and glossy, coating the pasta and chicken. If it looks too thick at any point, splash in a bit more stock or water to loosen it.

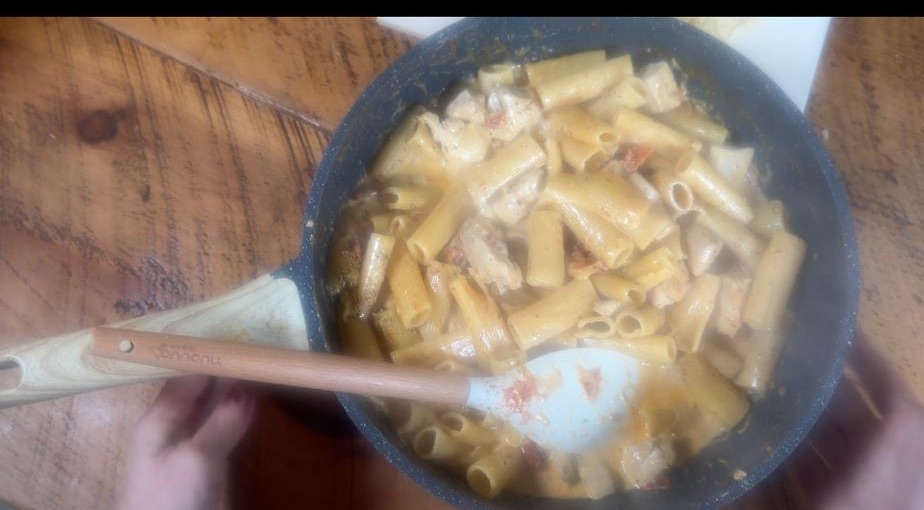
    6. Finish with Parmesan, chilli and basil
    Take the pan off the heat and stir in the grated Parmesan until it melts into the sauce. Add chilli flakes for a gentle kick, then stir through the fresh basil. If you like a bit of brightness against the richness, squeeze in a little lemon juice and give it all a good mix.

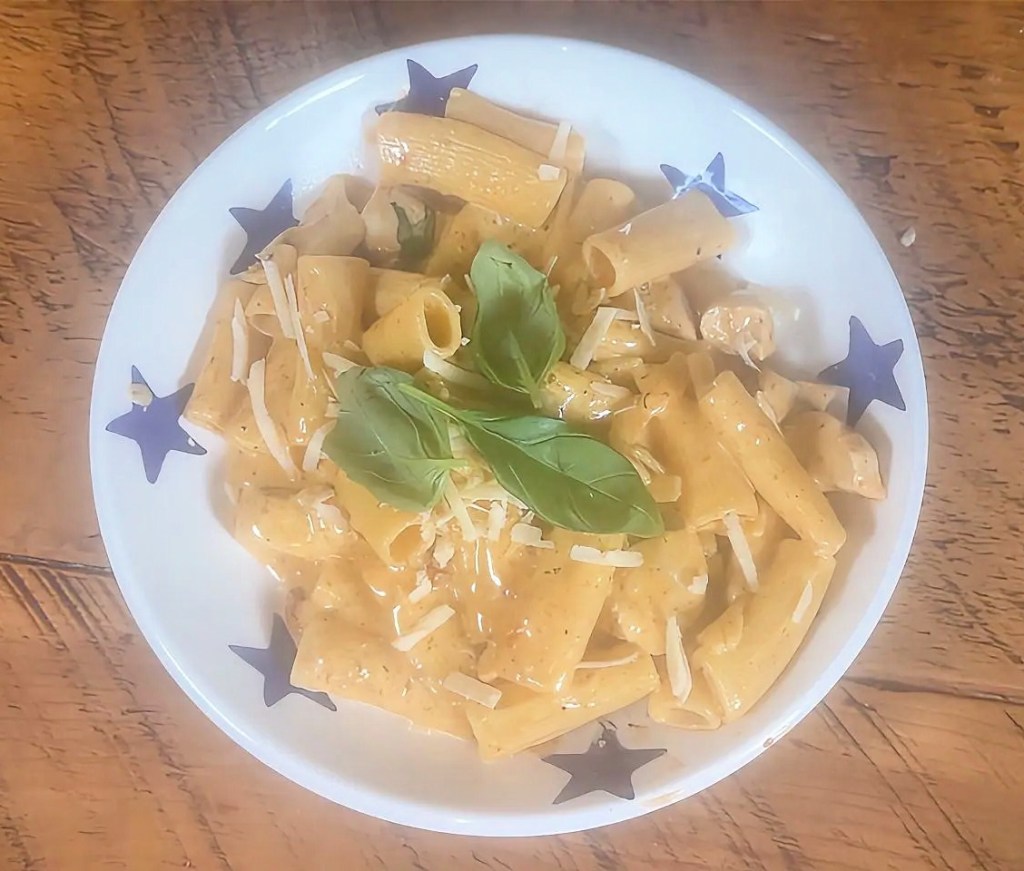
    Taste, tweak and serve
    Taste and adjust the seasoning – a little more salt, pepper or chilli if you think it needs it. Serve straight from the pan into warm bowls, topping each portion with extra Parmesan and a few basil leaves for that “wow” moment.

    Little tips and serving ideas
    • A simple green salad or some steamed greens on the side balances the richness really nicely.
    • Garlic bread or crusty bread is perfect for mopping up any leftover sauce in the pan.
    • Leftovers reheat well – just add a splash of water or cream when you warm it through so the sauce loosens up again.
    Make this once and it’s very likely to become your signature pasta – the one people ask for again and again, and the one you know you can always rely on when you want maximum flavour with minimum faff.

    If you make this One‑Pan Marry Me Chicken Rigatoni, let me know how it goes – I love hearing if it got any “marry me” reactions at the table! Save or pin this recipe so you’ve got it ready for your next cosy pasta night, and if you share it on social, tag me so I can see your version. And if creamy, one‑pan comfort food is your thing, stick around – there are plenty more easy, feel‑good dinners coming your way.

    Shopping links – a small commission may be paid to me

    utensils set https://amzn.to/3PC7lbJ

    chopping board .. later edition to mine https://amzn.to/4v42HDh

    pan set .. https://amzn.to/41aNToV

    kitchen scales https://amzn.to/4bNL17G

  • Squishy Banana Bread with Melty Choc Chips and dates

    Squishy Banana Bread with Melty Choc Chips and dates

    You know those recipes that sneak into your life and suddenly become your thing? This banana bread is exactly that – simple, reliable, and just a little bit extra thanks to the mix of chocolates and optional dates.

    It’s the perfect bake for when your bananas have gone spotty and you fancy something cosy with a cuppa, without spending all afternoon in the kitchen. One bowl, minimal effort, maximum payoff.
    It’s a great “anytime” loaf: Sunday baking, after-school snacks, packed lunches, or a little treat with your morning coffee. The ripe bananas keep it soft and moist, the white and dark chocolate chips give you pockets of sweetness and richness, and the chopped dates (if you use them) add lovely chewy, caramel-like bites. It feels like a classic banana loaf that’s had a little glow up – still homely and comforting, but just special enough that people will ask you for the recipe.

    Ingredients
    • 100g softened butter
    • 175g caster sugar
    • 2 large eggs
    • 2 ripe bananas, mashed (the spottier the better)
    • 225g self-raising flour
    • 1 tsp baking powder
    • 2 tbsp milk
    • 100g white chocolate chips
    • 100g dark chocolate chips
    • 100g chopped dates (optional, but lovely for extra chew and sweetness)

    Method

    • Get your tin and oven ready
      Preheat your oven to 180C / 160C fan / Gas Mark 4.
      Lightly grease a 2lb loaf tin, then line the base and sides with baking parchment. This makes it much easier to lift the loaf out later without it sticking or breaking.
    • Mash the bananas
      Peel your ripe bananas and pop them into a small bowl. Mash with a fork until mostly smooth, with just a few little lumps. The riper the bananas, the sweeter and more flavourful your loaf will be.
    • Mix everything in one bowl
      In a large mixing bowl, add the softened butter and caster sugar. Beat them together until well combined and a bit lighter in texture.
      Add the eggs, mashed bananas, self-raising flour, baking powder and milk straight into the same bowl. Using an electric hand mixer or a wooden spoon, beat everything together for about 2 minutes, until you have a smooth, thick batter and everything is well blended.
    • Fill the tin
      Spoon the mixture into your prepared loaf tin. Use the back of a spoon or a spatula to level the surface so it bakes evenly and looks neat once it’s risen.

    • Bake your banana bread
      Place the tin in the preheated oven and bake for about 1 hour. Ovens do vary, so start checking from around 50 minutes.
    • The loaf is ready when it’s well risen, a lovely golden brown on top and a fine skewer inserted into the centre comes out clean. Don’t worry if you see a little melted chocolate on the skewer – you just don’t want any raw batter.
    • Cool it down (the hardest part!)
      Take the tin out of the oven and leave the banana bread to cool in the tin for a few minutes so it can firm up a little.
      Then carefully lift it out using the parchment, peel off the paper and transfer the loaf to a wire rack to cool completely – or at least until it’s just slightly warm.

    Serving ideas and little tips
    • The absolute best moment is slicing it while it’s still a touch warm, when the chocolate chips are soft and a bit melty and the crumb is tender and moist.
    • It’s delicious on its own, but a thin swipe of butter on a warm slice takes it into full comfort-food territory.
    • The loaf keeps well for a few days in an airtight container, and the flavour actually deepens by the next day.
    • Older slices are lovely lightly toasted under the grill and served with butter for a cosy breakfast or snack.


    • You can easily tweak it: swap the dates for chopped nuts (like walnuts or pecans), or stick to just white or just dark chocolate depending on what you have in the cupboard.
    This is one of those low-effort, high-reward bakes that makes your kitchen smell amazing, looks impressive sliced on a board, and tastes like a warm, homemade hug. Make it once and there’s a good chance you’ll become “the banana bread person” among your friends and family – and you won’t mind one bit.

    Shopping links .. i may get a small commission if you purchase

    kenwood mixer – this is the newer sleeker version than my old workhorse but they are classics ! https://amzn.to/3Qef1AV

    chopped dates – these are lovely and soft https://amzn.to/47AmjF8

    white chocolate chips https://amzn.to/4tHDoWv

    dark chocolate chips https://amzn.to/3OfoN5i

    flour canister https://amzn.to/4moJd8R

    caster sugar canister https://amzn.to/414LVX9

    loaf tin https://amzn.to/3PNShaU

    loaf tin greaseproof liners https://amzn.to/3QeTQ1F

  • My Go-To Feta & Egg Breakfast Wrap 🥬🥚

    My Go-To Feta & Egg Breakfast Wrap 🥬🥚


    Okay, hands up if mornings always feel like a race against the clock 🙋‍♀️ Because same. I swear I blink and it’s suddenly time to leave the house. But I refuse to start my day with a sad granola bar when something this easy and delicious exists!


    This feta and egg breakfast wrap has been my current obsession — it’s super quick, tastes amazing, and makes me feel like I’ve got my life vaguely together (even when I definitely don’t 😅).

    What You’ll Need
    • 1 tsp avocado oil
    • 1 tortilla wrap
    • 1 cup spinach
    • 1 egg
    • 2 tbsp crumbled feta cheese
    • Optional: a drizzle of balsamic glaze, because fancy breakfasts at home are the vibe ✨

    Let’s Make It!
    Heat a little avocado oil in a pan and warm your tortilla for about a minute each side, just to soften it up. Take it out, then throw in your spinach — it’ll wilt in no time.


    Next bit’s the fun part: sprinkle your feta

    in a circle (leave a tiny hole in the middle), crack your egg right in the centre, pop the lid on, and let it cook for about two minutes.

    You get this gorgeous melty, golden egg situation that smells so good.

    Slide it all onto your tortilla, drizzle with balsamic glaze, fold it up, and that’s breakfast done! 🥙

    Why You Need This Wrap in Your Life
    It’s seriously foolproof — five minutes, one pan, and no weird ingredients. Plus, it’s healthy-ish but still hits that “oooo yum” comfort food note.
    You can totally mix it up too: swap feta for cheddar, add avocado slices, or maybe a bit of chilli if you like a kick.

    I’ve been making this non-stop lately and honestly can’t get enough. It’s the kind of breakfast that looks fancy but takes less effort than making toast 😂
    Would you try this? Or are you more of a sweet breakfast person? Let me know in the comments because I love getting new breakfast ideas from you all!

    shopping links – i may get a small commision if you buy

    kitchen scales https://amzn.to/4bNL17G

    chopping board set https://amzn.to/4scJGvU

    super cute ceramic egg holder https://amzn.to/4vkYyv8

    pan set https://amzn.to/41aNToV

  • Sound Bliss in Grappenhall: Our Peaceful Evening of Sound Bathing with Mija

    Sound Bliss in Grappenhall: Our Peaceful Evening of Sound Bathing with Mija

    Steam curled up from the paper cup in my hand as I took that first comforting sip of herbal tea, a tiny plate of handmade treats balanced on my lap. Lance sat beside me, his own cup and cakes resting on a crinkly white paper plate, and for a moment it felt like we were on a cosy date night, gently landing back in the real world after being bathed in waves of sound. That simple scene – tea, cake, and a soft, candlelit glow – perfectly sums up how we ended the evening: grounded, nourished, and very grateful for Mija’s magic.


    Arriving at Sound Bliss
    We arrived at Grappenhall Independent Methodist Church just before 7 pm, arms full of our own mats and blankets, ready to create a little nest for the evening. The space was set up beautifully but kept wonderfully intimate: fairy lights tracing the edges of the room, candles glowing at floor level, and vases of bright yellow daffodils adding a soft, spring-like touch. In the centre, a circle of frosted crystal singing bowls sat on a patterned rug, surrounded by twinkling lights and little lotus candle holders.
    On the wall behind, a large heart artwork carried words like kindness, joy, gentleness, and love, quietly setting the intention for the night. With everyone spreading out their mats and blankets, the room felt less like a formal class and more like a gathering of friends coming together to rest and recharge.
    Held by Mija’s Presence
    Mija, who also teaches us yoga, has such a gentle, grounded presence that you instantly feel at ease around her. She welcomed each person personally, making sure everyone was comfortable and had what they needed to relax. There’s something very special about the way she holds space – calm, warm, and quietly reassuring, without any pressure to “do” anything perfectly.
    Before we settled down, she explained what to expect from the sound bath and encouraged us to simply receive, letting the vibrations do their work. Her intention for the evening felt clear: to offer a pocket of peace in the middle of busy lives.


    The Sound Bath Experience
    Once everyone was lying down on their mats, snuggled under blankets, the lights dimmed and the room dropped into a deep, shared silence. Mija moved into the centre of the circle of bowls, surrounded by candles and subtle rainbow colours reflecting on the walls. When she began to play, the first tones were gentle and pure, like a soft exhale rolling across the room.


    The sound unfolded in waves: deep, resonant notes that you could feel humming through your chest, shimmering higher tones that seemed to float just above your body, and occasional accents from other instruments. With eyes closed, it felt as if the sound was moving through every part of the body, loosening tension we hadn’t even realised we were holding. Time became a bit blurry; there were moments where it felt like we were outside of it altogether. Mija walking between us playing instruments and chimes reminiscent of the wind and sea


    For me, the experience was deeply soothing, almost like being cradled in sound. For Lance, it brought a sense of stillness and clarity – he later described it as “meditation with a soundtrack your whole body can hear.” Thoughts would rise up and then drift away again on the vibrations, leaving behind a calm, spacious feeling.


    Oracle Cards and Gentle Reflection
    After the sound gradually faded, we were guided to come back slowly – stretching, moving fingers and toes, and eventually sitting up. Laid out on the floor were oracle card decks, carefully arranged so everyone could choose a card that spoke to them. I loved this part; it turned the evening into not just a relaxation session, but a little ritual of reflection and guidance.
    Each card felt like a tiny mirror, offering insight or reassurance. It was fascinating to see how many people picked messages that lined up perfectly with what they were going through in life.


    Tea, Handmade Treats, and Coming Back to Earth
    Only once we were fully back in the room did Mija bring out the beautiful snacks in, all lovingly prepared by her. On my plate was a glossy date stuffed with peanut butter and dipped in chocolate – rich, gooey, and ridiculously good – alongside a square of vegan blueberry cake, delicately decorated with edible flowers. They looked almost too pretty to eat, but we managed.


    Sipping herbal tea and nibbling on these treats was the perfect way to ground after the sound bath. It gave everyone time to chat quietly, share how the experience had felt, and let our bodies catch up with the deep relaxation we’d just dropped into. For Lance and me, that little tea-and-cake moment sealed the evening as something really special – not rushed, not transactional, just thoughtful and heart-led from beginning to end.
    Why This Sound Bath Meant So Much
    Walking out into the cool night air afterwards, wrapped up in our blankets and mats, we both felt softer around the edges – calmer, clearer, and more connected to ourselves and each other. The combination of Mija’s nurturing presence, the intimate setting, the powerful sound journey, and those lovingly made snacks created an experience that felt truly holistic.


    If you’re curious about sound bathing, I’d absolutely recommend trying a session with Mija if you can. Bring your comfiest mat and blanket, leave your to-do list at the door, and let yourself be held by the sound, the space, and the small, beautiful details that make the evening feel so special.

    Mija can be found on instagram https://www.instagram.com/mijayoga?igsh=MWtiOTVreWs1ejB1bQ==

  • Gooey Easter Mini Creme Egg Brownies

    Gooey Easter Mini Creme Egg Brownies

    If there’s one thing I have to bake every Easter, it’s these Gooey Mini Creme Egg Brownies. They’re rich, fudgy, a little bit messy, and absolutely loaded with chocolate – basically everything you want from an Easter treat in one tray.They’re the kind of brownies you pop down on the table and everyone quietly hovers, “just waiting” for you to say it’s okay to dig in. Whether you’re baking for family, friends, or just because you fancied something chocolatey with a cuppa, these are such a simple little joy.

    Ingredients
    You’ll need:
    • 200 g unsalted butter
    • 200 g dark chocolate
    • 3 large eggs
    • 275 g caster sugar
    • 100 g plain flour
    • 50 g cocoa powder
    • 100 g white chocolate chips
    • 100 g milk chocolate chips
    • 3 bags mini Creme Eggs, frozen and unwrapped (foil removed)
    • Extra Creme Eggs (halved) for the top – optional, but very hard to resist
    A quick tip: freezing the mini Creme Eggs first helps them keep that lovely gooey centre instead of disappearing completely into the batter.

    How to Make Them

    1. Get everything ready
      Preheat your oven to 180ºC (160ºC fan).
      Line a 9” square baking tin with parchment paper – I like to leave a bit hanging over the edges so you can lift the brownies out easily later.
    2. Melt the butter and chocolate
      Pop the butter and dark chocolate into a heatproof bowl.
      Gently melt it over a pan of simmering water, or microwave in short bursts, stirring in between, until it’s smooth and glossy.
      Set it aside to cool down a little – you want it closer to room temperature so it doesn’t cook the eggs.

    3. Whisk the eggs and sugar
    In another bowl, whisk the eggs and caster sugar together.
    Keep going for a few minutes until the mixture turns pale, thick and mousse‑like, and almost doubles in volume. This step gives you that lovely shiny top and a gorgeous texture, so it’s worth the extra minute or two.

    4. Bring the two together
    Pour the cooled melted chocolate mixture over the whisked eggs and sugar.
    5. Gently fold everything together with a spatula until it looks smooth and combined. Take your time here – you don’t want to knock out all the air you’ve just whipped in.

    6. Add the dry ingredients
    Sift the plain flour and cocoa powder over the top of the mixture.
    Fold again until you can’t see any streaks of flour. It should look thick, glossy and very tempting already.

    7. Stir in the chocolate and Creme Eggs
    Now for the fun part.
    Fold through the white chocolate chips, milk chocolate chips and the frozen mini Creme Eggs. You should have a gloriously chunky, chocolate‑packed batter.

    8. Time to bake
    Pour the batter into your lined tin and level the top.


    9. Bake in the preheated oven for around 25–30 minutes.

    The edges should look set, but the middle should still have a slight wobble – that’s your fudgy centre in the making.

    10. Add the extra Creme Eggs
    When the brownies come out of the oven, gently press the halved Creme Eggs onto the top.
    They’ll soften and sink in slightly, giving you that picture‑perfect, gooey Easter brownie look.

    Let them set (the hardest part!)
    Leave the brownies to cool completely in the tin.


    If you want really neat slices, pop the whole tin into the fridge for a couple of hours so the chocolate can firm up.
    Once chilled, lift them out using the parchment and slice into squares or chunky bars. Serve at room temperature for maximum gooeyness.

    How to Serve
    This is where you can have a bit of fun:
    • Warm a slice gently and add a scoop of vanilla ice cream.
    • Pile them up on a plate or stand as a centrepiece for your Easter table.
    • Wrap a few pieces in parchment and ribbon as a sweet little gift for a neighbour, friend, or family member.
    They’re rich, indulgent, and feel just that little bit special – exactly what an Easter bake should be.

    Storing Your Brownies
    • Keep them in an airtight container at room temperature for up to 3 days.
    • If your kitchen is warm, you can store them in the fridge and bring them out a little before serving.
    • They also freeze really well: wrap slices individually and freeze for up to a month. Perfect for when you fancy a sneaky treat with a cup of tea.

    A Little Easter Tradition
    These brownies are one of those recipes that easily turn into a little ritual – you make them once, someone asks for them again next year, and suddenly they’ve become “your” Easter bake.
    If you do try them, I’d love to know how they went for you – did they make it to the table, or did everyone start picking at the tray while they were still warm?

    Links – small commission paid

    Russell Hobbs hand blender https://amzn.to/41AA0QS

    Tala self raising flour tin https://amzn.to/4s3CeDk

    Tala plain flour tin https://amzn.to/416gWdd

    Tala sugar tin https://amzn.to/4sZMn5r

    Baking tins https://amzn.to/3NLVWFF

    Measuring spoons https://amzn.to/4rWdSex

    Kitchen scales https://amzn.to/4thgZPq

    Wire cooling rack https://amzn.to/4dOxbD9

    trivet/ pan stand https://amzn.to/4tgDfsy

    baking parchment https://amzn.to/4s6Ok

  • Ultimate Comfort Cottage Pie

    Ultimate Comfort Cottage Pie

    This the cottage pie you make when you want the house to smell amazing and everyone gathered around the table, waiting for that first spoonful. It’s rich, cosy and full of flavour, with a proper savoury mince base and a thick layer of cheesy mash that crisps up beautifully in the oven.

    Ingredients


    For the filling
    • 3 tbsp olive oil
    • 1¼kg beef mince
    • 2 onions, finely chopped
    • 3 carrots, chopped
    • 3 celery sticks, chopped
    • 2 garlic cloves, finely chopped
    • 3 tbsp plain flour
    • 1 tbsp tomato purée
    • 1 large glass red wine
    • (or red wine stock if you prefer)
    • 850ml beef stock
    • 4 tbsp Worcestershire sauce
    • A few thyme sprigs
    • 2 bay leaves
    • Salt and black pepper, to taste
    For the mash
    • 1.8kg potatoes, peeled and chopped
    • 225ml milk (I use double cream for a more luxurious feel)
    • 25g butter
    • 200g strong cheddar, grated
    • Freshly grated nutmeg (optional)
    • Salt and black pepper, to taste

    Method
    Make the filling

    Brown the mince
    Heat 1 tbsp of the olive oil in a large saucepan over medium–high heat. Add some of the beef mince and cook until nicely browned, then scoop it out onto a plate. Repeat with the rest of the mince, adding a little more oil if you need to. Taking the time to brown it in batches gives you that deep, savoury flavour that makes this pie so satisfying

    Soften the vegetables
    Once all the mince is browned and set aside, add the remaining 2 tbsp olive oil to the same pan. Tip in the chopped onions, carrots and celery with a pinch of salt. Cook them gently for about 20 minutes, stirring now and then, until they’re soft and starting to turn lightly golden. This is a lovely, low‑effort stage – you can potter about the kitchen while the veg quietly do their thing.

    Add garlic, flour and tomato
    Stir in the finely chopped garlic, then sprinkle over the plain flour and add the tomato purée. Turn the heat up slightly and cook for 2–3 minutes, stirring, so the flour can cook out. The mixture will look a bit thick and clumpy at this stage, but that’s exactly what you want – it will help thicken the gravy later.

    Deglaze and add the liquids
    Return all the browned mince (and any juices on the plate) to the pan. Pour in the large glass of red wine or red wine stock. Let it bubble for a minute or two, scraping up any tasty browned bits from the bottom of the pan as you go.

    Build the gravy
    Add the beef stock, Worcestershire sauce, thyme sprigs and bay leaves. Give everything a good stir, bring it up to a gentle simmer, then turn the heat down low. Leave it to cook uncovered for about 45 minutes, stirring occasionally.

    Thicken and season
    After around 30 minutes, have a look at the consistency. If the liquid still looks quite thin, turn the heat up just a touch and let it reduce until you have a thick, glossy gravy that coats the mince. Fish out the bay leaves and thyme stalks, then taste and season well with salt and black pepper. Set the filling aside while you make the mash.

    Make the cheesy mash

    Cook the potatoes
    Put the peeled, chopped potatoes into a large pan and cover with salted cold water. Bring to the boil, then reduce to a simmer and cook until the potatoes are tender when you poke them with a knife.

    Steam‑dry and mash
    Drain the potatoes really well, then leave them in the hot pan for a couple of minutes to steam‑dry – this helps keep the mash fluffy. Add the milk, butter and about three‑quarters of the grated cheddar. Mash until smooth and creamy.

    Season the mash
    Season with a little freshly grated nutmeg if you like, plus salt and black pepper to taste. The mash should taste delicious on its own – that’s your sign it’s ready to top the pie.

    Assemble and bake

    Preheat the oven
    Heat your oven to 220°C / 200°C fan / Gas 7.

    Layer up the pie
    Spoon the beef filling into two ovenproof dishes, spreading it out in an even layer. Carefully spoon or pipe the mash over the top, making sure you cover all the meat so the gravy stays tucked underneath

    Add the cheese
    Scatter the remaining grated cheddar over the top of the mash. Little peaks and swirls will catch and go extra golden and crispy in the oven.

    Bake until golden
    Bake for 25–30 minutes, or until the top is beautifully golden, crisp in places and the filling is bubbling around the edges. Let it sit for a few minutes before serving so it’s easier to scoop.

    Slow cooker option
    If you want to make life easier, you can let the filling bubble away in the slow cooker:

    1. Brown the mince in batches as above, then tip it into your slow cooker.
    2. Soften the onions, carrots and celery in a pan, then add the garlic, flour and tomato purée and cook for 2–3 minutes.
    3. Add the red wine or red wine stock, beef stock, Worcestershire sauce, thyme, bay leaves, salt and pepper. Bring to a simmer, then pour everything into the slow cooker over the mince.
    4. Cook on High for 4–5 hours until rich and thick.
    5. Make the mash as above, spoon the filling into an ovenproof dish, top with mash and cheese, then bake at 220°C / 200°C fan / Gas 7 for 20–25 minutes until golden.

    This is one of those recipes that quietly becomes “your” cottage pie – the one people ask for when they’re coming over, or the one you keep a spare of in the freezer for those days when you just need something warm and familiar. It’s not fancy food, but that’s exactly why it feels so special: it’s simple, generous and made to be eaten in big, cosy scoops.
    Serve it with a pile of peas, some buttery greens or just on its own in a big bowl, curled up on the sofa. If you tweak it – add peas to the mince, swap the cheddar, skip the wine – make a note of what you did. Over time, this will turn into your own little family version, with all its tiny changes and stories attached.
    If you try it, I’d love to know: are you here mostly for the rich mince, or are you team “all about the cheesy mash”?

    Links .. small commission paid

    Cheese grater https://amzn.to/4tbQTgx

    Pan set (in cream ) https://amzn.to/3O7cUOQ

    hand mixer https://amzn.to/3PDll4W

  • 🍪 Soft & Gooey Mini Egg Cookies – Our Favourite Easter Bake 🐣💐

    🍪 Soft & Gooey Mini Egg Cookies – Our Favourite Easter Bake 🐣💐

    Every Easter, our kitchen starts to smell like pure happiness — that mix of butter, sugar, and melting chocolate means one thing: Mini Egg Cookies are back.This recipe has become a bit of a spring tradition for us. The first batch never makes it to the cooling rack because the moment those cookies come out of the oven, still warm and soft in the middle, we can’t resist breaking one open. The pastel colours of the Mini Eggs peek through the golden dough, and the centres stay deliciously gooey — it’s comfort and nostalgia in every bite.

    💕 Why You’ll Love These Cookies
    They’re simple to make — no fancy mixers, no tricky steps — just classic, homely baking. Yet they look like something from a bakery window. The mix of white and dark chocolate chunks gives a lovely balance of sweet and rich, while the crushed Mini Eggs bring that irresistible Easter crunch and colour.
    Whether you’re baking with little ones, creating gifts for friends, or just enjoying a quiet weekend bake (our favourite kind of self-care), these cookies are joyful, a little messy, and absolutely delicious.

    🧺 Ingredients
    • 175g softened butter
    • 200g light brown soft sugar
    • 100g golden caster sugar
    • 1 tbsp vanilla extract
    • 1 large egg
    • 250g plain flour
    • ½ tsp bicarbonate of soda
    • Pinch of sea salt
    • 50g white chocolate, chopped
    • 100g dark chocolate, chopped
    • 100g Mini Eggs, lightly crushed (save a few large pieces for decorating)

    🥣 Method

    • Preheat & prepare: Heat your oven to 190°C (170°C fan) and line two baking trays with parchment.
      Tip: If your kitchen is cool, leave the butter out a little longer — soft butter makes all the difference for that light, fluffy texture at the start.
    • Cream the base: In a large mixing bowl, beat together the butter, both sugars, and vanilla extract until pale and creamy. You can use a hand‑held whisk, but mixing by hand works just as well (and makes your kitchen smell heavenly).
    • Add the egg: Crack in your egg, then mix again until smooth and glossy.
    • Form the dough: Add the flour, bicarbonate of soda, and a pinch of salt. Fold gently until everything comes together — it should feel thick and a little sticky.
    • Add the magic: Stir through the white and dark chocolate chunks and about half of your crushed Mini Eggs. Save the bigger, prettier pieces to press on top later — they’ll make the cookies look beautiful when baked.
    • Shape & chill: Scoop out golf ball‑sized mounds of dough and place them on the trays (4–6 per tray so they have room to spread). For that perfect chunky bakery-style cookie, chill the dough for 30 minutes before baking.
    • Bake to perfection: Bake for 15–18 minutes, swapping trays halfway through. You want the edges golden and just set, but the middles still soft and pale. That’s the secret to the gooey texture.
    • Cool & serve: Leave the cookies on the tray for 10 minutes to finish setting, then move them to a cooling rack. It’s honestly worth waiting a few minutes before biting in — but if a little melted chocolate ends up on your fingers, that’s part of the fun.

    🌷 A Few Baking Notes
    • If you prefer crispy cookies, add a couple of extra minutes to the baking time.
    • Freeze‑ahead tip: shape the dough balls, place them on a tray to freeze, then store in a container for up to 3 months. Bake straight from frozen, adding 2–3 minutes to the time.
    • They make a lovely homemade gift — stack a few, tie them up in a clear bag with ribbon, and add a little Easter tag.

    💬 Final Thoughts
    Sometimes the simplest bakes are the most special. These cookies don’t just taste amazing; they bring everyone into the kitchen — chatting, laughing, stealing bits of dough when they think no one’s looking.
    So pour yourself a cuppa, pop on a playlist, and bake a tray. When that first batch comes out warm and golden, you’ll understand why these have become our Easter tradition.
    🐣💐 Happy baking from our kitchen to yours.

    MiniEggCookies #EasterBakes #HomeBaking #CookieRecipe #SpringTreats #UKBakers #BakingTok #LCLivingKitchen

    Links – small commission paid

    Russell Hobbs hand blenderhttps://amzn.to/41AA0QS

    Tala self raising flour tin https://amzn.to/4s3CeDk

    Tala plain flour tin https://amzn.to/416gWdd

    Tala sugar tin https://amzn.to/4sZMn5r

    Baking tray https://amzn.to/4dRbwu0

    Measuring spoons https://amzn.to/4rWdSex

    Kitchen scales https://amzn.to/4thgZPq

    Wire cooling rack https://amzn.to/4dOxbD9

  • The merits of a Fitbit

    The merits of a Fitbit

    Rapidly approaching a milestone birthday rather faster than I would have hoped … clue it’s not 21… I’m determined to hit the gym with a vengeance and look as good as possible in those milestone photographs. Some may call that vanity but there is a deeper more important reason it .. the creaks and pains are there and I’m determined to hit my next decade running …maybe not marathon worthy but certainly better than a leisurely stroll..

    Although I have been a regular gym goer for many years I have kind of lost my confidence a little when it comes to a programme. I have used personal trainers in the past and they gave me confidence but I didn’t want to have the expense and I also have a very knowledgable boyfriend who can help me with technique . The whole thing seemed a little overwhelming .. the answer to my conundrum came in the form of the ai trainer in my Fitbit

    I have had fitbits for absolutely years .. initially starting with the little clip on one but a few years ago Lance bought me a Fitbit versa 2 and I have found it really useful for tracking my steps etc . I subscribe to the Fitbit premium which is £79.99 a year – about 22p a day. Fitbit premium offers advanced sleep analysis with detailed sleep score breakdown, monthly sleep profile, and tailored suggestions, instead of just a basic score.

    Daily Readiness or “Readiness Score” that tells you whether to push hard, do light activity, or rest based on recent activity, sleep quality, and heart rate variability

    Extra health metrics such as more detailed skin temperature trends, stress metrics, and manual blood glucose logging in the app, giving a fuller picture of recovery and wellbeing.

    These are all really handy stats to know and gives you an overview as to how you are doing but it’s the ai trainer I am absolutely loving as it has given me custom built programme in minutes . Fitbit already has all my stats such as age, weight and my health stats so it really was as simple as telling it what my goals are, whether you prefer to work out in the gym or at home, prefer machines or free weights and what weaknesses my ageing body has .. tender back, weak knees .. slightly dodgy wrists – I’m doomed 😂 .and hey presto in minutes it designs a custom built programme. This is a sample of one of the weights programmes , it suggests a weight and number of repetitions but you can manually alter these if you find them too heavy or light .

    Once you have done the sets you simply mark them as done and then it automatically logs it to your history . You get a post workout summary which compares to previous workouts so you can see how you are improving .. There is a chat option if you have any questions you want answering and if there is anything you like particularly or don’t like you just chat and it can change the programme accordingly, for example I’m not a fan of cable machines so I told it and the plan was altered accordingly.

    The ai coach plans your schedule for the week and provides you with an after workout summary.

    So I’m in to the second week of the trainer and I’m finding it so useful, it’s motivating and stops you having to think about what you need to do, it takes away the hard work

    As well as the above the Fitbit premium also has a workout library where it has loads of different workouts if you want to do your exercise at home. You just choose the type of workout you want, the length and the library has something for you .

    As well as physical fitness it also has your mental wellbeing accounted for with a selection of meditations again which can be selected by type . I find the sleep ones particularly good as I have a very busy mind and find it hard to switch off.

    The rest of the family have Apple Watches but I can’t be swayed . The Fitbit stays charged much longer than an Apple Watch and I find it much much easier to navigate. In addition the customer service is great . Whilst on holiday the screen on the Fitbit stopped working and I contacted them and they went through troubleshooting which didn’t work and they simply replaced it free of charge and sent direct to my home. I couldn’t have asked for any more

    The only I had to change was the strap. I’m not a great fan of the plastic/rubber style straps so I changed it for a more blingy type leather strap from Amazon which dresses it up a little bit.

    Being a bit of a clumsy clot I also got a set of screen protector which were cheap as chips but stops the screen smashing or getting scratched, it’s sillicone i think not hard plastic and pops on easily and does the job

    A bedside charger was something I have just invested in as well and it works really well for me and looks neater.

    I honestly can’t find a negative thing to say about this smartwatch, I love the look, the functions and the ease to use .. a 10/10 for me.

    Link for the silicone screen protector

    If you want to see my progress with the the trainer I will update in a couple of weeks as to how I’m getting on !

    Carolyn 25.03.2026

    Links below in case you want further information on anything Ive mentioned

    Link for fitbit sense https://amzn.to/4rMhDDv

    Link for fitbit screen protector https://amzn.to/47OREE6

    Link for fitbit docking station https://amzn.to/4rJvASp

    Link for blingy watch strap https://amzn.to/4uKUqUG

    I may get paid a very small amount if you purchase.

  • A night at The Lowry Theatre, Salford

    A night at The Lowry Theatre, Salford

    By nature Lance and I are home birds but we make one exception.. and that’s a night at the Lowry Theatre in Manchester . We are going for a lovely meal followed by the RSC Production of “The Constant Wife” starring Strictly winner and former Eastenders actress Kara Tointon.

    The Lowry is a registered charity a non-profit organisation which only gets 6% of their income from public funding and as well as the theatre productions offers an art gallery and also workshops and a strong educational programme

    The theatre is easy to get too by metro or if you are a little further afield like us there is plenty of

    Parking with the onsite car park – we usually pay for this by the app rather than queuing on the way out . We are Lowry members which costs £40 and is an absolute bargain – for this you get priority booking , 2-4-1 tickets on most opening nights (which means the cost pays for itself on its first booking! ) and you also get 10% off in the restaurant and also the gift shop

    The Lowry Theatre

    We normally go and dine in the restaurant first as the quality of the food and the ambience are excellent and as they are geared towards pre theatre dining there is none of the panic of .. “are we going to get our food in time ?” Like when you book an ordinary restaurant

    The restaurant itself is inside the Lowry theatre and has fabulous views of the water front and also views of MUFC Old Trafford ground , which could be a disadvantage if you are a Liverpool supporter 😂

    The restaurant

    The restaurant is very relaxed and informal and serves modern British menus with locally sourced ingredients. The menus are seasonal , so change 4 times a year – we had the Spring menu. The staff are fabulous , especially Rob and are attentive, knowledgable and unobtrusive

    The Spring menu

    You can choose from either two or three courses and there are vegetarian options . The pricing is very reasonable – it is £32 for two course or £38 for three and as mentioned before there is 10% off for Lowry members – the tables can be booked online and prepaid at the time of booking the tickets or just direct on their website at a later date – really simple to do

    For the starters I chose the Port of Lancaster smokehouse smoked salmon parfait and Lance chose the roasted parsnip and sorrel soup . Mine was absolutely delicious, the parfait was really fresh tasting with little pops of egg Caviar whilst Lance said his soup was hearty and delicious served with a chunk of fresh bread not as nice as the one I make at home he stated .. though that could have been a diplomatic comment 😂

    Smoked salmon parfait
    Roast Parsnip & sorrel soup

    For the main course we both chose the same Garlic & Herb Cumbrian chicken breast potato pave, parsnip purée, spring greens, golden beetroot, red wine jus – this was delicious . I’ve 👎🏼 had golden beetroot before but it’s lovely – actually has the taste and textures of pears, the chicken was cooked to perfection , really well seasoned and not overpowered by the herbs or garlic and the parsnip puree is sweet creamy and just yum

    Cumbrian chicken

    Feeling rather full what we particularly like about The Lowry restaurant is the option to have you dessert in the interval – it saves the queues at the refreshment stand and it’s ready at your table when you return. It gives you the option to let the first two course digest and really appreciate the sweet treats .. This is Lances favourite part of the evening I think 😂

    I decided to have the sticky toffee pudding with plant based ice cream and it was the perfect combination of sweetness and stickiness – and Lance agreed with the spoonful I let him taste !

    Sticky toffee pudding with plant based ice cream

    Lance decided upon the Basque cheesecake with sea buckthorne curd and bee pollen tuile . The curd is similar to lemon curd but made with sea berries so a little richer . Lance said is was perfect . Not too heavy not too light and went perfect with the cup of tea we also had !

    Basque Cheesecake

    So now to the show!

    The Constant Wife

    1927. Constance is a very unhappy woman. “Nonsense” says her mother “she eats well, sleeps well, dresses well and she’s losing weight. No woman can be unhappy in those circumstances.” Constance is the perfect wife and mother, and her husband is as devoted to her as he is to his mistress, who just happens to be her best friend. This is a Royal Shakespeare Company Production and is in connection the cruise company Cunard where it being performed in May upon its Queen Mary cruise from New York to Southampton.

    The play starts with Mrs Culver (Sara Crowe – whom showing my age I remember from the Philadelphia cheese advert !) and her daughter Martha Culver (excellently played by Amy Vicary-Smith) discussing where it not to tell Constance Middleton (Kara Tointon) that her husband John Middleton (Tim Delap) is having an affair with her best friend Marie-Louise Durham (played in this performance by Jocasta King) . Martha a modern forthright unmarried young women is all for transparency and feels her sister should know the truth about what a cad her husband is whilst Mrs Culver believes that what her daughter doesn’t know won’t hurt her as she has a wonderful life as it is . As the plot unfolds it turns out that Constance has known about her husbands affair for a year having walked in on the couple unbeknownst to them whilst returning early from a trip taking her daughter to boarding school . Rather than confronting the couple immediately we witness the despair and internal wrangling as she experiences she encounters whilst deciding what do – her only confident being the loyal butler Bentley (brilliantly played by Philip Rahm) who it appears is harbouring a secret of his own.

    Constance

    When her sister invites Constance to go into the interior design business with her she after slight hesitation agrees and starts to plan her future her husband blissfully ignorant of what she has discovered

    The re-emergence of one of Constance’s old flame Bernard Kersal (Alex Mugnaioni) who is still desperately in love with her provides a welcome distraction for Constance and is welcomed by her husband as it gives him plenty of time for philandering!

    The affair is revealed when Mortimer Durham (played by Jules Brown) the husband of Marie-Louise finds a cigarette case belonging to the errant husband under the pillow on his wife’s bed and confronts the couple in front of the whole cast .To the incredulity of everyone Constance covers up the infidelity and the husband leaves feeling embarrassed and apologetic at his behaviour !

    What unravels is a story and examination of a marriage, what really goes on behind closed doors and whether forgiveness really is sweeter than revenge? I don’t want to spoil the end apart from justice is served and would highly recommend you catch the production when it tours near you.

    Tokay is as Lance says reminiscent of the old “Play for today” , a gentle farce with more than a few double entendres . The set and costumes are divine, Music specially written by Jamie Cullum , acting is top notch and it’s a brilliantly casted show. We left the theatre a little lighter and with a spring in our step – a thoroughly enjoyable evening with the best company .. who could want anymore ?

    set photo credits to the constant wife website

    Links:

    The Lowry theatre https://thelowry.com

    The Constant wife https://constantwife.com