If you’re anything like me, you’re constantly looking for a snack that hits that perfect sweet spot—something chewy, satisfying, and filling enough to keep you going until your next meal.
The problem? So many “healthy” store-bought bars are packed with hidden sugars and processed syrups.
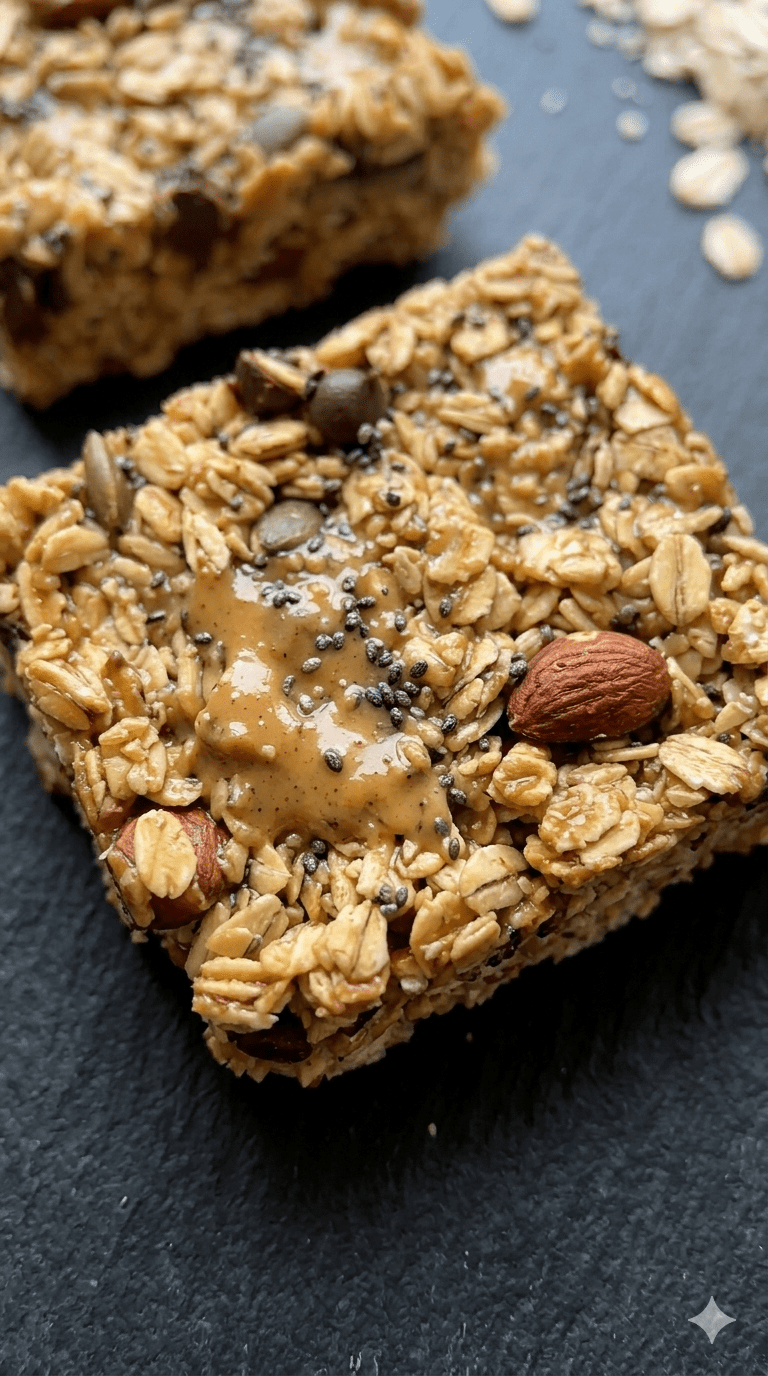
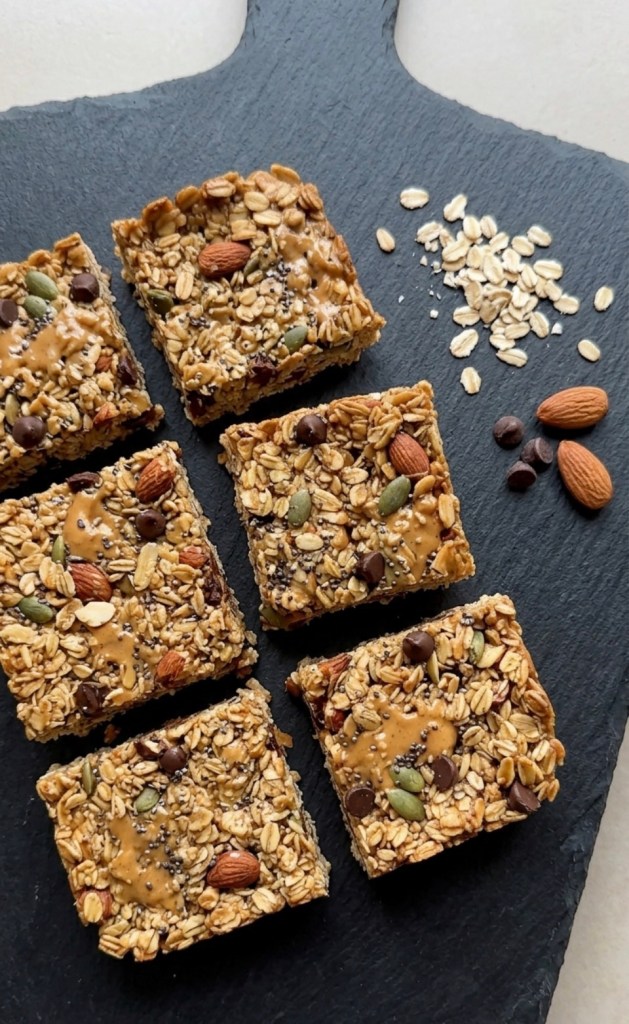
That is why I’ve been making these Nut Butter Energy Bars on repeat lately. They use natural nut butter as a binder, meaning you get a dose of healthy fats and protein without the refined sugar crash. Plus, they take less than 25 minutes from start to finish!
Why You’ll Love These
Simple Ingredients: You likely already have most of these in your pantry.
Highly Customizable: Switch up the nuts, seeds, or add-ins based on what you have on hand.
Meal Prep Friendly: They hold up perfectly for the week—just grab and go.
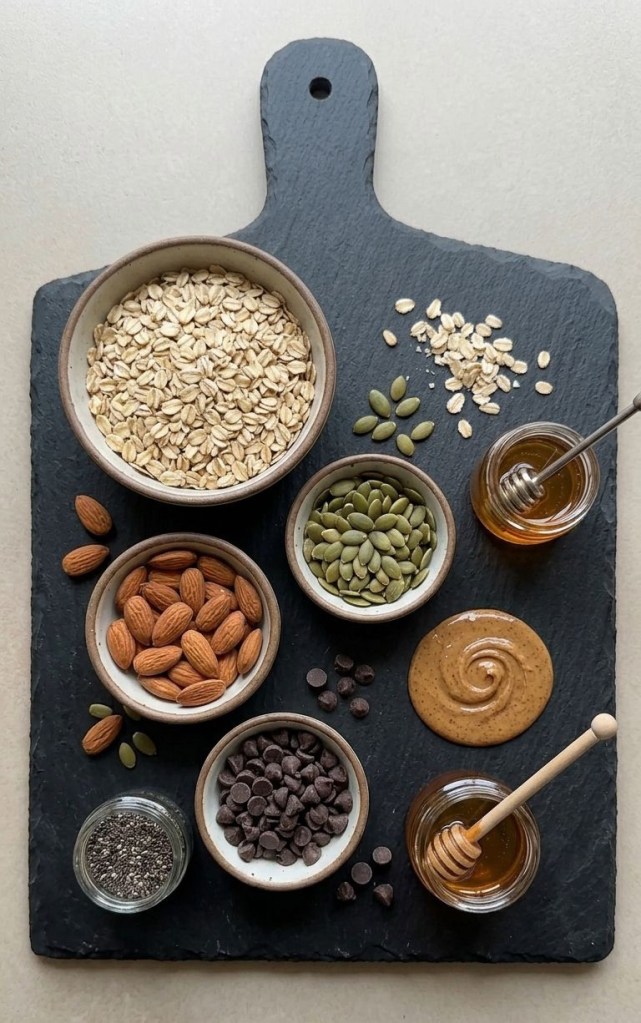
Ingredients
250g Rolled oats
180g Natural peanut butter (ensure it’s the runny kind with no added palm oil)
80g Maple syrup or honey
60g Melted coconut oil
1 tsp Vanilla extract
1/2 tsp Sea salt
Optional: 50g dark chocolate chips, almonds, or pumpkin seeds for extra texture
Method
1 Prep: Preheat your oven to 175°C (155°C fan). Line an 8×8-inch baking dish with parchment paper, leaving a little overhang on the sides so you can lift the bars out easily later.
2 Combine Wet Ingredients: In a large bowl, whisk together the peanut butter, maple syrup, coconut oil, vanilla, and salt until smooth.
3 Mix: Fold in the oats and any optional add-ins (like chocolate chips or seeds). Stir until every oat is evenly coated in the nut butter mixture.
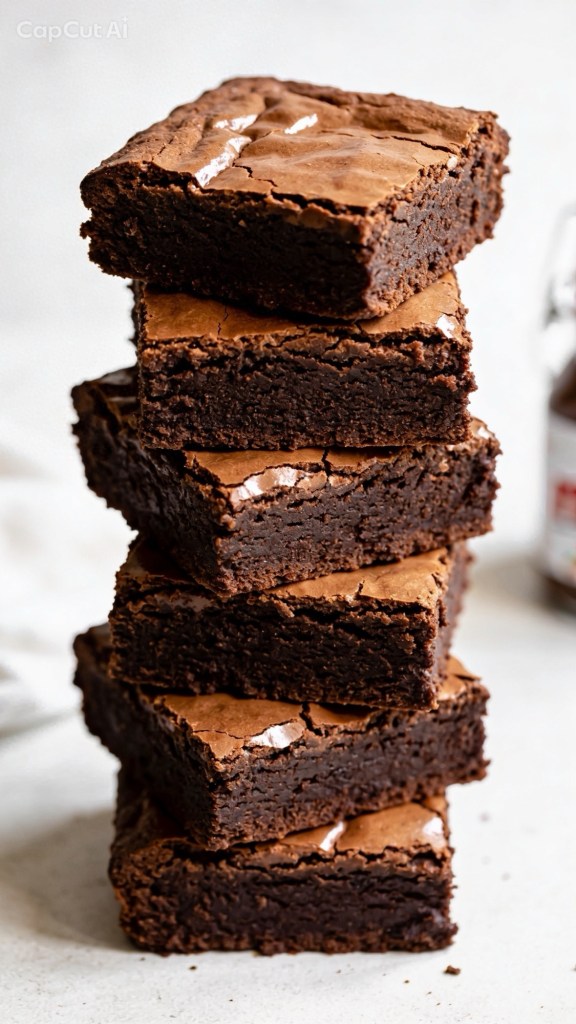
4 The Secret Step: Transfer the mixture to your baking dish. Use the back of a flat-bottomed glass or a metal spatula to press the mixture down firmly. This is the key to getting a dense, chewy bar that doesn’t crumble!
5 Bake: Bake for 18–22 minutes. The edges should look golden brown, even if the center still feels slightly soft.
6 Cool & Slice: Let the bars cool completely in the tin on a wire rack. For the best result, chill them in the fridge for 30 minutes before slicing into squares.
Tips for Success
Nut Butter Swaps: You can easily swap the peanut butter for almond or cashew butter. Almond butter offers a slightly more earthy, sophisticated profile.
Storage: Keep these in an airtight container at room temperature for up to 5 days. If you’ve made a double batch, you can freeze them for up to 3 months.
Have you tried making these? Tag me in your photos or let me know in the comments which nut butter you chose!
We’ve all been there. It’s 9 PM on a rainy Tuesday, the work emails won’t stop pinging, and your brain is screaming for something sweet, warm, and comforting. When life gets a bit too chaotic, some people meditate, others go for a brisk run, and a few light scented candles.
Me? I put on my comfiest trackies, head straight to the kitchen, and grab a jar of hazelnut spread.
What started as a viral TikTok meme—the ultimate “what do we do when we’re stressed?” joke—has officially become my holy grail baking recipe. Let’s be honest: standing over a warm oven and eating gooey chocolate straight from the baking tin might actually be the cheapest form of self-care available.
If you have a jar of Nutella, a couple of eggs, and a scoop of flour in your cupboard, you are exactly 20 minutes away from chocolate heaven. Here is why this recipe works, the science behind it, and how to nail it on your very first try.
The Secret Science: Why 3 Ingredients Actually Work
Usually, baking is a strict science experiment. If you forget the baking powder, mess up the sugar ratio, or use the wrong type of fat, your bake is ruined. You’re usually left hunting through the cupboards for golden syrup, cocoa powder, and blocks of expensive baking chocolate.
This recipe completely throws the traditional rulebook out the window. Why? Because the clever scientists at Ferrero have already done the hard work for you.
• The Nutella: Think of Nutella not just as a topping, but as your primary baking base. It is already packed with cocoa for flavour, sugar for sweetness, and palm oil/hazelnut fats for moisture. It replaces the butter, sugar, and cocoa powder of a traditional brownie in one single scoop.
• The Eggs: Eggs are the magicians of this recipe. They provide the structure, the rise, and—most importantly—that highly coveted, shiny, papery crinkle-top that separates a mediocre brownie from an elite one.
• The Plain Flour: A tiny amount of plain flour binds everything together. Because we aren’t using raising agents (like self-raising flour or baking powder), the dense properties of plain flour keep the texture beautifully fudgy rather than cake-like.
No fancy equipment, no waiting for butter to soften on the counter for hours, and practically zero washing up. It is pure kitchen efficiency.
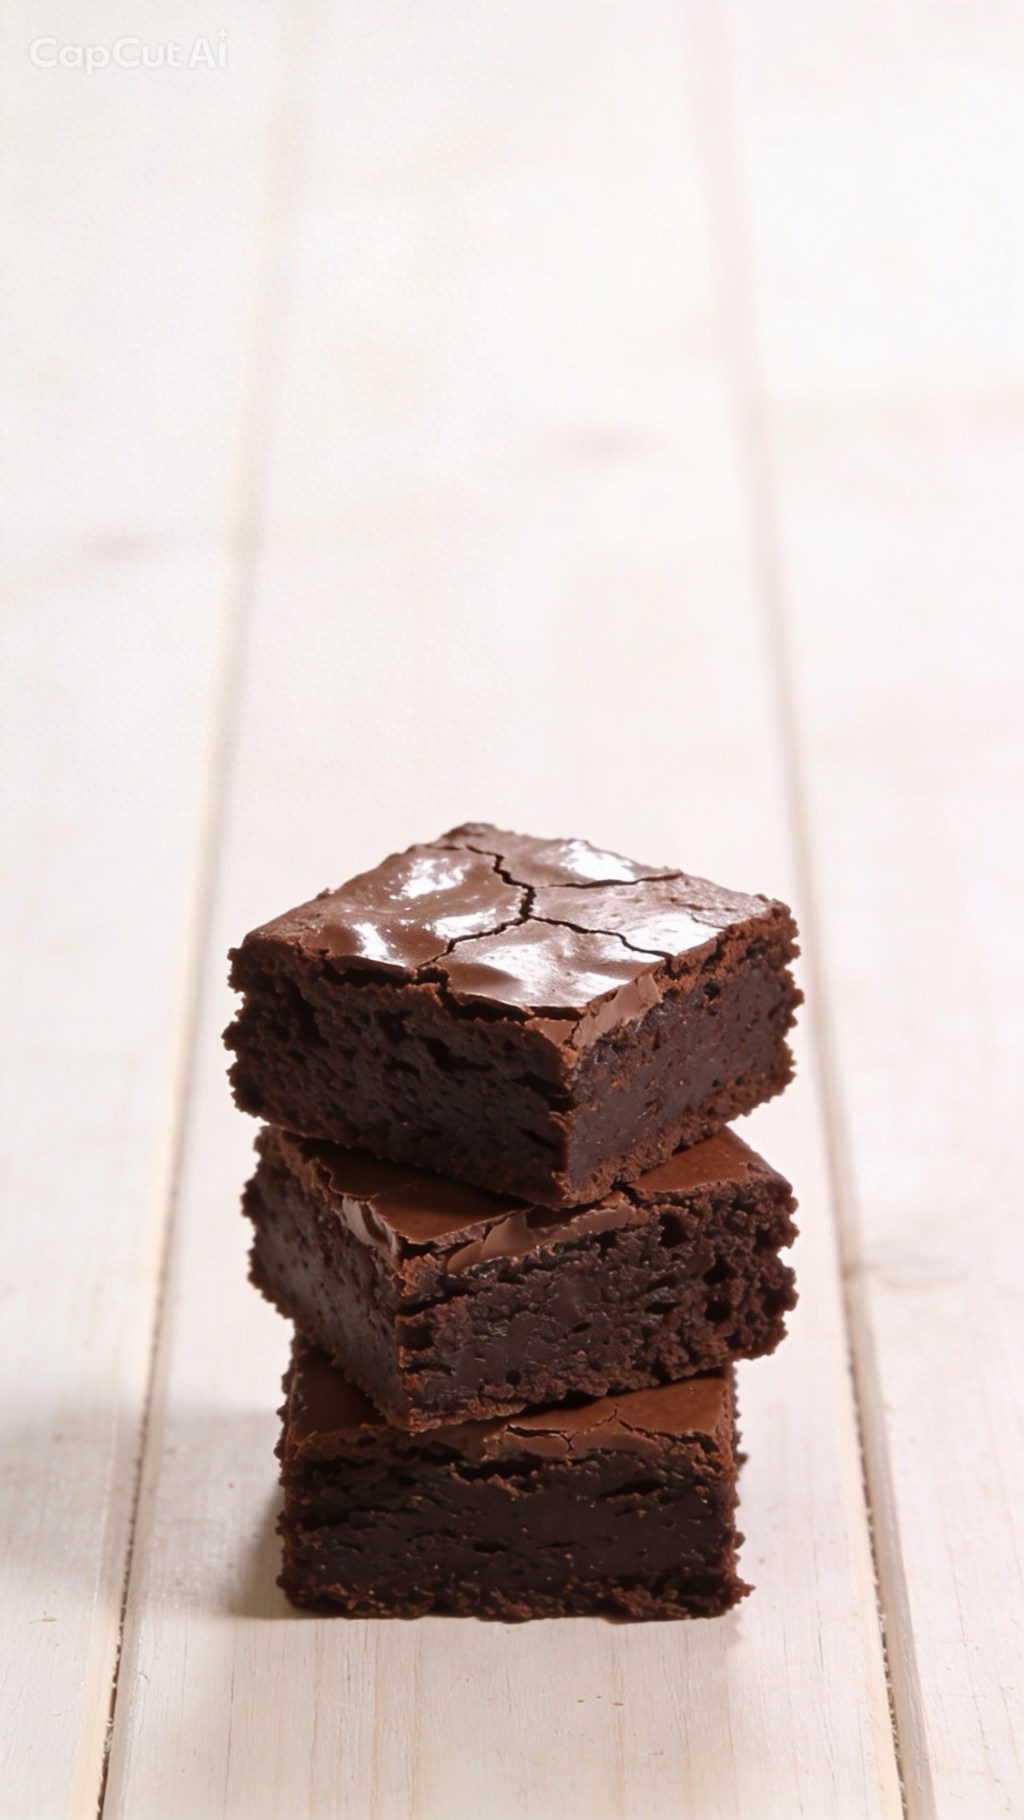
The Recipe: Fudgy Nutella Brownies
Ingredients
• Nutella: 280g (Roughly one standard small jar. Ensure it’s at room temperature so it mixes easily.)
• Eggs: 2 Large (Use free-range, room-temperature eggs for the best rise.)
• Plain Flour: 65g (Standard plain white flour – do not use self-raising!)
Step-by-Step Method
1. Prep Your Station
Before you do anything else, preheat your oven to 180°C (160°C fan/Gas Mark 4). Line a small square baking tin (around 8×8 inches or 20×20 cm) with baking parchment.
Top Tip: Leave a bit of parchment overhang on the sides. This creates “handles” so you can easily lift the brownie block out of the tin later without it breaking apart.
2. Whisk the Base
In a medium-sized mixing bowl, crack in your two large eggs and add the 280g of Nutella. Grab a whisk and go to town. At first, it might look a bit split, lumpy, or strange as the cold eggs hit the thick spread. Keep whisking for about a minute! Suddenly, it will transform into a beautifully smooth, glossy, and thick chocolate batter.
3. Fold, Don’t Stir
Sift your 65g of plain flour into the bowl. Put the whisk away and grab a silicone spatula or a wooden spoon. Gently fold the flour into the chocolate mixture using a figure-of-eight motion just until the white streaks disappear.
The Golden Rule: Stop mixing the second the flour is incorporated! If you overmix the batter, you will develop the gluten in the flour. This turns your dense, fudgy brownies into a tough, bready cake—and nobody wants a bready brownie.
4. Into the Oven
Pour the batter into your lined tin. It will be quite thick and sticky, so use your spatula to smooth it out into the corners. Pop it into the middle shelf of the oven and bake for 15 to 20 minutes.
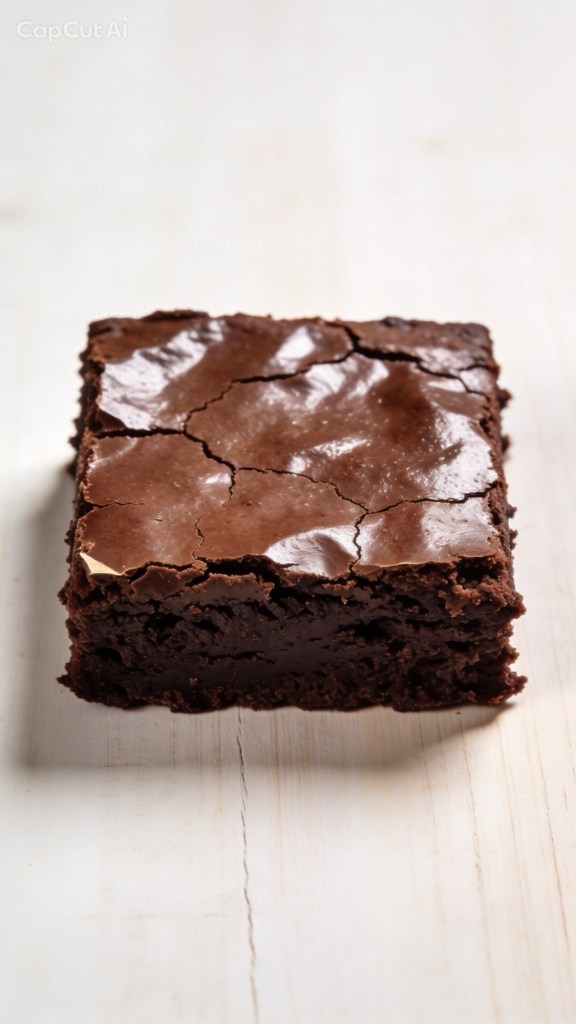
The Ultimate Brownie Test: Fudgy vs. Overbaked
How do you know when they are perfectly done?
You want the edges to look set and matte, and the top should have that gorgeous, paper-like crinkle. However, if you gently shake the tin, the very centre should still have a tiny bit of a wobble.
If you insert a toothpick or skewer into the centre, it should not come out completely clean. It should have a few moist, sticky crumbs attached to it. If the skewer comes out completely dry, you’ve overbaked them into a cake. Pull them out early—they will continue to firm up as they cool down in the hot tin!
Variations to Try (If You’re Feeling Fancy)
While the 3-ingredient version is perfect on its own, it also acts as a brilliant blank canvas. If you want to level up your bake next time, try folding in these extras right before baking:
• The Sweet & Salty: Add a generous pinch of flaky sea salt (like Maldon) over the top right before it goes in the oven.
• The Crunch: Fold in 50g of chopped, toasted hazelnuts to mimic the inside of a Ferrero Rocher.
• The Ultimate Chocolate Fix: Toss in a handful of white or milk chocolate chips for a bit of texture.
How to Serve
If you possess an incredible amount of self-control, let the brownies cool completely in the tin for about 20–30 minutes, slice them into neat squares, and serve them alongside a scoop of vanilla bean ice cream or a hot cup of tea.
If you’re having one of those weeks? Forget the knife. Grab a spoon, sit yourself down on the kitchen floor, and eat them warm and gooey straight out of the tin. We completely support your journey.
Have you tried the 3-ingredient Nutella brownie trend yet, or are you skeptical that a recipe this simple can actually taste good? Let me know in the comments below if you’re team fudgy or team cakey!
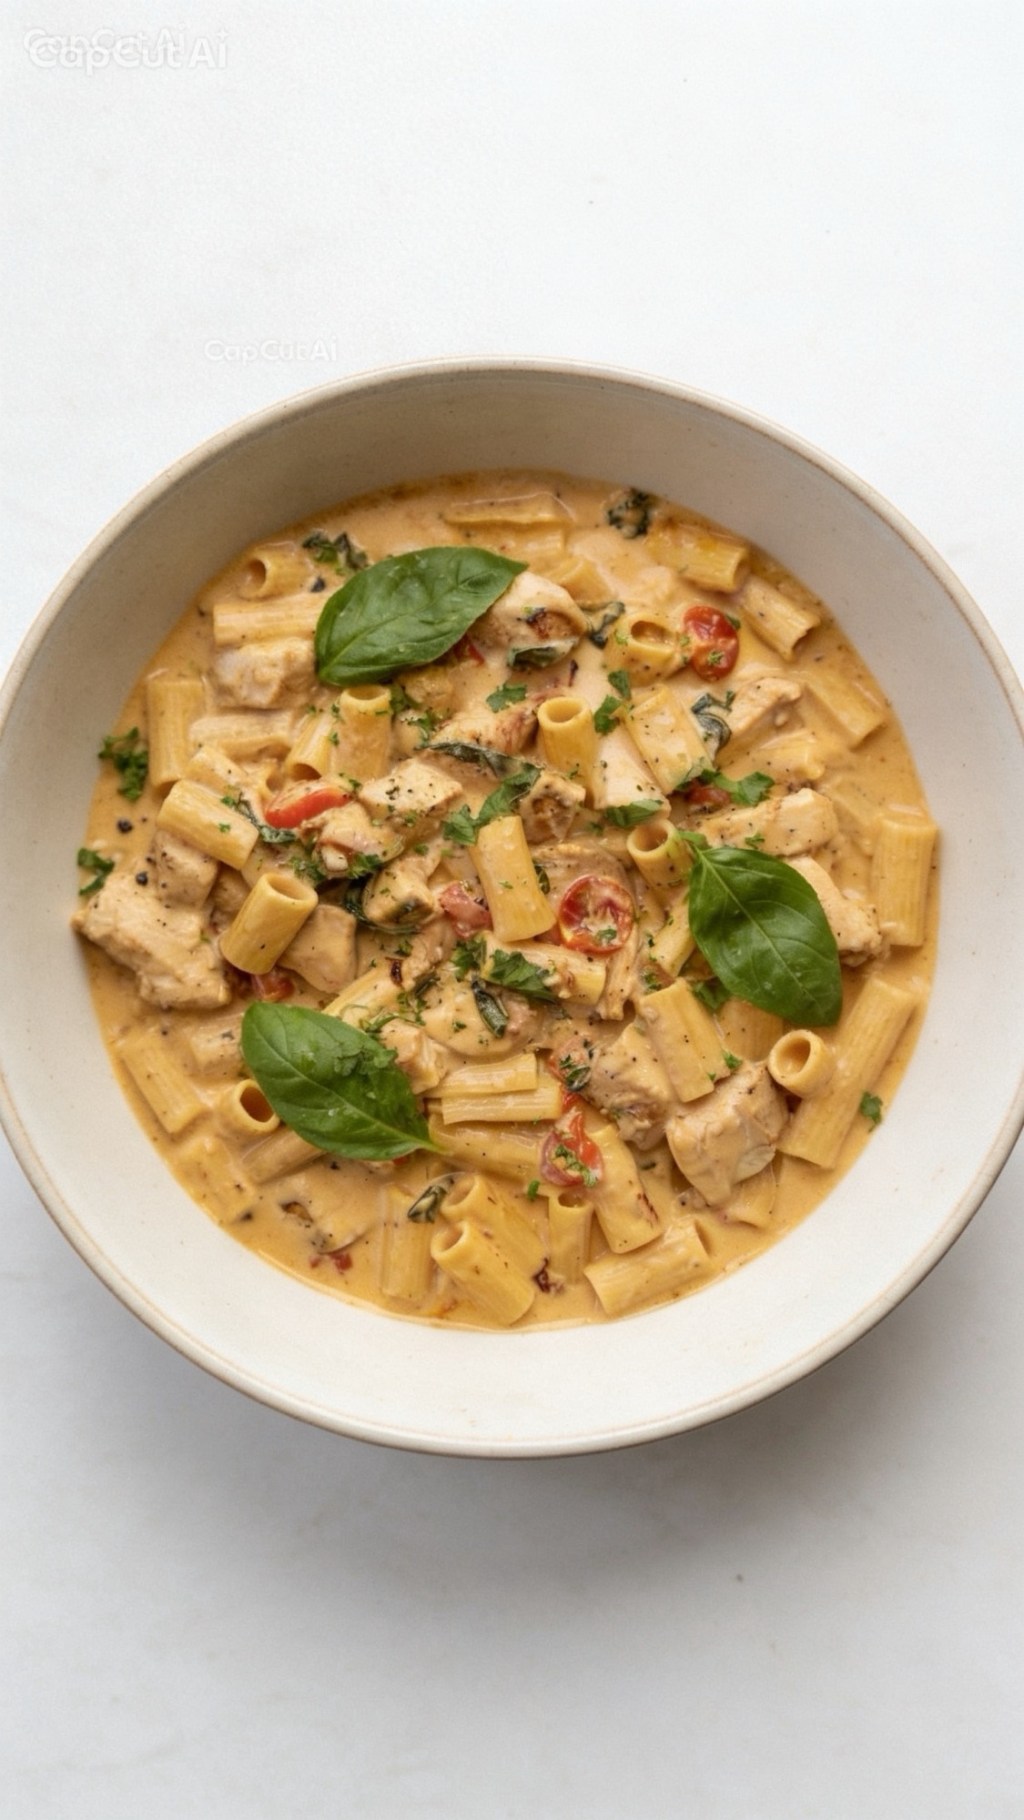
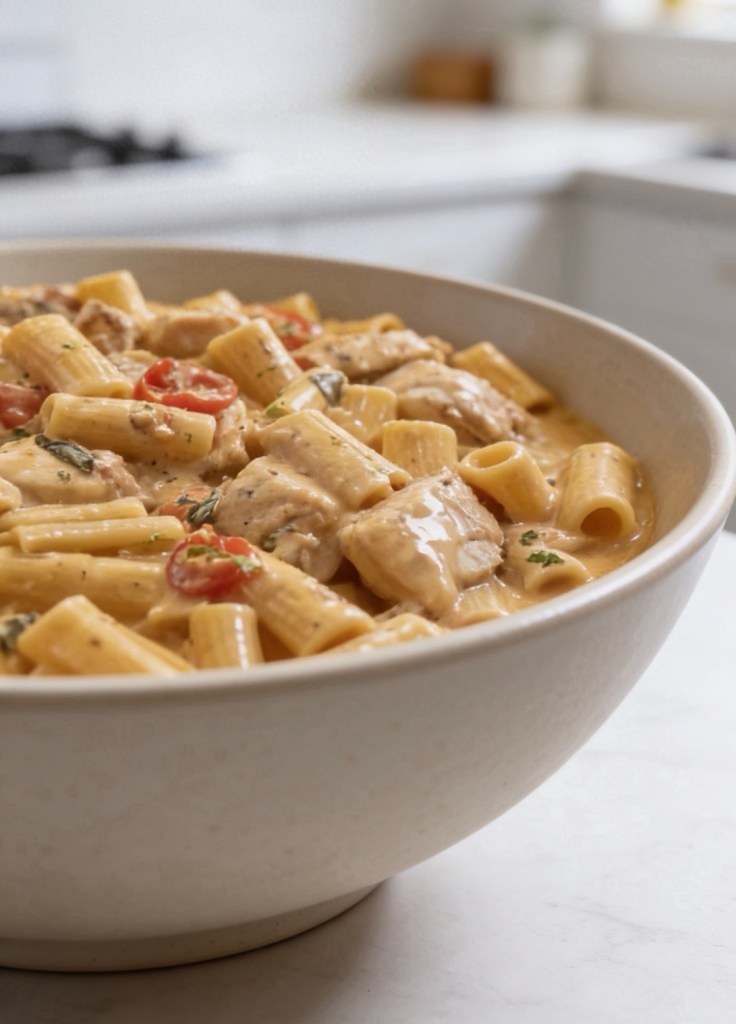
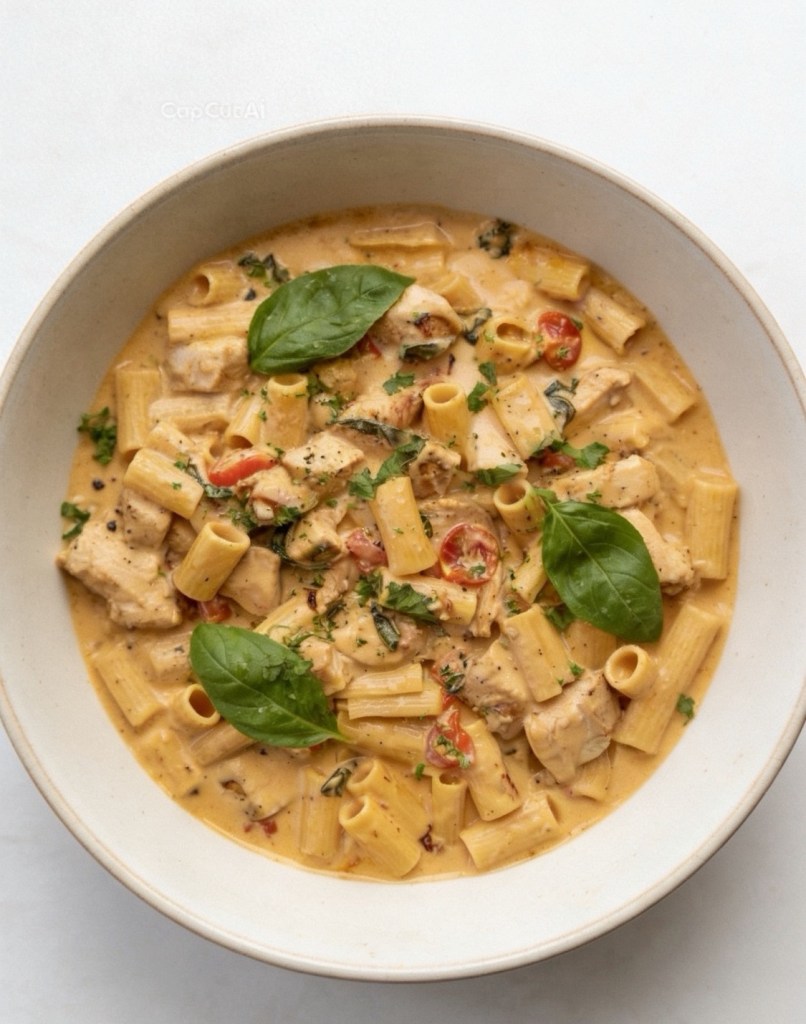
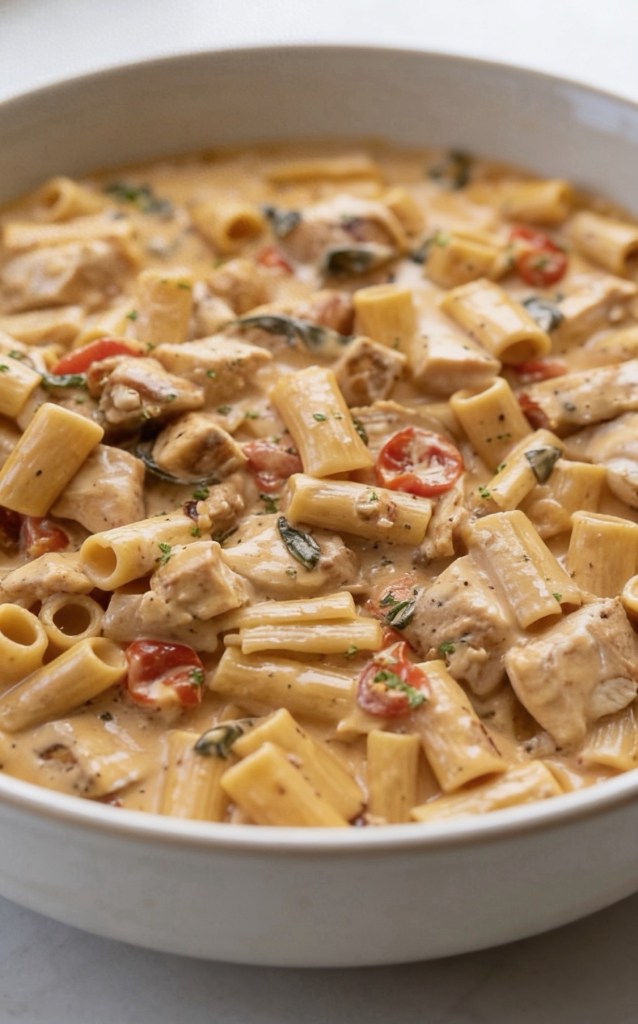
Do you ever have one of those nights where you want a restaurant-quality dinner, but you absolutely do not have the energy for restaurant-quality effort? Enter this Creamy Tuscan Chicken Pasta.
Packed with juicy chicken, tangy sun-dried tomatoes, and fresh spinach tossed in a rich, velvety Parmesan sauce, this dish tastes like it simmered for hours. The best part? It goes from prep to plate in just 20 minutes.
Whether you’re looking to shake up your midweek meal rotation or need an effortless date-night dinner, this recipe hits the comfort food jackpot. Here is exactly how to make it using standard UK measurements.
What You’ll Need (Ingredients)
Before you hit the kitchen, gather these simple ingredients. Everything can be easily found at your local UK supermarket:
• 340g penne pasta: Holds onto the creamy sauce perfectly, but rigatoni or fusilli work great too.
• 450g chicken breasts: Sliced into thin strips so they cook quickly and stay tender.
• 2 tbsp olive oil: For searing the chicken and building the base of the sauce.
• 3 garlic cloves: Minced.
• 150g sun-dried tomatoes: Chopped. These add a rich, sweet, and tangy punch to balance the cream.
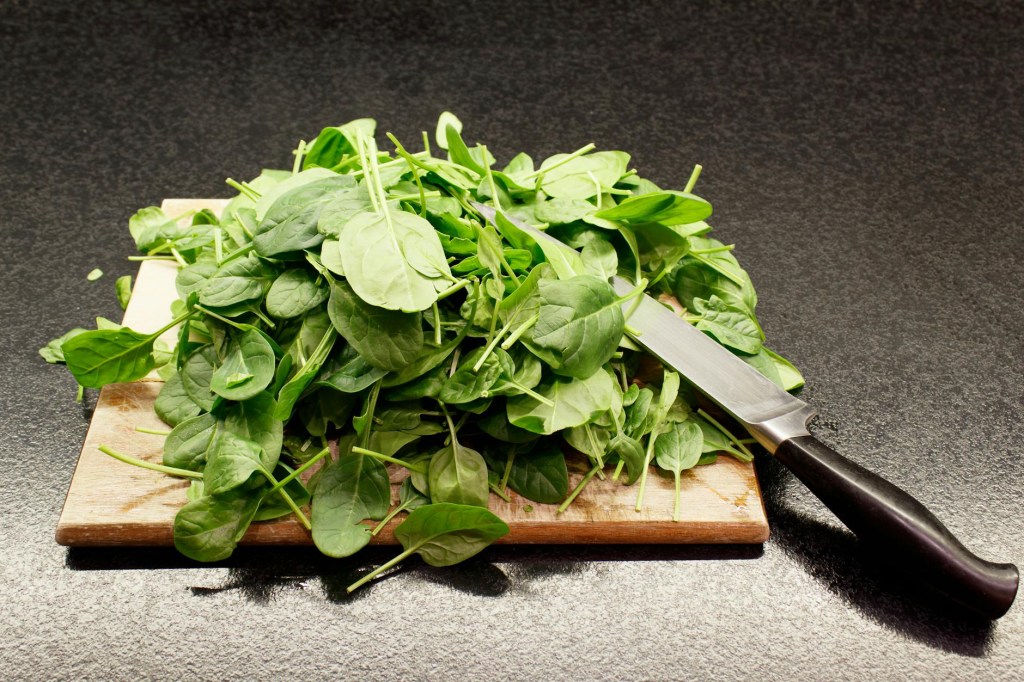
• 60g baby spinach: Adds a pop of colour and a bit of freshness.
• 240ml double cream: The ultimate base for a glossy, luxurious sauce.
• 240ml chicken stock: Balances the richness of the cream.
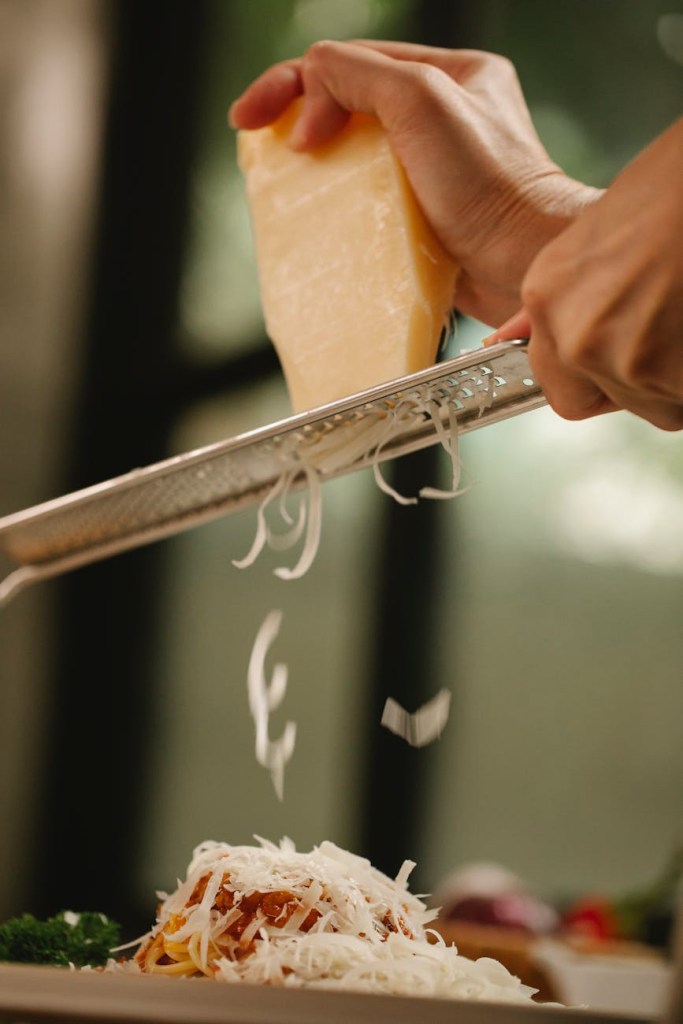
• 90g grated Parmesan cheese: Freshly grated melts the smoothest.
• 1 tsp Italian seasoning: A classic herb blend to season the chicken.
• 1/2 tsp dried chilli flakes (optional): For a subtle, warming kick.
• Salt and black pepper: To taste.
Step-by-Step Method
1. Cook the Pasta
Bring a large pot of salted water to a rolling boil and cook your 340g of penne pasta according to the packet instructions until it’s al dente (cooked through but still holding a bit of a bite). Drain the pasta and set it aside.
2. Sear the Chicken
Season your sliced chicken breasts generously with salt, pepper, and the teaspoon of Italian seasoning. Heat 2 tablespoons of olive oil in a large frying pan over a medium-high heat. Add the chicken strips and sear them for 5–6 minutes, tossing occasionally, until they are beautifully golden and completely cooked through. Remove the chicken from the pan and pop it onto a plate for later.
3. Build the Creamy Base
Don’t clean out the pan—those browned bits left behind mean extra flavour! Turn the heat down to medium and toss in your 3 minced garlic cloves and 150g of chopped sun-dried tomatoes. Fry for about 1 minute until fragrant, being careful not to let the garlic burn. Next, pour in 240ml of chicken stock and 240ml of double cream. Bring the mixture to a gentle simmer and let it bubble away for 3 minutes to reduce and thicken slightly.
4. Wilt the Spinach and Melt the Cheese
Stir 90g of grated Parmesan and 60g of baby spinach into the simmering sauce. Keep stirring for a minute or two until the cheese has completely melted into the cream and the spinach has wilted. If you like a little heat, stir your chilli flakes in now.
5. Toss it All Together
Return the cooked chicken and the drained penne pasta to the pan. Toss everything together vigorously for a minute or two until the pasta is completely coated in that glossy, velvety sauce and everything is piping hot.
Top Tips for Success
• Don’t Overcook the Garlic: Garlic burns quickly and can turn bitter. Make sure your pan has cooled down slightly from cooking the chicken before you toss it in, and only fry it for a minute before hitting it with the liquids.
• Switch Up the Protein: If you don’t fancy chicken, this recipe works beautifully with prawns, or you can add some fried pancetta along with the garlic for an extra layer of depth.
• Make it Vegetarian: Simply skip the chicken, swap the chicken stock for vegetable stock, and throw in some sliced mushrooms or artichoke hearts instead.
Give it a Try!
This Creamy Tuscan Chicken Pasta is guaranteed to please everyone at the dinner table. If you make this recipe, I’d love to hear how it turned out!
Leave a comment below, let me know if you made any tweaks, and don’t forget to tag me on TikTok if you filmed your creation! Happy cooking!
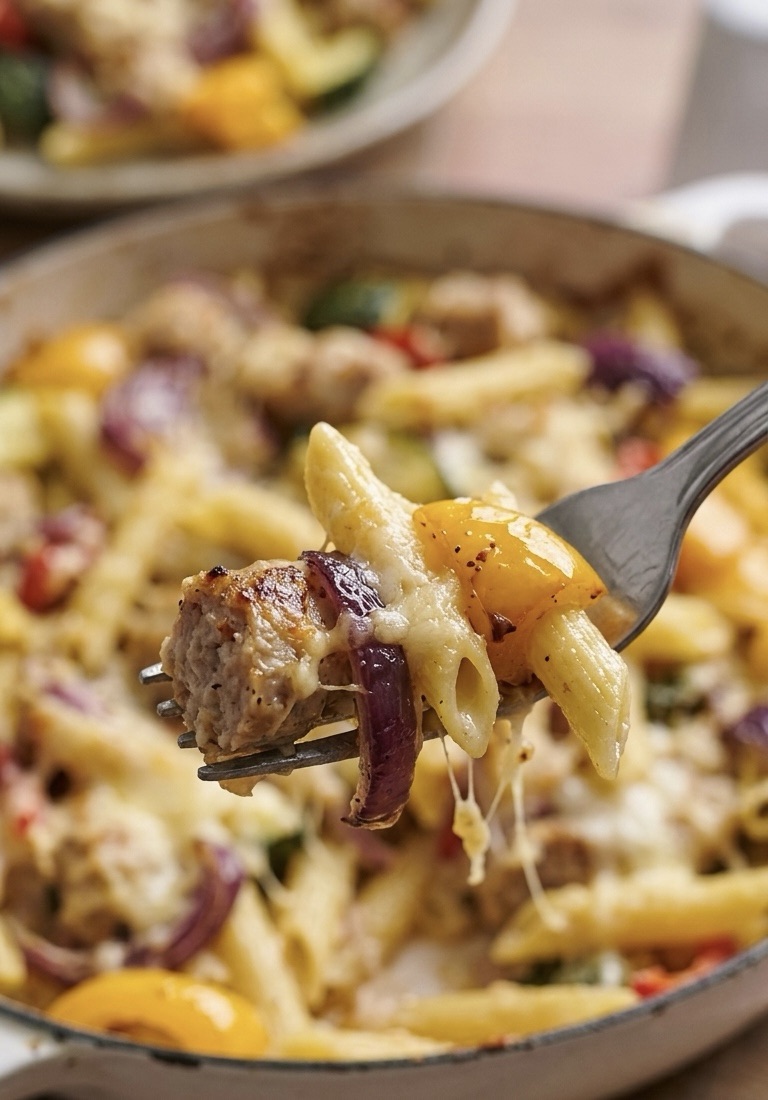
Let’s be honest: there’s nothing quite like a traybake to save a busy weeknight. I’ve been obsessed with this specific combo lately—it’s inspired by a classic recipe which is “ Pinterest-worthy” and made in my own kitchen.
The Secret is in the Sausage
If you want this dish to go from “standard midweek meal” to “gourmet comfort food,” don’t skimp on the sausages. I highly recommend using high meat content sausages (look for 85% meat or higher) from your local butcher or even more reasonable Lidl do some brilliant ones . Heck sausages are good too.
A proper Cumberland or a peppery Lincolnshire works beautifully here. Because we’re roasting them, cheaper sausages tend to shrink or release too much water; a high-quality banger stays juicy, holds its shape, and develops a gorgeous caramelised crust that flavours the entire tin.
The Double-Roast Technique
What makes this version a winner is the roasting process. Instead of just boiling everything, we’re roasting the peppers, courgettes, and red onions first to intensify their natural sweetness. Then, we toss in those chunky sausage pieces so they get lovely and browned while the veg finishes off.
While the oven is doing the heavy lifting, you just boil your penne until al dente, drain it, and then the magic happens. You toss the pasta directly into that hot roasting tin, letting it soak up the juices. Pour over the silky double cream, blanket the whole thing in a sharp, mature Cheddar, and give it one last blast in the oven.
The result? A colourful, quintessentially British “hug in a bowl” that looks like it took way more effort than it actually did.
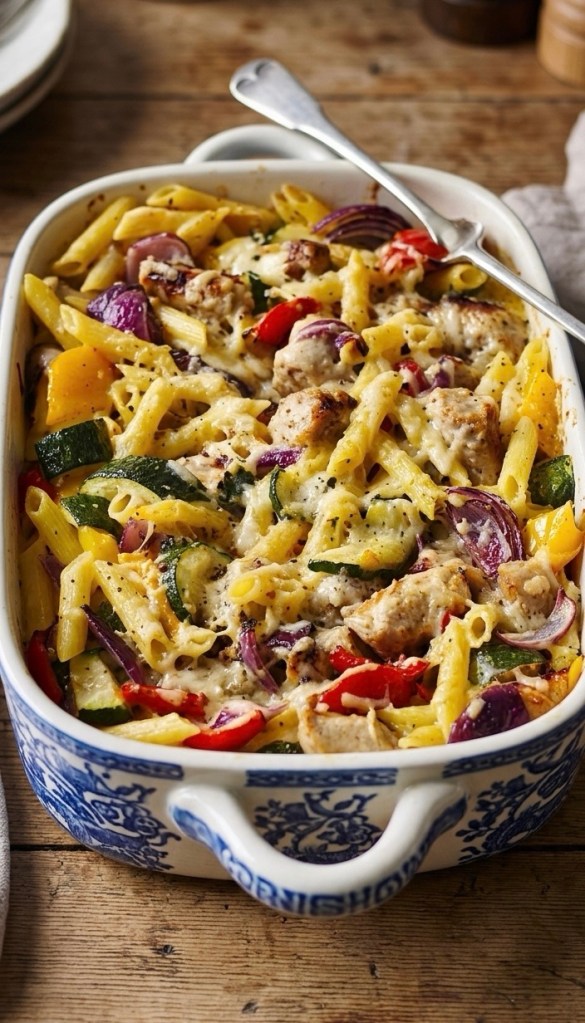
The Recipe & Method
Prep time: 15 mins | Cook time: 40 mins | Serves: 4
Ingredients
• The Stars: 6-8 high meat content sausages (Cumberland or Lincolnshire are top-tier choices), cut into thick, chunky coins.
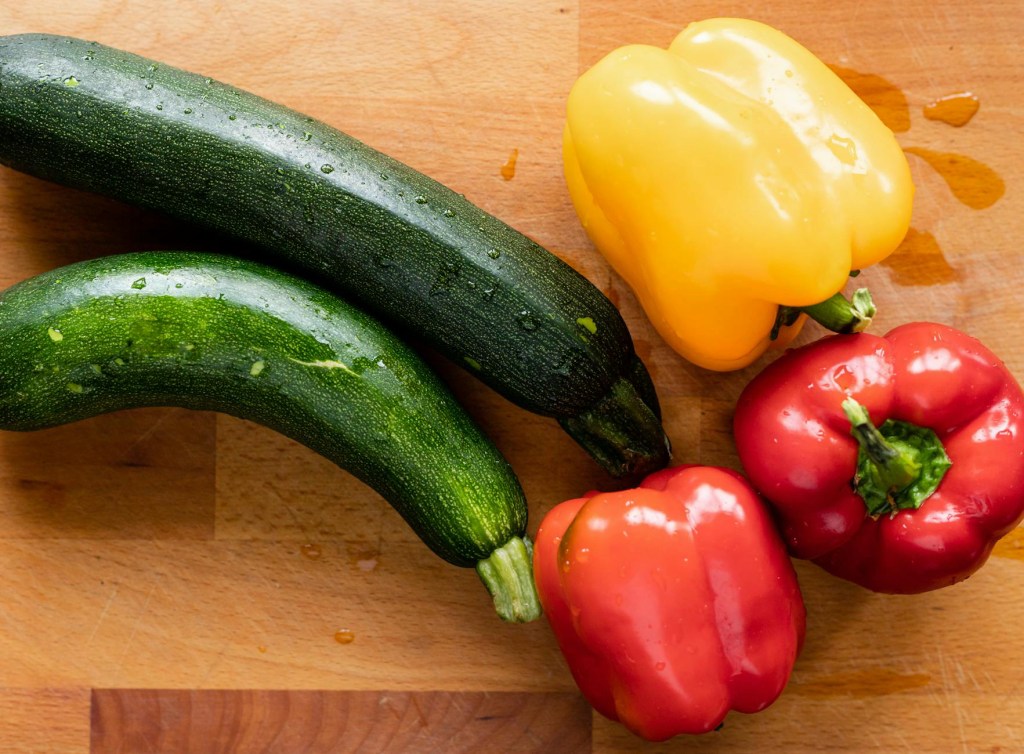
• The Veg: 1 large red onion (peeled and wedged), 1 large courgette (sliced into thick half-moons), and 2 mixed peppers (deseeded and chopped into 3cm chunks).
• The Pasta: 300g dried Penne pasta.
• The Sauce: 100ml Double cream (don’t use single, it’ll split!) and 1 tbsp olive oil.
• The Topping: 150g Mature Cheddar, freshly grated for the best melt.
• Seasoning: A generous pinch of sea salt and plenty of freshly ground black pepper.
Method
1. Prep the Heat: Crank your oven up to 220°C (200°C Fan / Gas 7). You want it hot so the veg roasts rather than steams.
2. The First Roast: Spread your chopped onion, peppers, and courgette in a large roasting tin. Drizzle with oil, season well, and toss. Roast for 10 minutes.
3. Sausage Time: Add your high-quality sausage chunks to the tin. Give it all a good stir to coat the sausages in those lovely veg juices. Roast for another 20 minutes until the sausages are golden-brown and cooked through.
4. Boil the Pasta: While the tin is sizzling, cook your penne in a large pan of salted boiling water for 10–12 minutes. You want it tender but with a slight bite. Drain well.
5. The Big Mix: Tip the drained pasta into the roasting tin. Pour over the double cream and toss everything together until every tube of pasta is glistening.
6. The Grand Finale: Scatter the grated Cheddar over the top. Return to the oven for a final 4–5 minutes until the cheese is bubbling, golden, and starting to brown at the edges.
Serve it straight from the dish with a side of garlic bread or a simple rocket salad. Perfect!
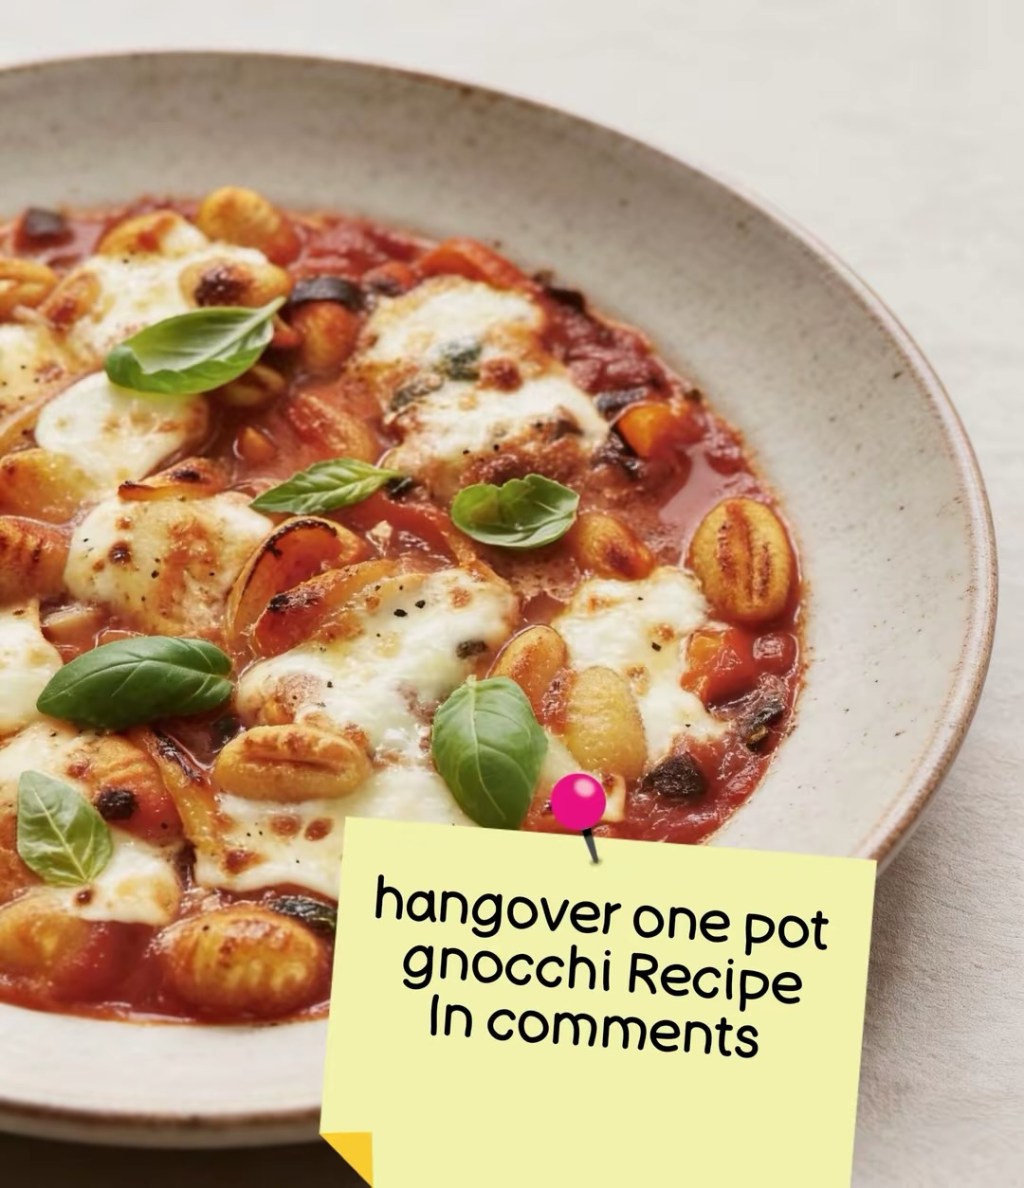
We’ve all been there. The sun is shining a little too brightly through the curtains, your head is doing a passable impression of a techno festival, and your stomach is demanding immediate attention. You need food, you need comfort, and you absolutely cannot deal with a sink full of dishes.
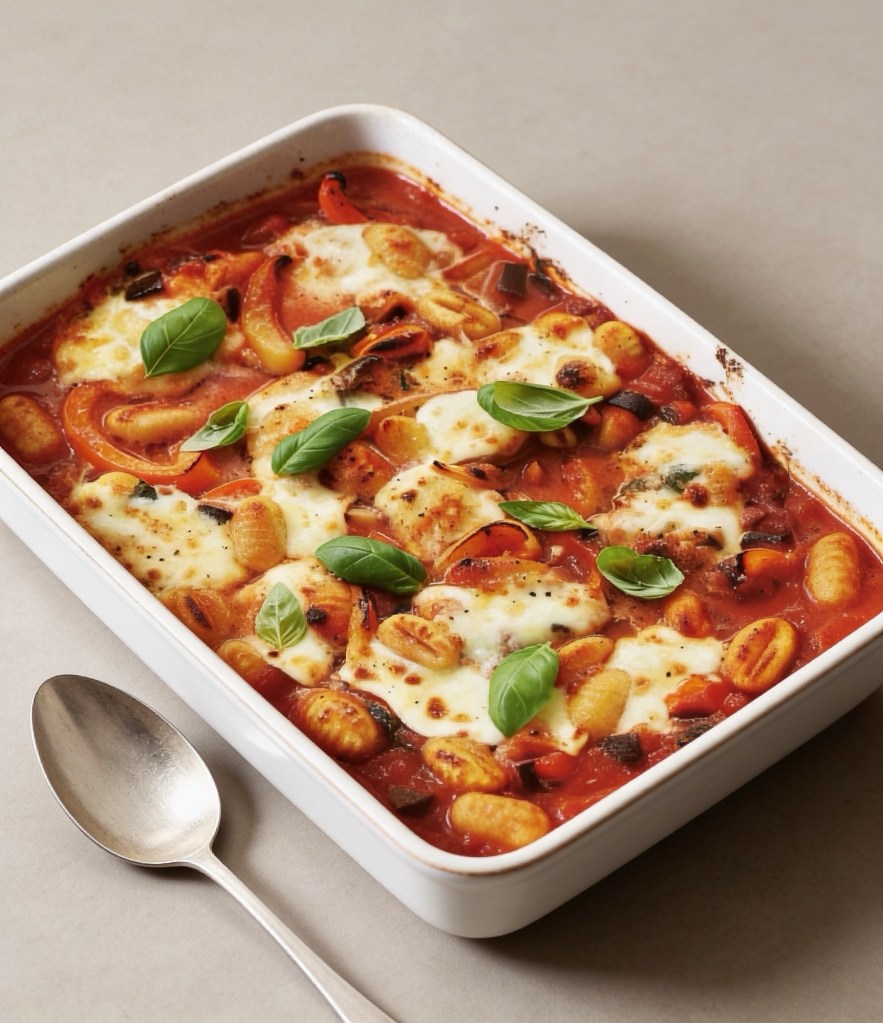
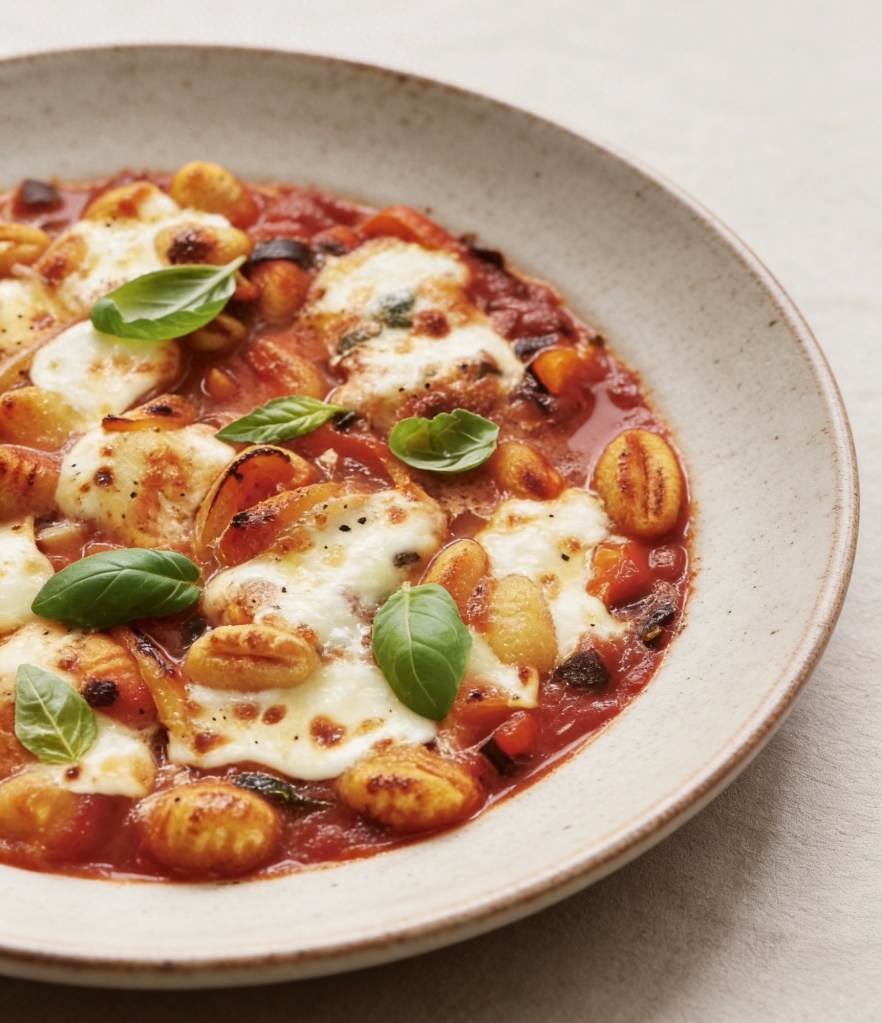
Enter the holy grail of hangover food: the One-Pot Cheesy Gnocchi Bake.
Why This is the Ultimate Hangover Cure
When you’re hurting, your body is crying out for a few specific things, and this recipe hits every single one of them:
• The Ultimate Carb Blanket: Gnocchi is pure, pillowy comfort. Unlike heavy pasta that requires waiting for a massive pot of water to boil (who has the patience?), gnocchi cooks right in the sauce. It provides the fast-acting carbohydrates your brain is begging for to restore your crashing blood sugar.
• Hydration & Electrolytes: Alcohol dehydrates you, stripping your body of essential salts. The rich tomato passata and veggie stock pot in this recipe act like a delicious, savory electrolyte drink, helping your body retain moisture and kickstarting your recovery.
• The Magic of Melted Cheese: Let’s be honest, science aside, melted mozzarella is good for the soul. The fats in the cheese help line your stomach and trigger those happy endorphins to battle the “hangover anxiety.”
• Minimal Effort, Maximum Reward: It’s a one-pot wonder. You chop a few veggies, dump everything into a casserole dish, cover it in cheese, and let the oven do the heavy lifting while you lie on the couch.
Ingredients & Method
Here is exactly how to pull this together when you’re operating on 10% brain power.
Step-by-Step
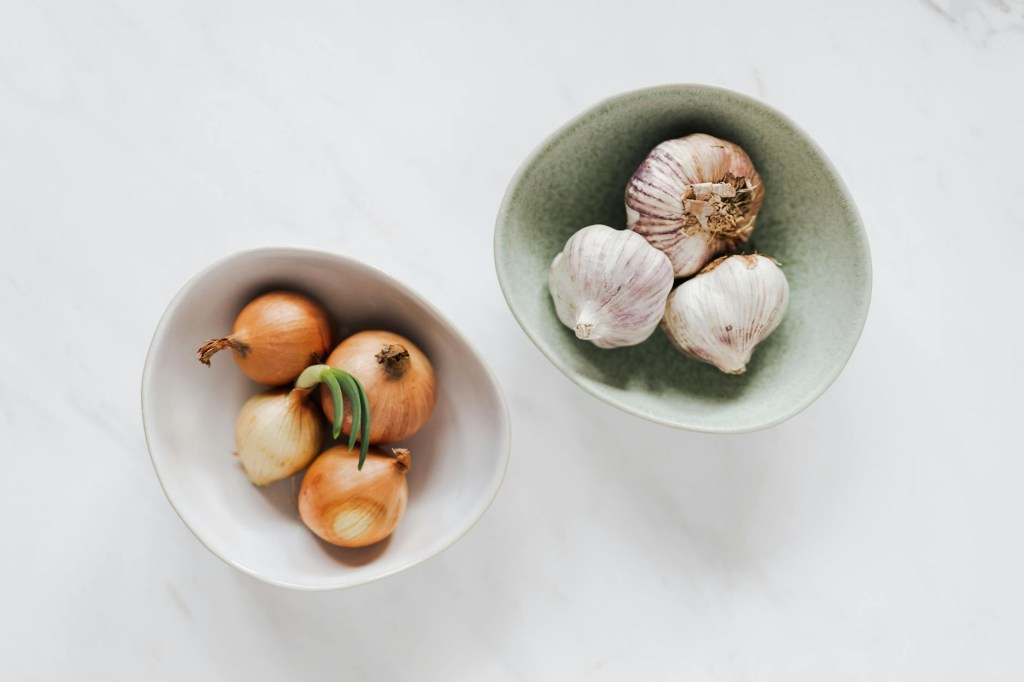
1. Get the base going: Heat a splash of olive oil in a heavy-based, ovenproof casserole dish. Toss in your chopped onion and garlic. Let them cook over a medium heat for about 6-8 minutes until they’re soft and fragrant.
2. Add the bulk: Stir in your chopped aubergine and let it cook for another 10 minutes. Give it an occasional stir—nothing too strenuous.
3. Preheat and level up: Crank your oven to 220°C/200°C fan/gas 7. Stir the chopped peppers and a handful of torn basil into the pan, letting them cook for 5 more minutes.
4. Make the sauce: Dissolve your stock pot in 200ml of boiling water. Pour that into the pan along with the passata. Give it all a really good stir.
5. The best part: Stir the gnocchi straight into the sauce (yes, raw!). Tear up your mozzarella and scatter it generously over the top.
6. Bake and relax: Pop the whole dish into the oven for 15-20 minutes. You’re looking for a bubbling sauce and a gorgeous, golden, melted cheese crust.
Scatter a few fresh basil leaves over the top to make it look pretty, grab a bowl, and go melt into the sofa. You’ve earned this.
What’s your go-to drink to pair with a hangover meal like this—are you team ice-cold cola or team extra-spicy Bloody Mary?
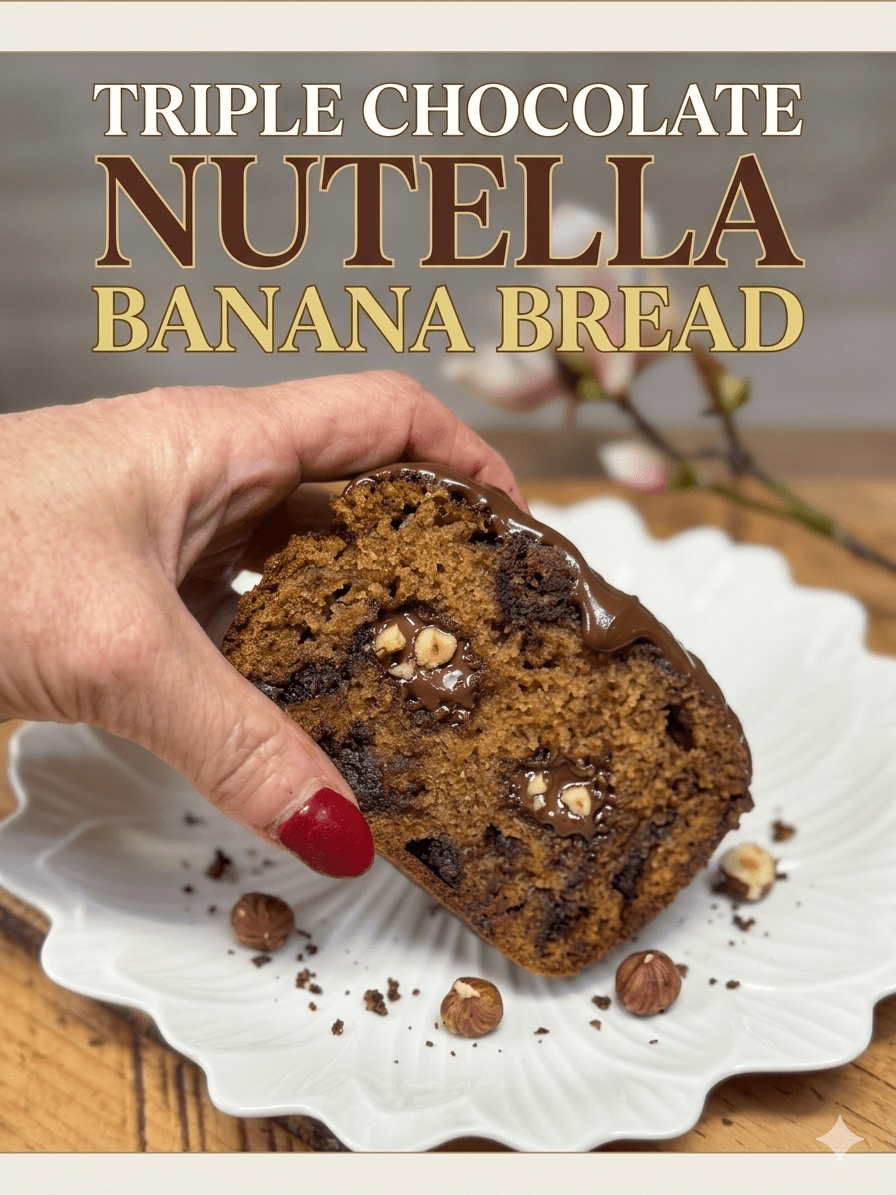
There are some bakes that feel less like recipes and more like little love letters to your past self, and this banana, Nutella and triple‑chocolate loaf is absolutely one of them.
It started, as these things so often do, with a bowl of sad, freckled bananas on the counter giving me the side‑eye. You know the ones: too far gone for toast, too soft for slicing, but absolutely perfect for baking. So into the bowl they went, all mashed up with melted butter, soft brown sugar and a bit of caster sugar until everything turned into that gorgeous, glossy, caramel‑smelling batter. I make banana bread every week for my dad as it’s his favourite but I thought I’d give him a bit of variation. And then I got a bit carried away. First came the Nutella. Now, Nutella is a bit of a… contraband item in this house. When the girls were younger, it was more or less banned – not because of the sugar, but because they had an absolutely terrible habit of leaving sticky Nutella spoons all over the kitchen. Honestly, I’d find them on the worktops, next to the sink, abandoned on plates – little chocolatey crime scenes everywhere. For my own sanity, the jar quietly disappeared for a few years. This time, I had to smuggle it back in like some sort of undercover snack dealer. Jar tucked discreetly into the shopping, no announcements made, straight into the cupboard before anyone could clock it and start reliving their spoon‑licking glory days.
Once I’d recovered from my secret mission, it was time to turn those bananas into something special.
Ingredients
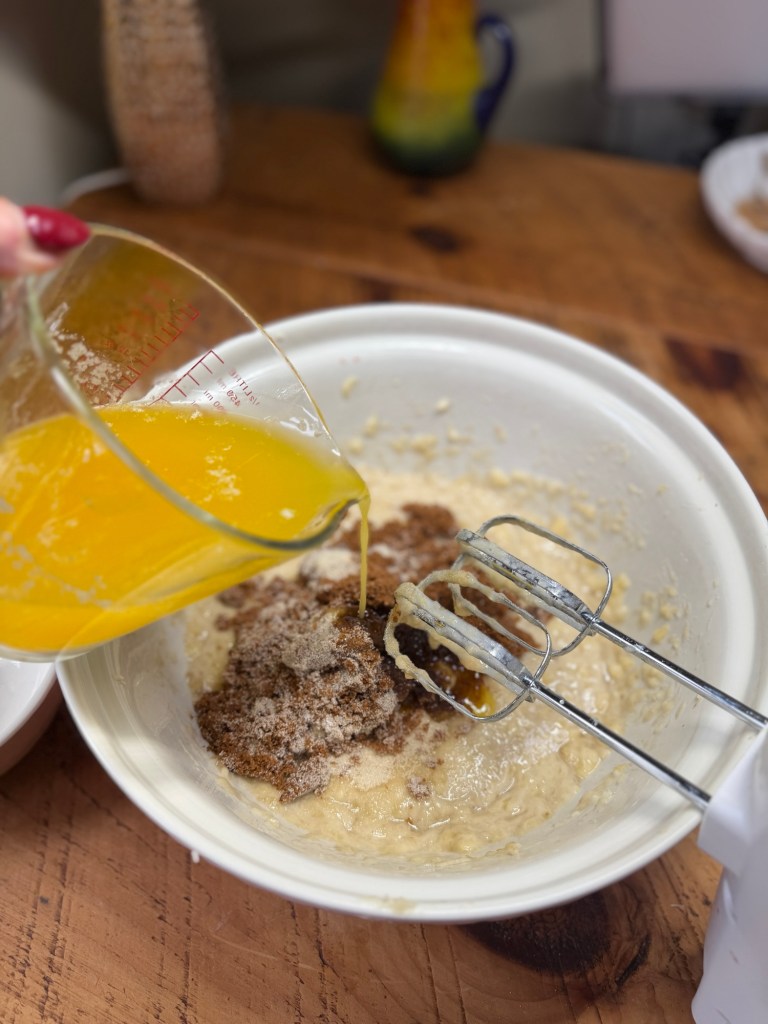
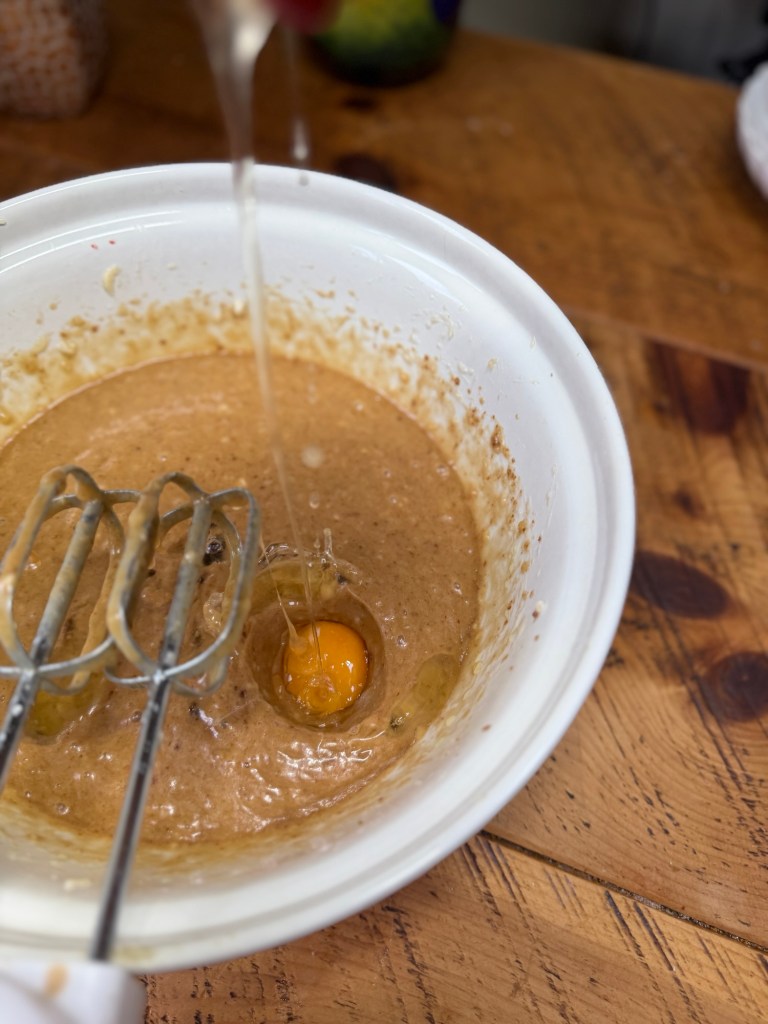
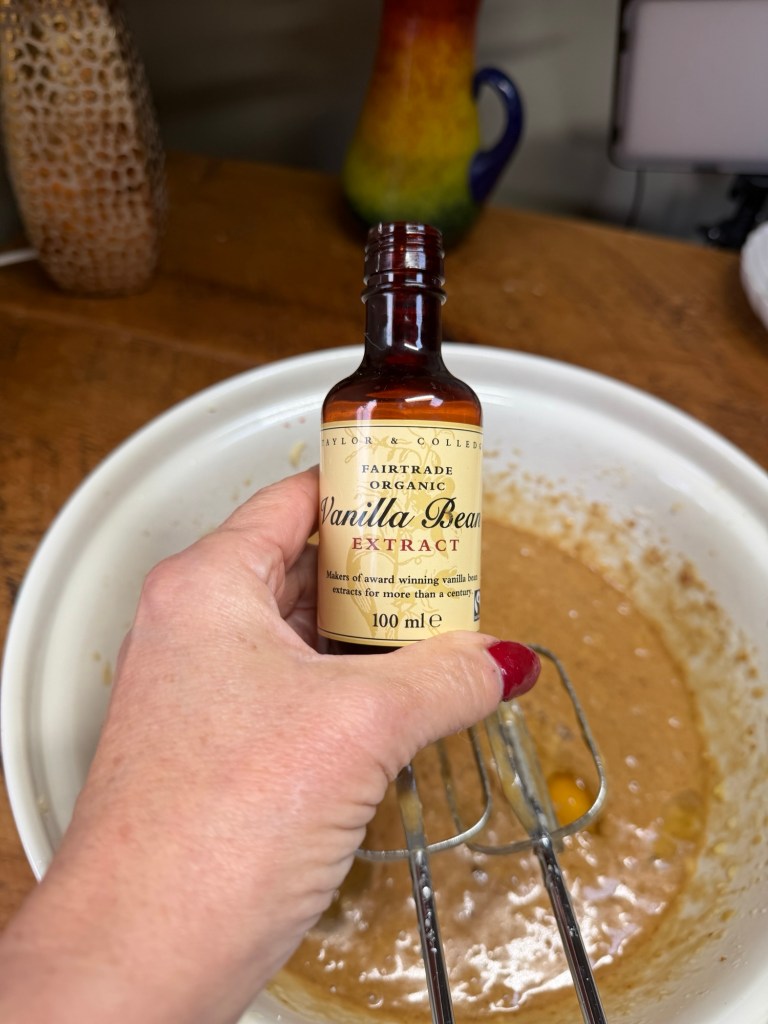
For one standard 2lb loaf tin: • 100 g soft light brown sugar • 50 g caster sugar • 115 g unsalted butter, melted and slightly cooled • 2 medium eggs • 1 teaspoon vanilla extract • 350–375 g mashed very ripe bananas (about 4–5 medium bananas) • 250 g plain flour • 1 teaspoon fine salt • 1 teaspoon bicarbonate of soda • 120 g Nutella (or chocolate hazelnut spread), gently warmed so it’s pourable • 100 g white chocolate chunks
. 100g of dark chocolate chunks
Method
Prep the tin and oven • Heat the oven to 180°C (160°C fan). • Grease and line a 2lb loaf tin with baking paper, letting the paper overhang slightly so you can lift the loaf out later. • Set aside while you get on with the wet ingredients.
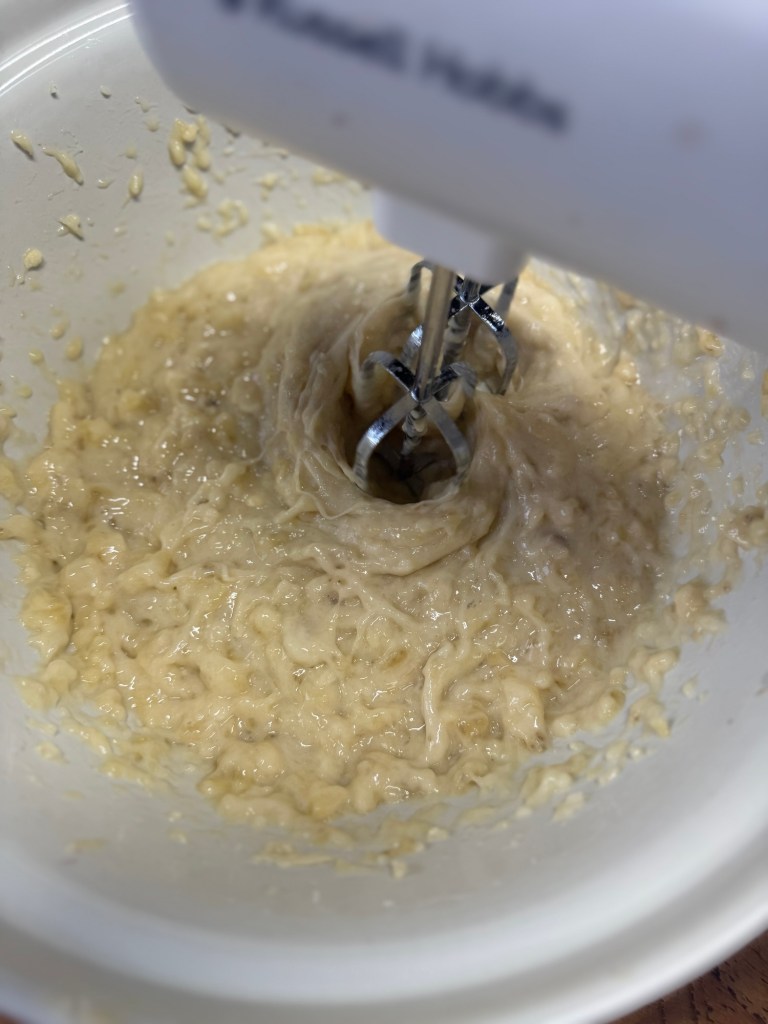
Make the banana mixture • In a large mixing bowl, whisk the bananas until they are soft
then add the melted, slightly cooled butter with the soft brown sugar and caster sugar until well combined and a bit glossy.
• Add the eggs and vanilla extract, whisking until the mixture looks smooth and a little lighter.
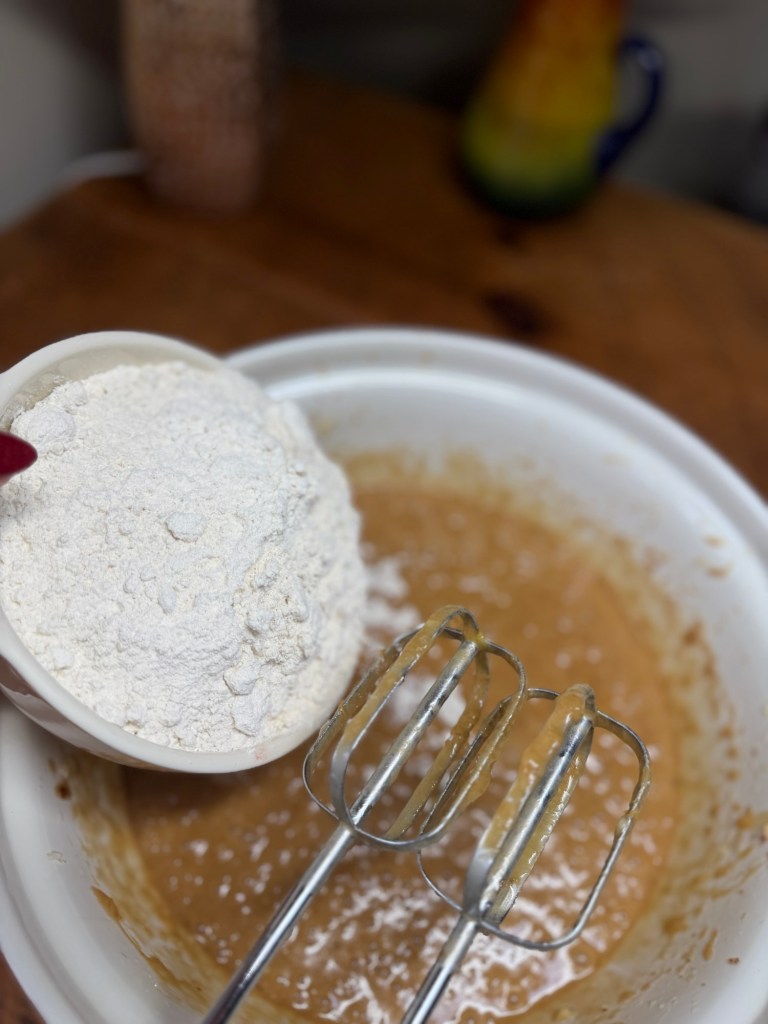
Add the dry ingredients – plain flour, salt and bicarbonate of soda very ripe bananas and stir them into the bowl until everything is well combined.
Fold in the dry ingredients until you can’t see any streaks of dry flour. Try not to overmix so you keep the loaf nice and soft.
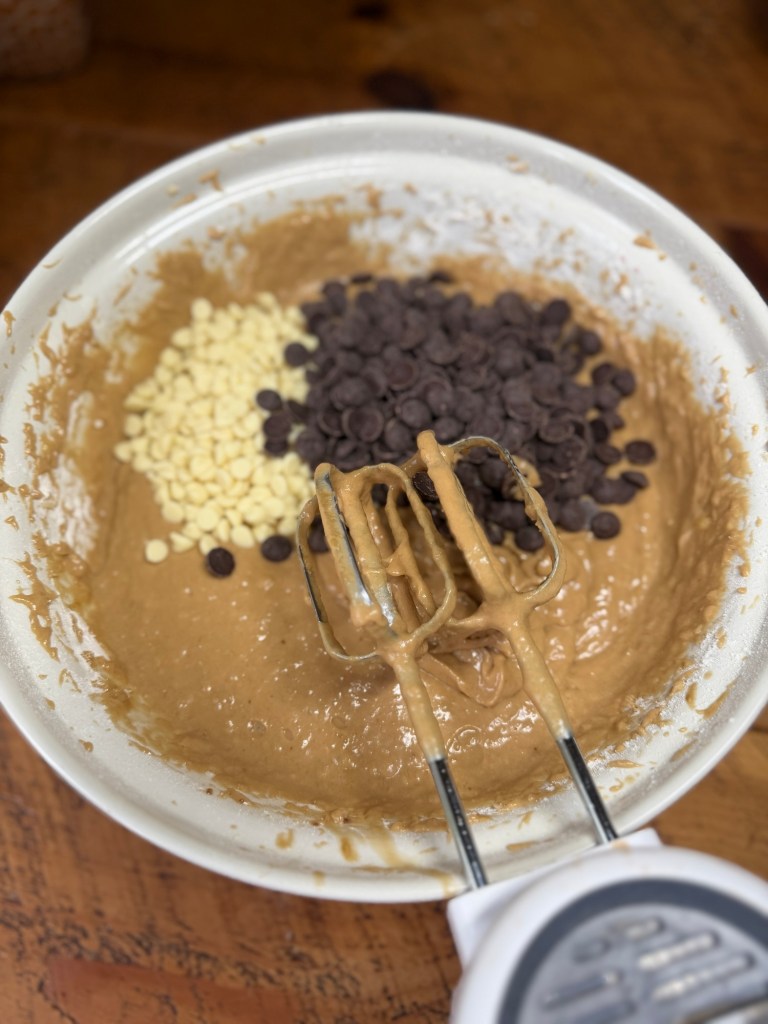
Add the chocolate chunks • Sprinkle in the white chocolate chunks and dark chocolate chunks.
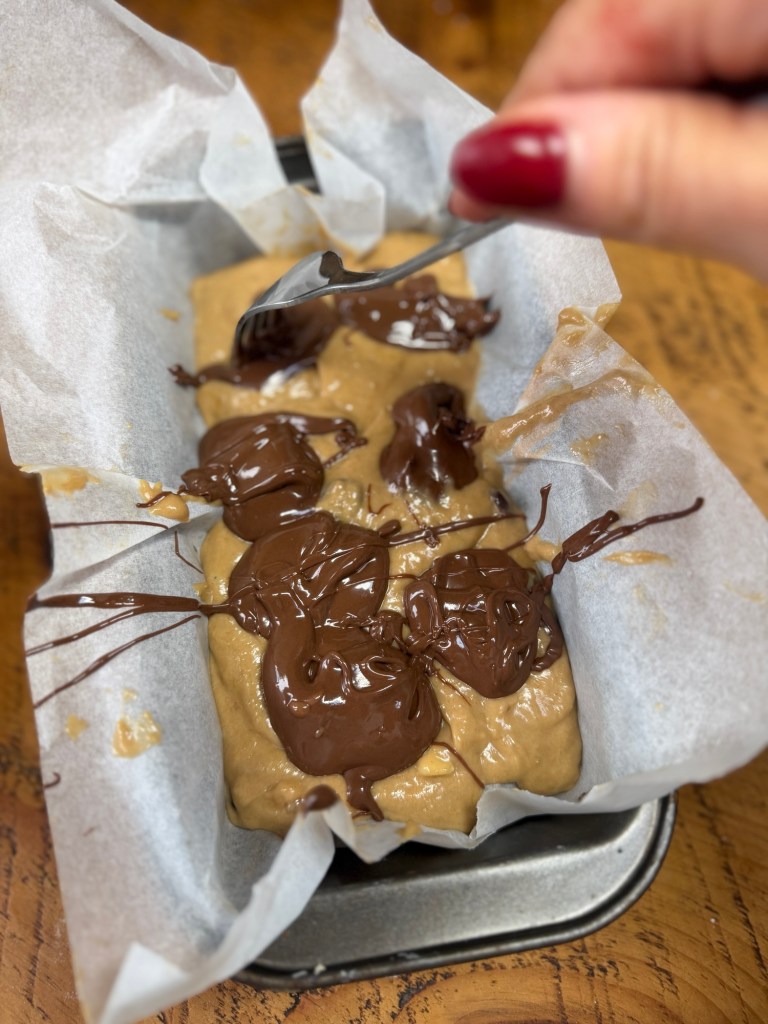
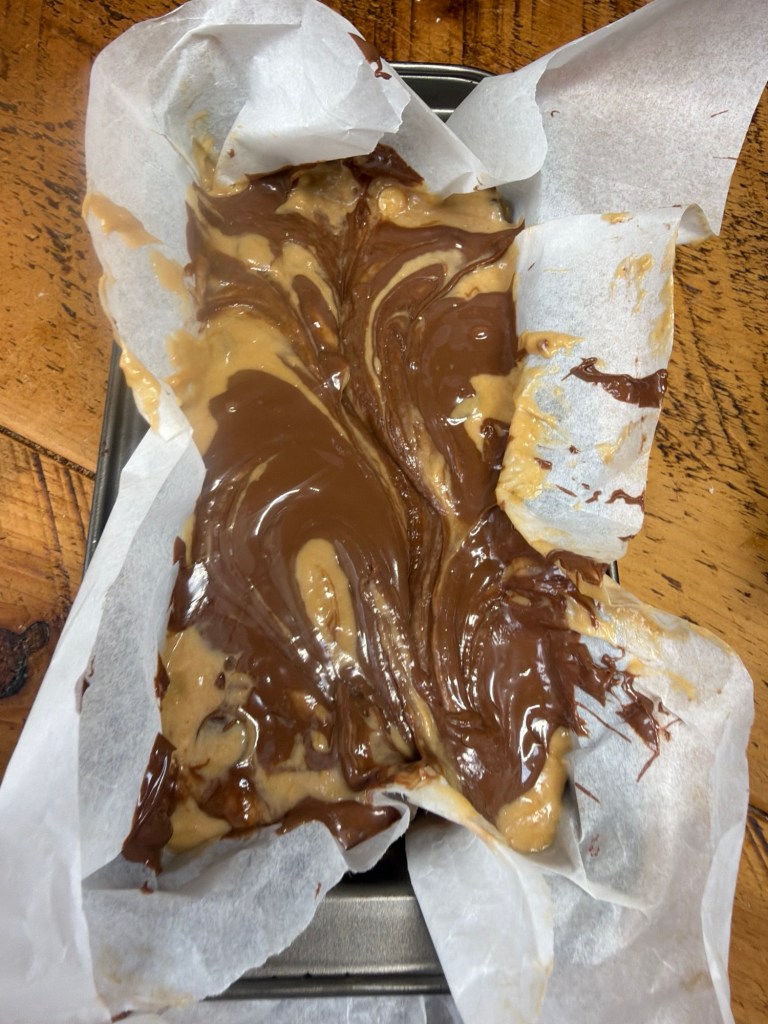
• Fold them through the batter so they’re evenly distributed, ready to melt into little pockets of joy as the loaf bakes • Pour the banana batter into your prepared loaf tin and smooth the top. • Warm the Nutella very gently (a few seconds in the microwave or sit the jar in a bowl of hot water) so it loosens and becomes pourable.
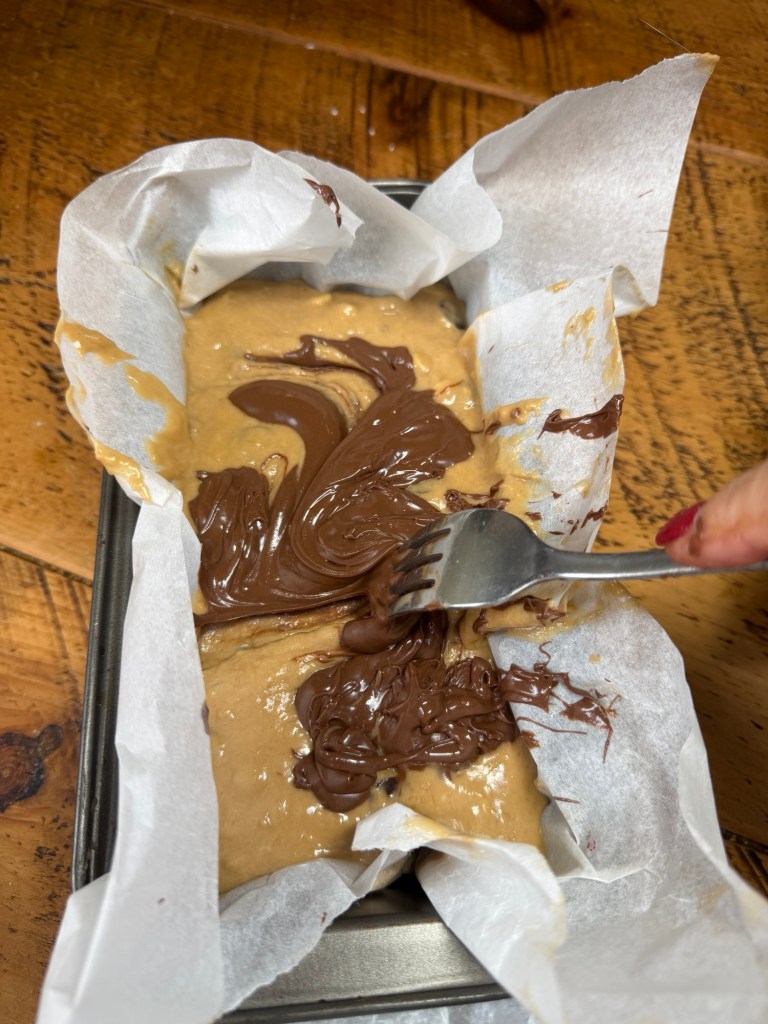
• Dollop or drizzle the Nutella over the top of the batter, then use a knife or skewer to swirl it through, creating ribbons of hazelnut chocolate.
No need for perfection here – messy swirls taste just as good.
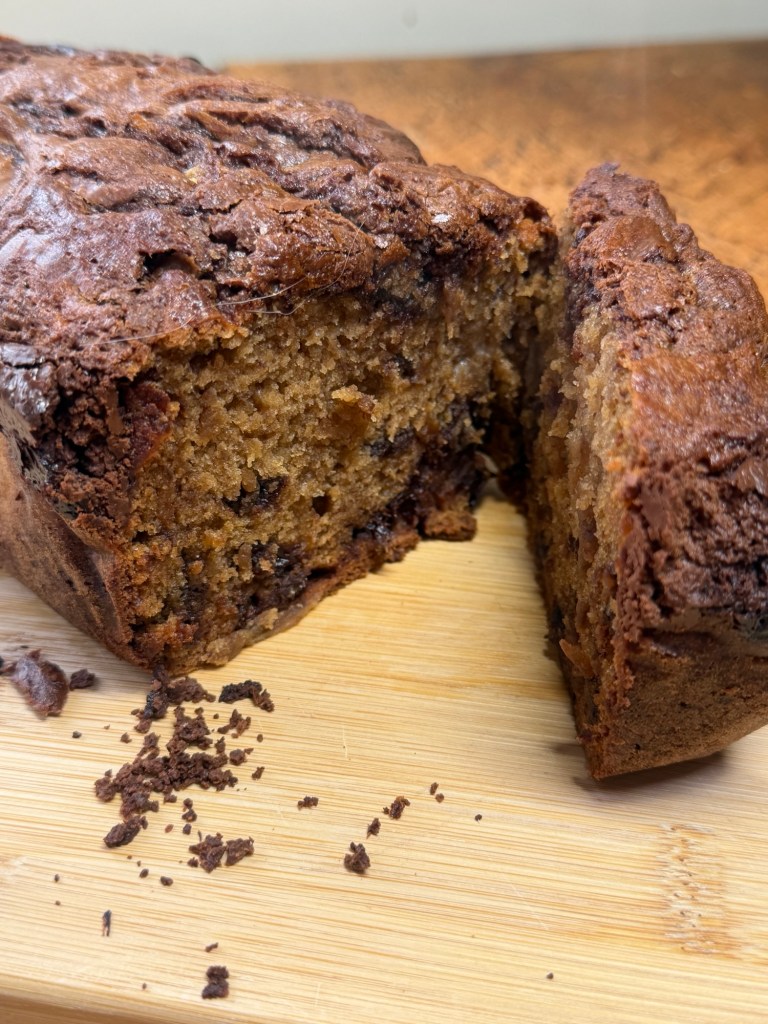
Bake • Pop the tin into the oven and bake for about 55–65 minutes, or until the loaf is risen, golden, and a skewer inserted into the centre comes out mostly clean, with just a few moist crumbs (avoid a big melted chocolate pocket when you test). • If the top is browning too quickly, loosely cover with foil for the last 10–15 minutes.
Cool (as much as you can bear) • Leave the loaf to cool in the tin for about 15 minutes, then lift it out onto a wire rack.
• You can let it cool completely… or do what we do and cut the first slices while it’s still just warm, when the chocolate is soft and the Nutella ripples are extra gooey.
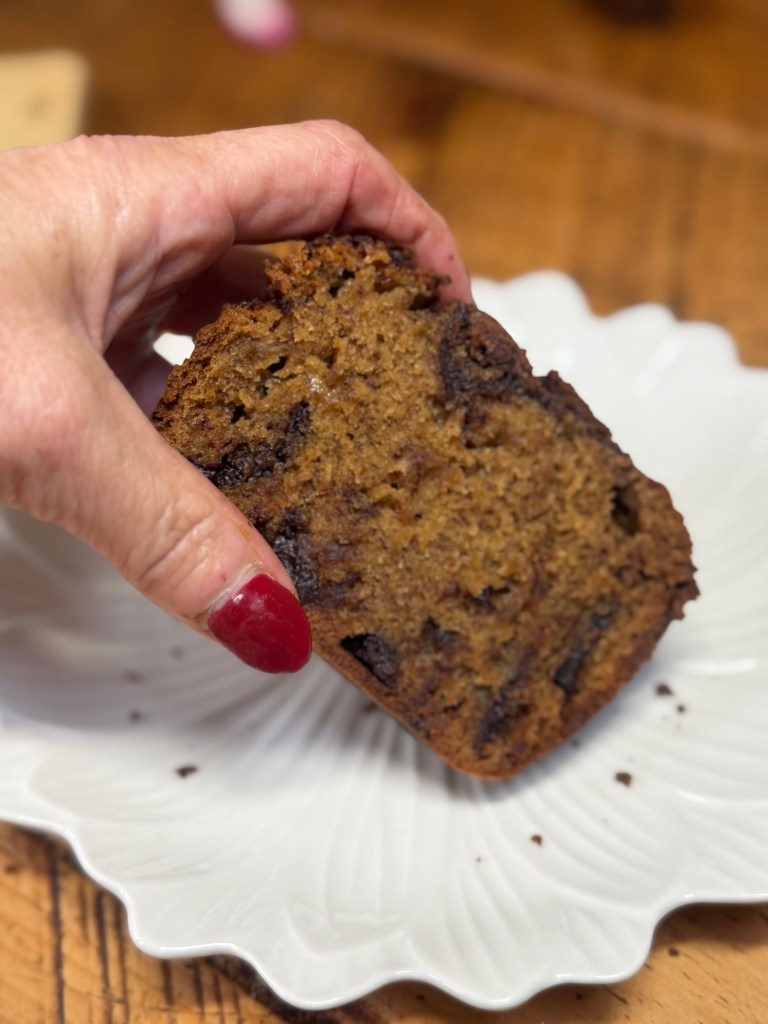
Every slice is a little bit of everything: soft, banana‑rich crumb, sweet white chocolate, deep dark chocolate and those cheeky streaks of Nutella that still feel ever so slightly naughty after its years-long ban. The funniest part is serving it now. No banned jars, no drama, no trail of sticky spoons (yet!) – just the girls eyeing up the tin and asking, “Is there Nutella in this?” with that look that tells me they know exactly what I’ve smuggled back into the house. Have you tried this recipe or any other suggestions for different types of banana bread ? Let me know in the comments.
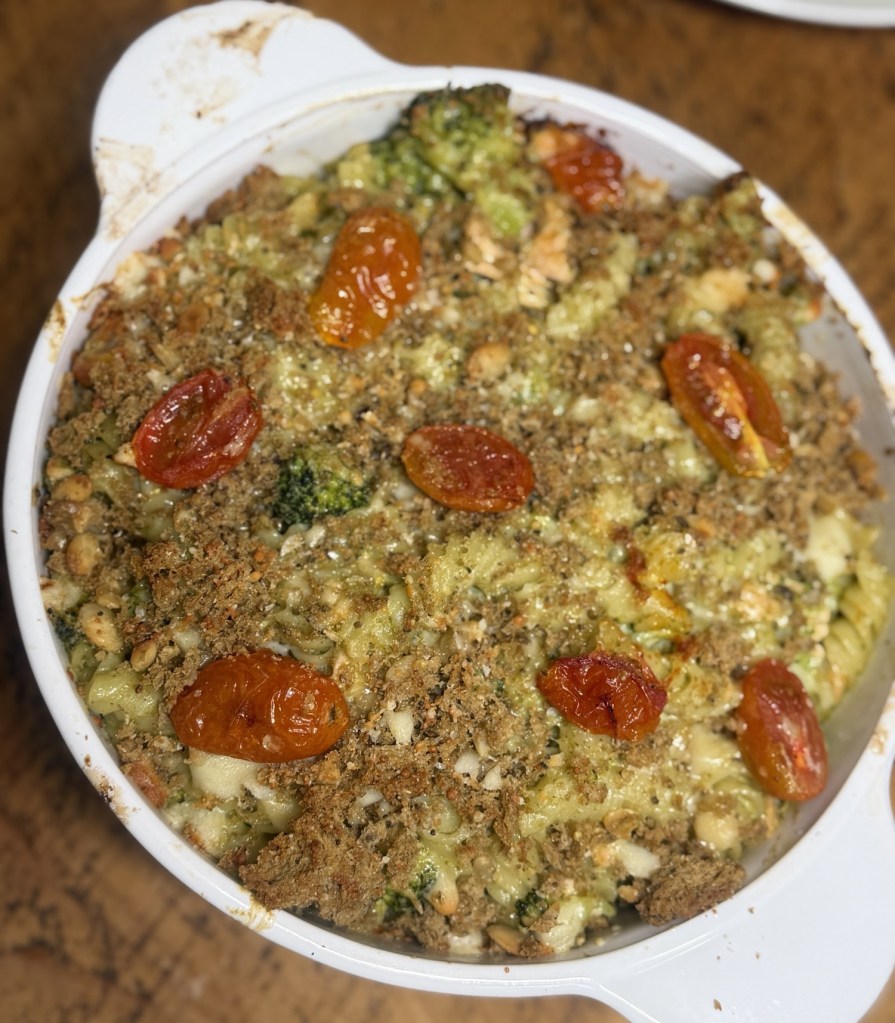
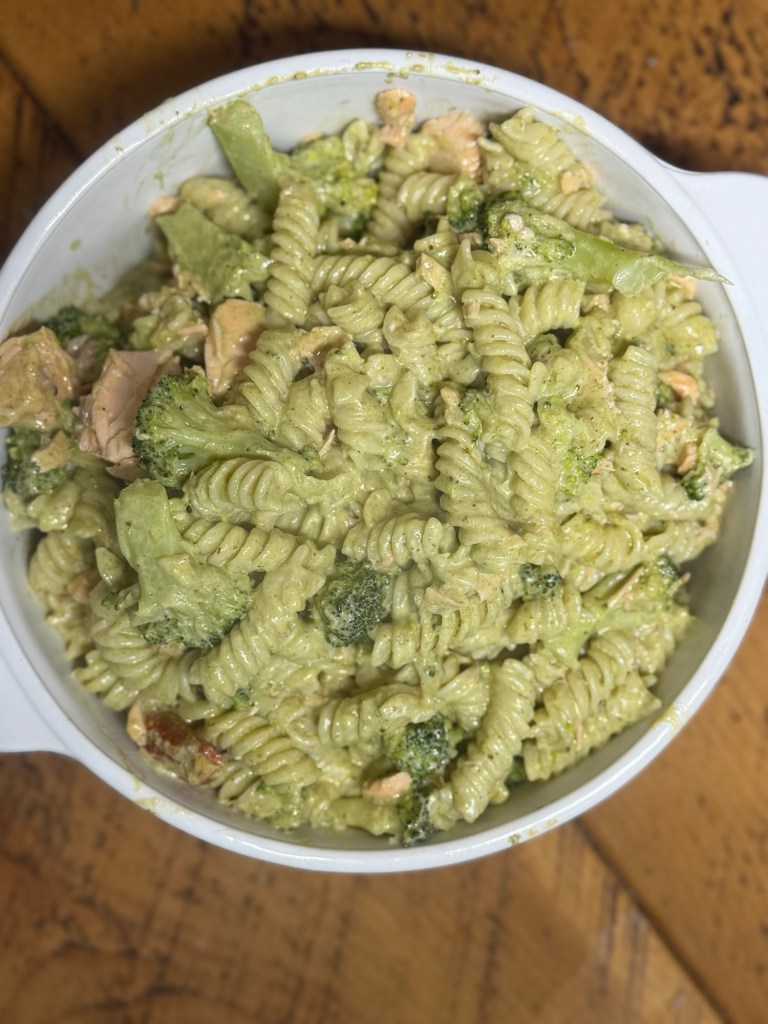
This is one of those dinners that just feels right at the end of a long day. It’s warm, creamy, full of flavour, and looks like you’ve made a real effort… even though it’s actually very simple to throw together.
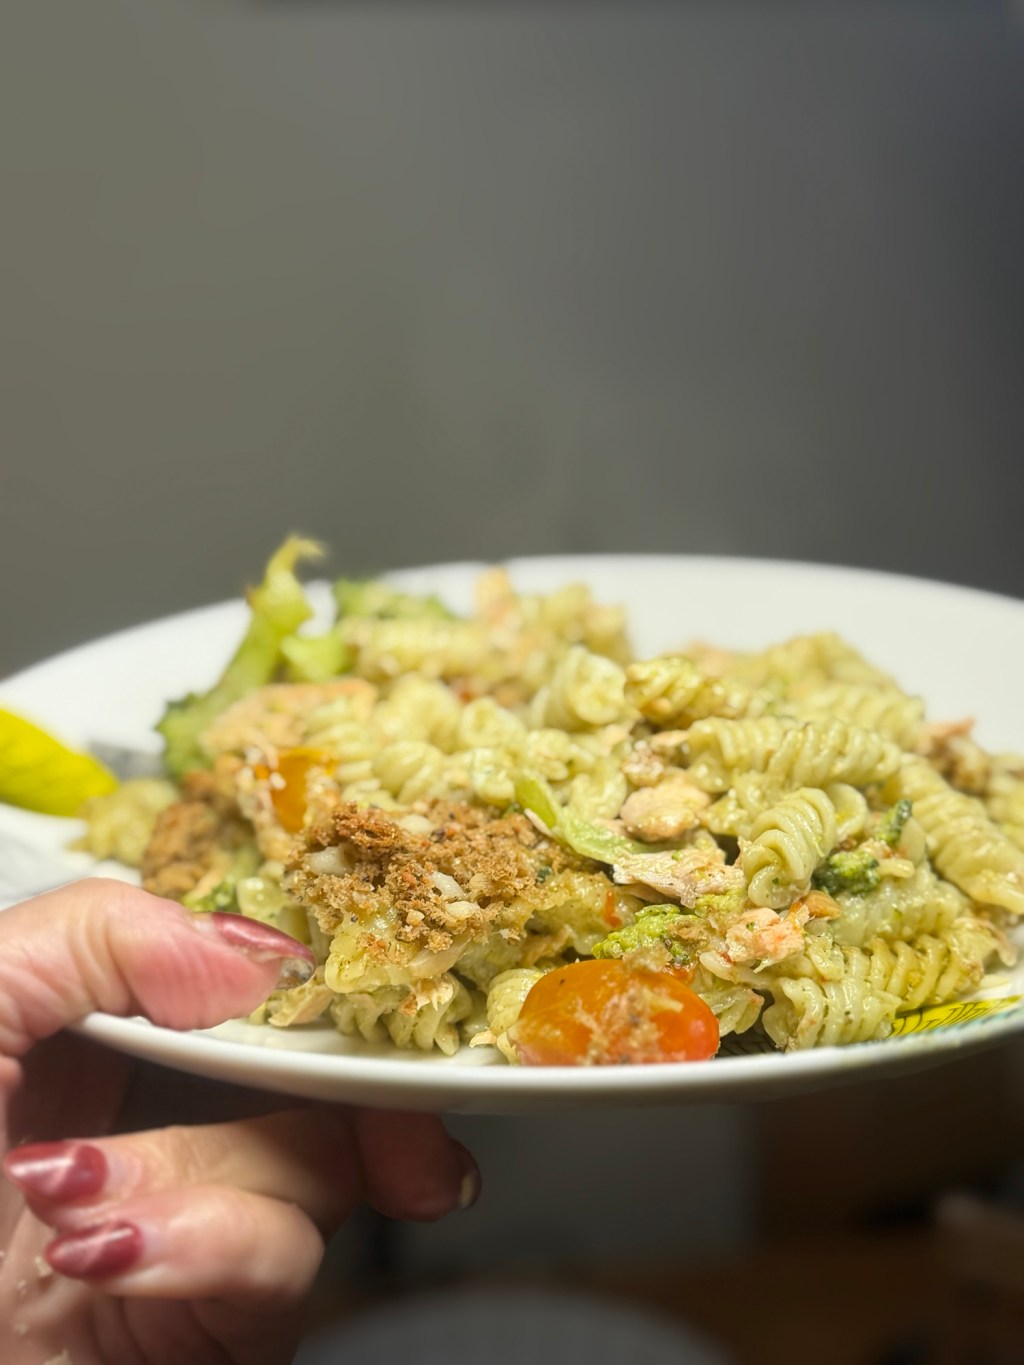
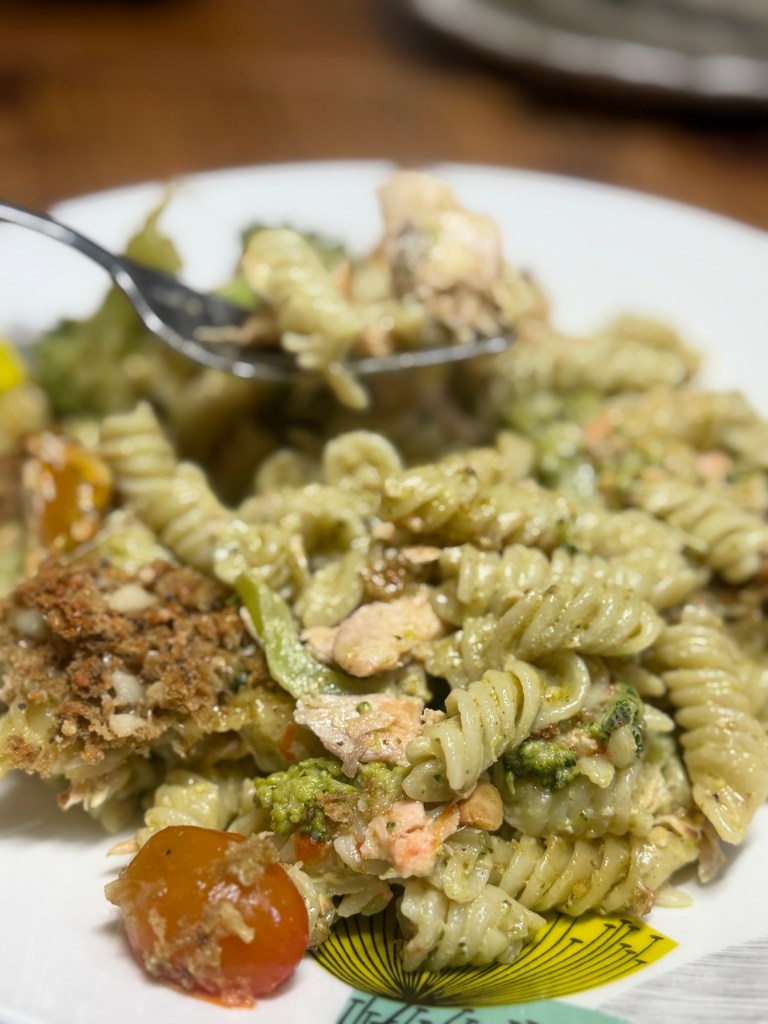
This pesto salmon pasta bake has quickly become a favourite in our house. You’ve got flaky salmon, sweet roasted tomatoes, and a rich, creamy pesto sauce all wrapped up with pasta and topped with that golden, crispy finish. It’s the kind of meal that disappears quickly and gets requested again the next week.
What I love most is how versatile it is. It’s perfect for a relaxed evening at home, but it’s also lovely enough to put in the middle of the table if you’ve got people coming round. And if you like to get ahead, you can prep it earlier in the day and just pop it in the oven when you’re ready.
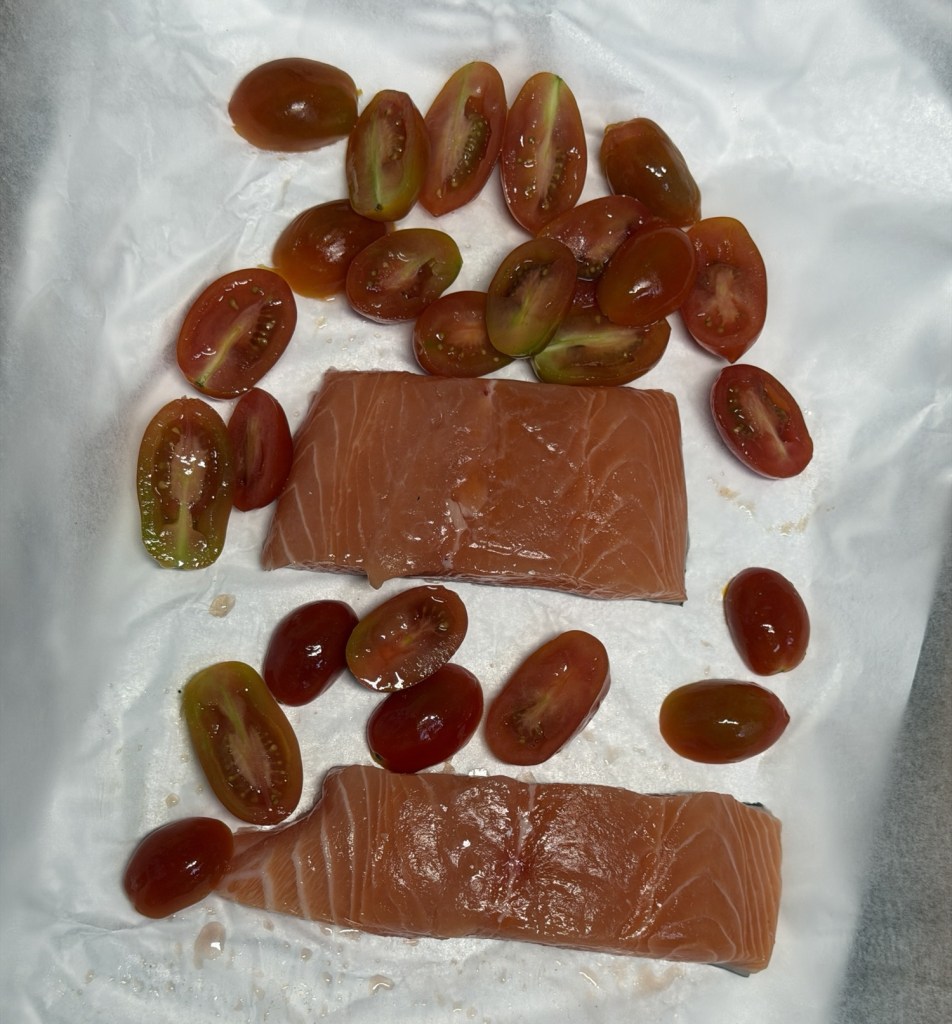
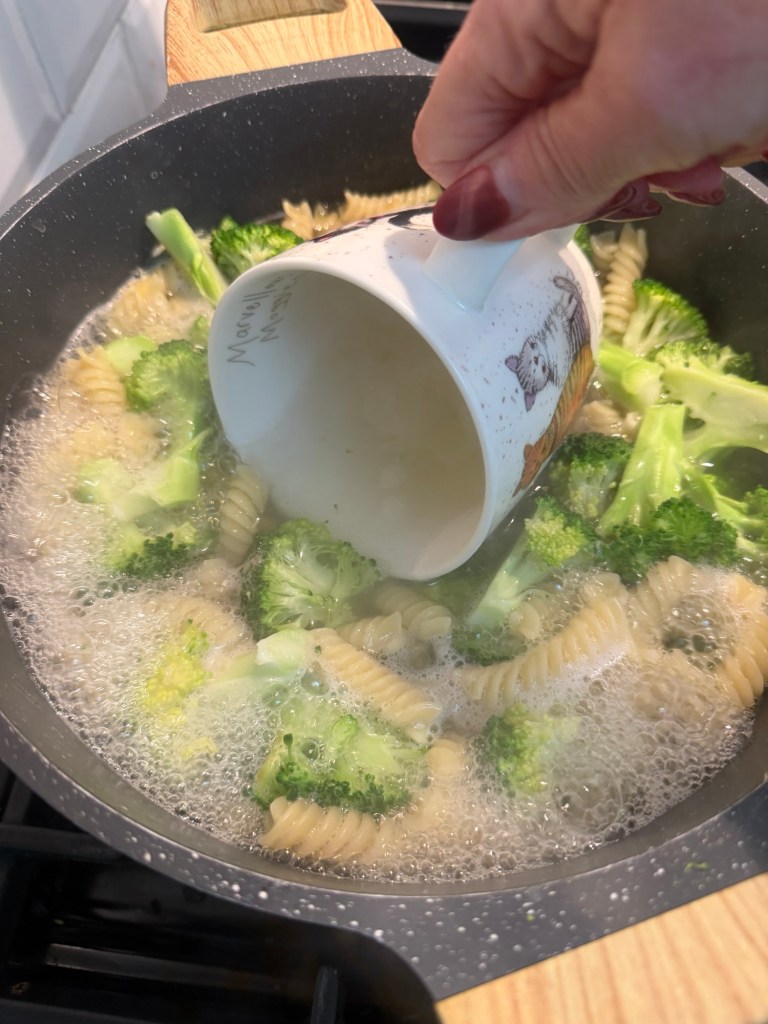
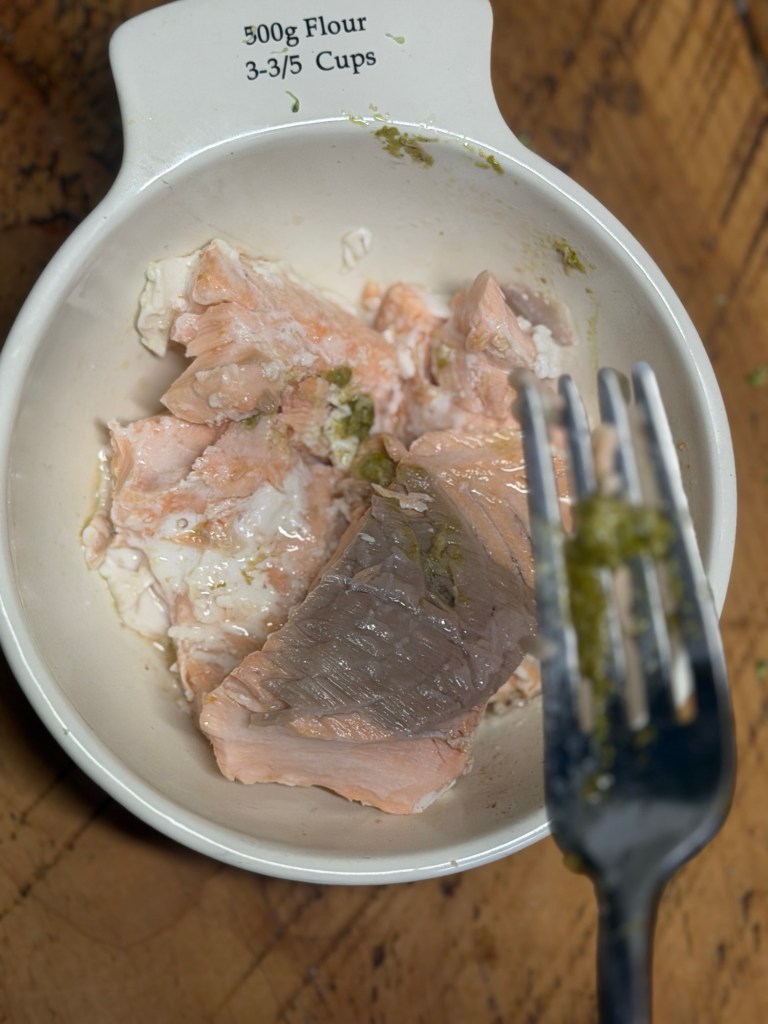
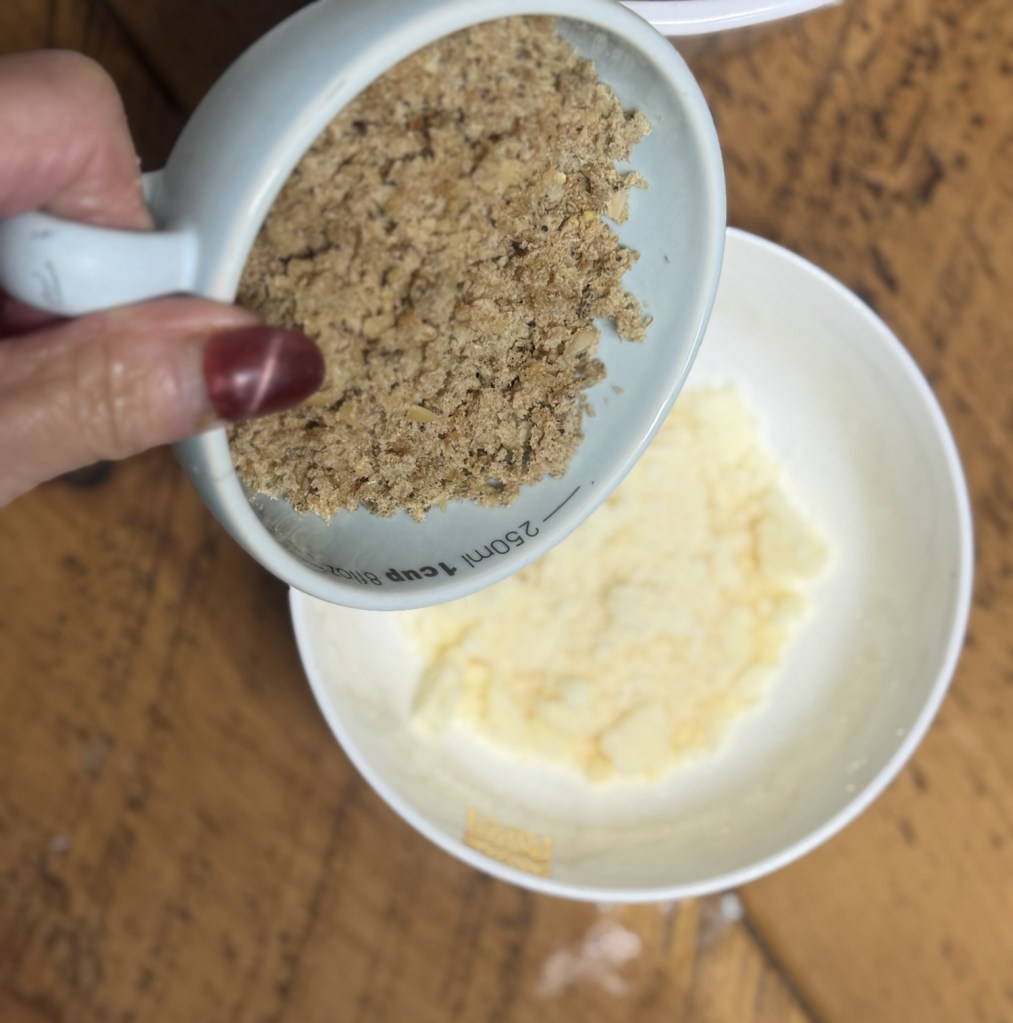
Ingredients • 150g cherry tomatoes, halved or sliced • 2 salmon fillets (about 260g) • 2 tbsp olive oil • 350g penne • 1 small broccoli (about 300g), cut into small florets • 150g pesto • 250g mascarpone • 50g breadcrumbs • 20g grated parmesan Method Start by preheating your oven to 160c . Arrange the cherry tomatoes and salmon fillets on a baking tray on foil season well, and drizzle over half of the olive oil.
Bake for around 15/20 minutes, until the salmon is cooked through and the tomatoes are soft and juicy. Set aside to cool slightly.
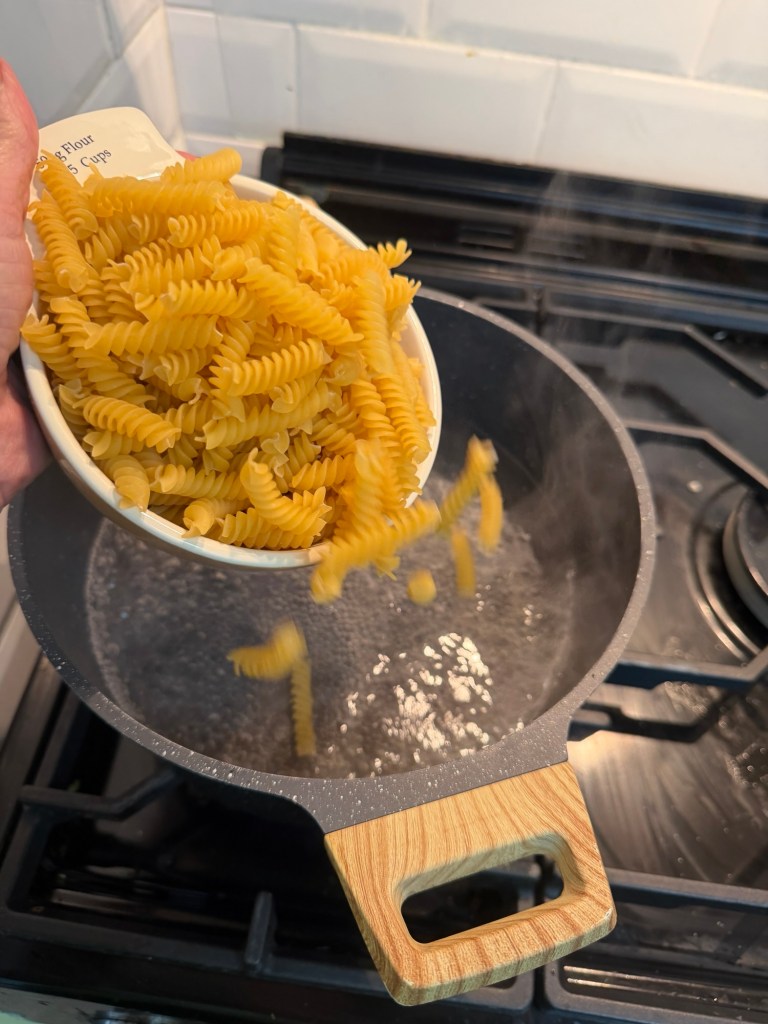
Meanwhile, cook the penne according to the packet instructions until al dente.
Add the broccoli for the final 2 minutes so it cooks through but still keeps a bit of texture.
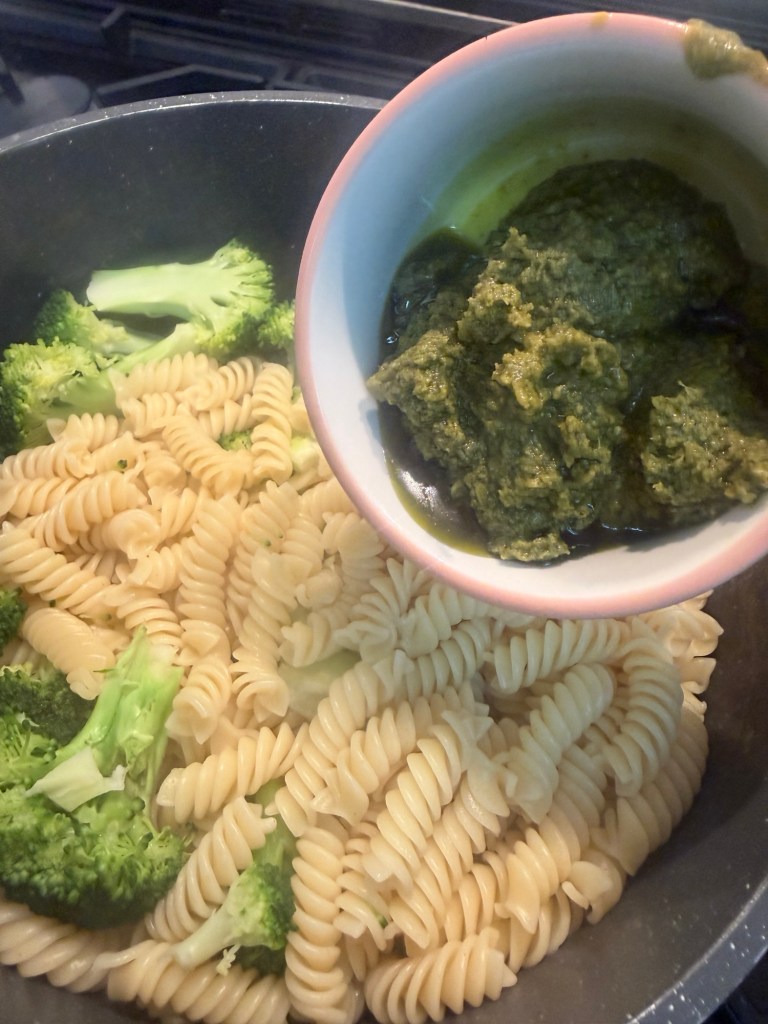
Before draining, scoop out a large mug of the pasta water—this makes all the difference to your sauce.
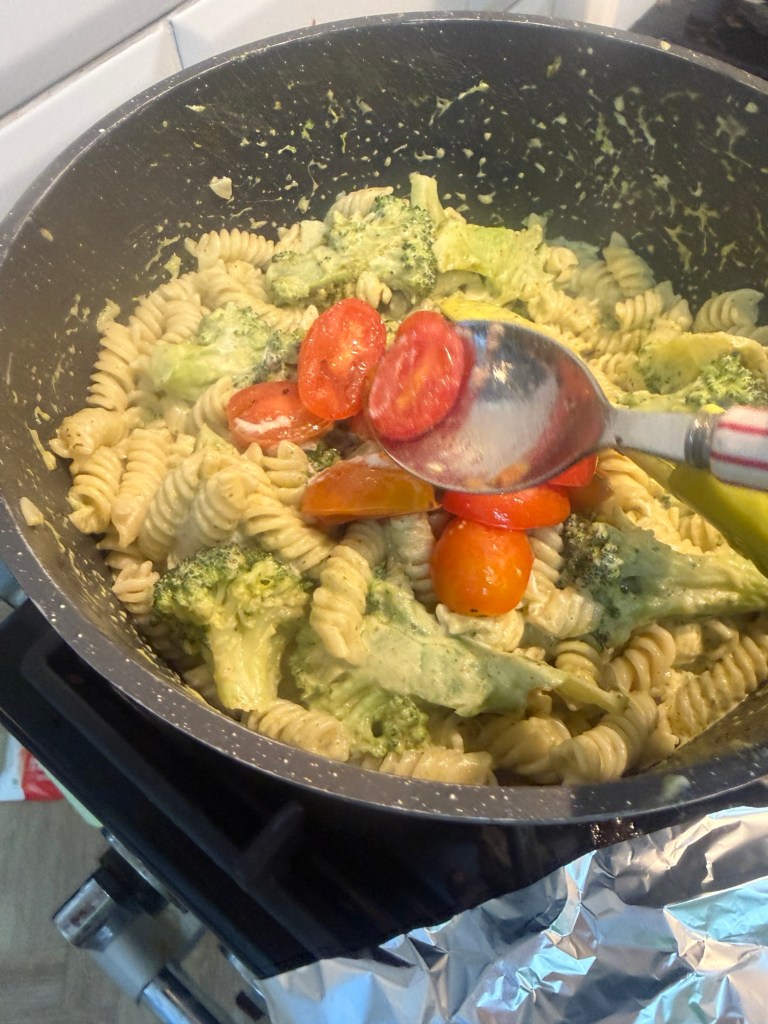
Return the pasta and broccoli to the pan, then stir in the pesto, mascarpone, and half of the roasted tomatoes.
Add a splash of the reserved pasta water and mix until the sauce becomes smooth and creamy, similar to double cream.
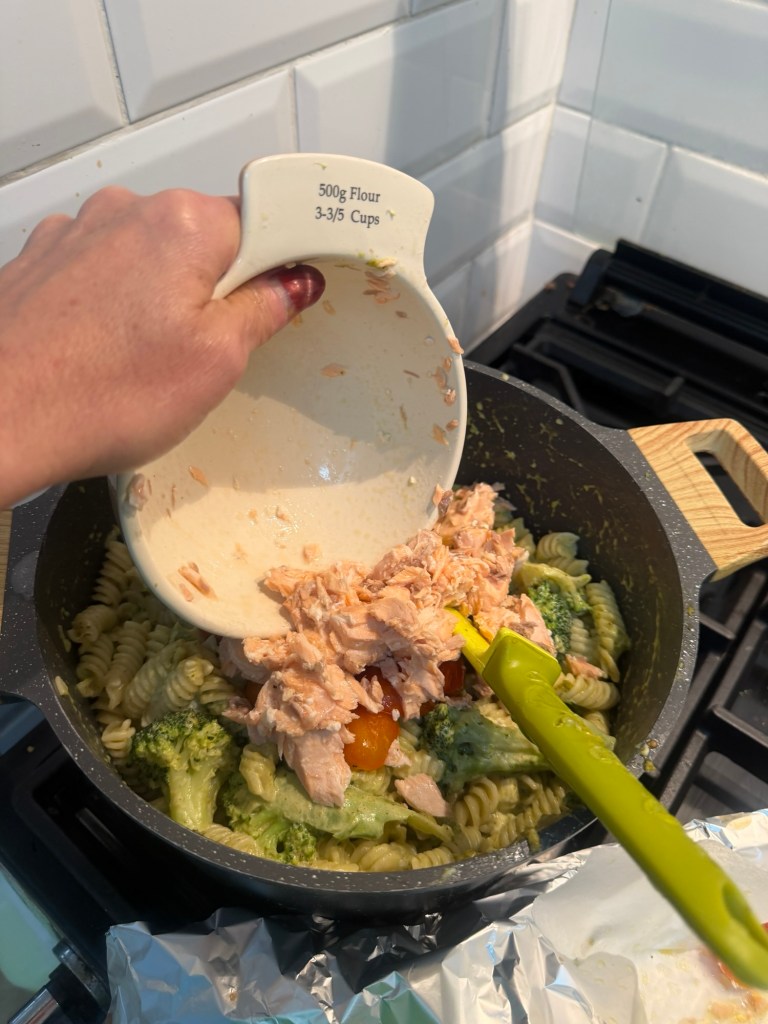
Flake in the salmon, removing the skin, and gently fold everything together so you keep those nice chunky pieces.
Transfer the mixture to a large baking dish.
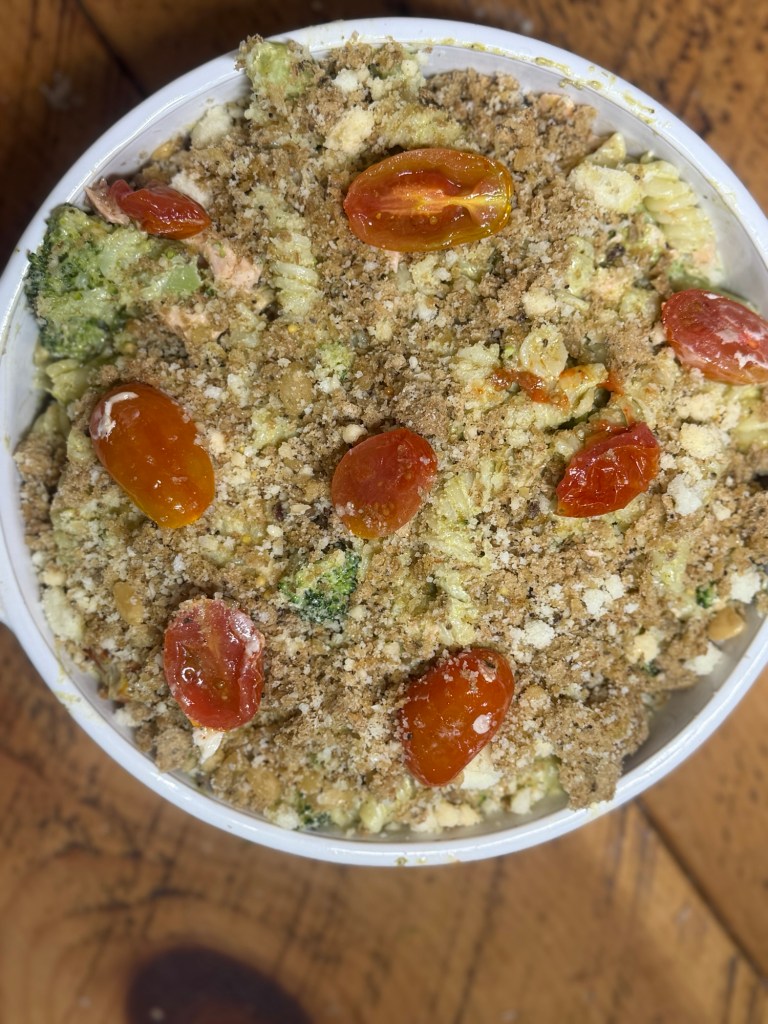
Mix the breadcrumbs, parmesan, and remaining olive oil together, then scatter over the top.
Finish by adding the rest of the tomatoes.
Bake in a preheated oven at 200°C (180°C fan) for 20 minutes, or 25 minutes if cooking from chilled, until the top is golden and crisp.
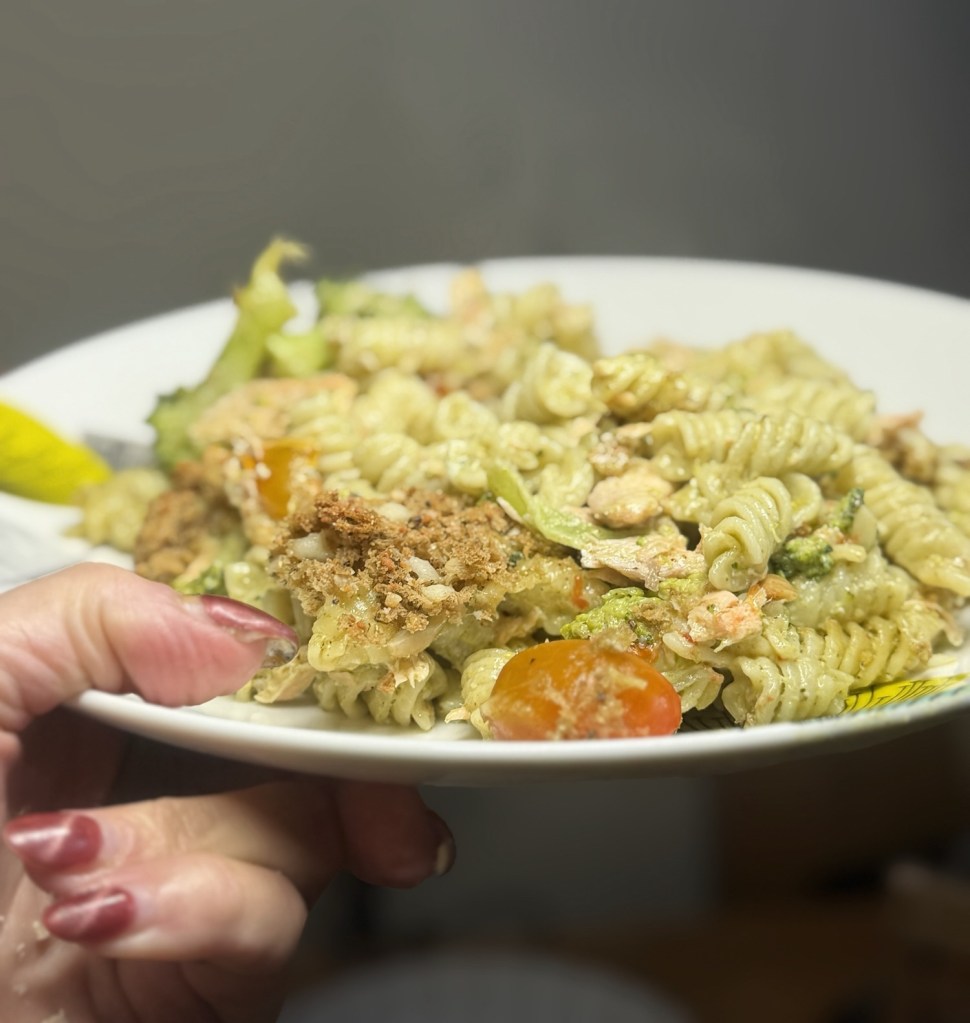
A Few Handy Tips • A little squeeze of lemon just before serving really brightens everything up. • You can easily swap the salmon for chicken or prawns if that’s what you have. • It reheats really well the next day, so it’s great for leftovers. Why You’ll Keep Coming Back to This It’s one of those reliable, no-fuss meals that still feels a bit special. Creamy, crispy, full of flavour—and easy enough to make any night of the week.
Let me know if you give this one a go—I always love hearing what you think, and any little tweaks you make along the way. Don’t forget to save it for later, because this is definitely one you’ll want to come back to.
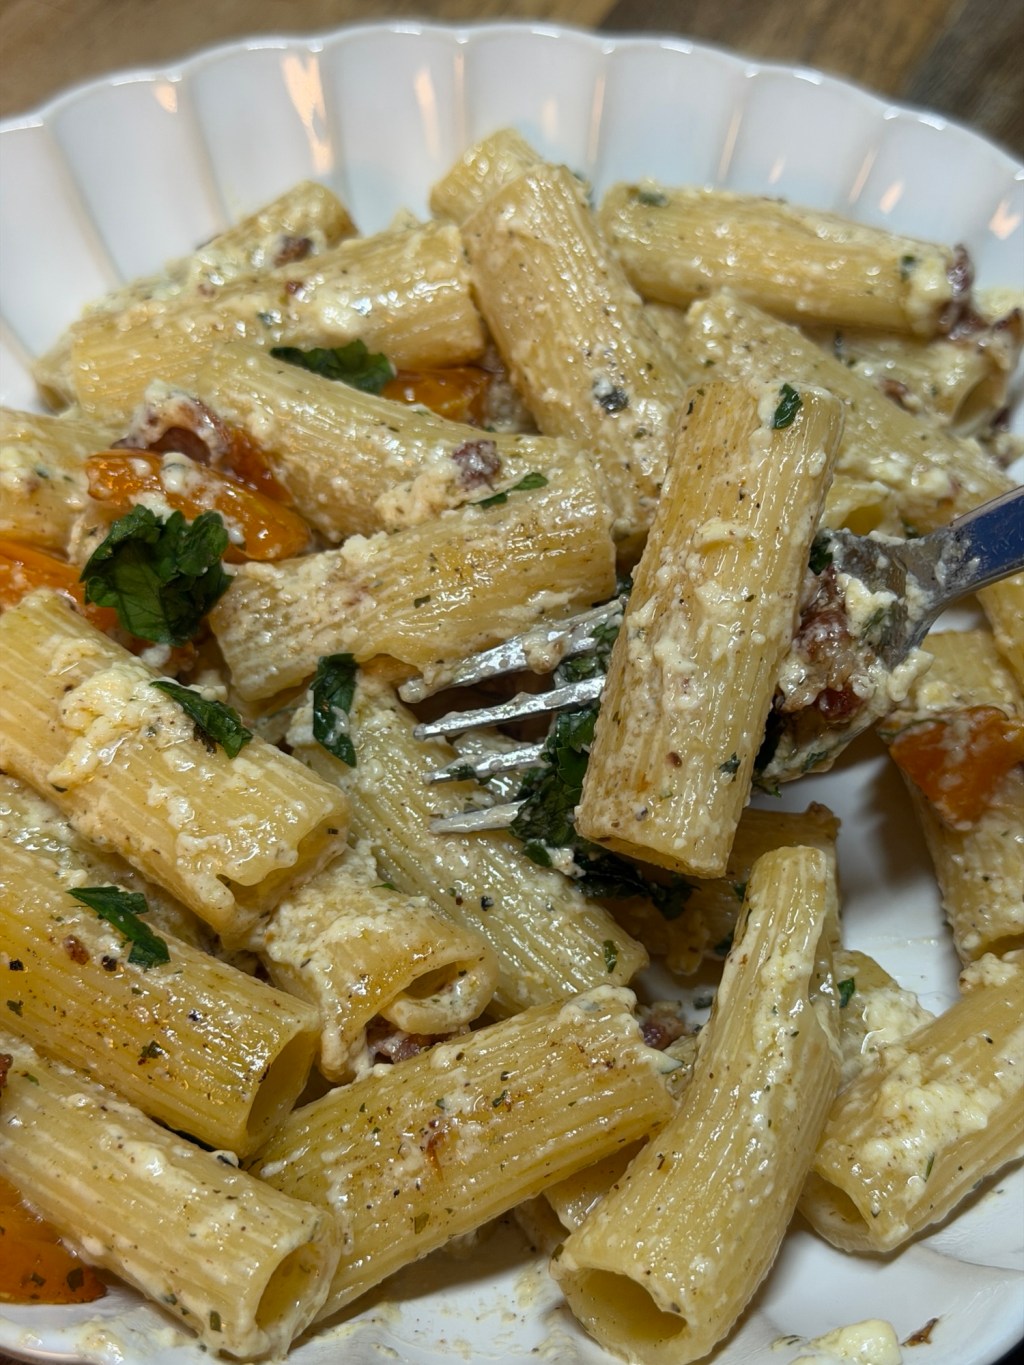
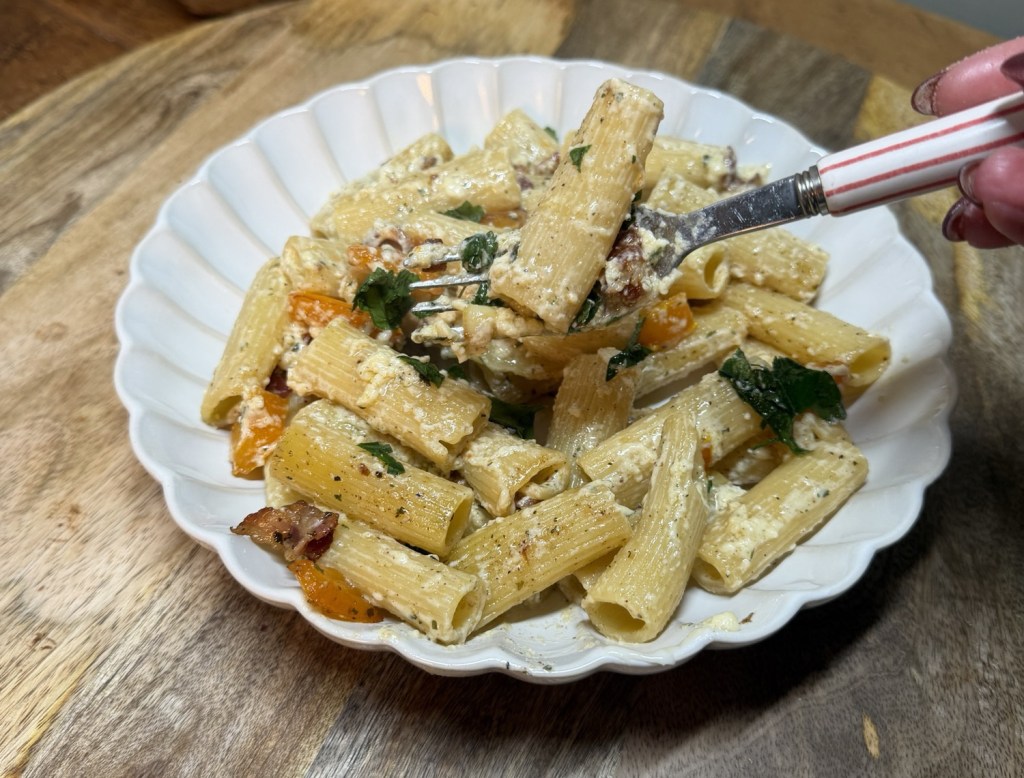
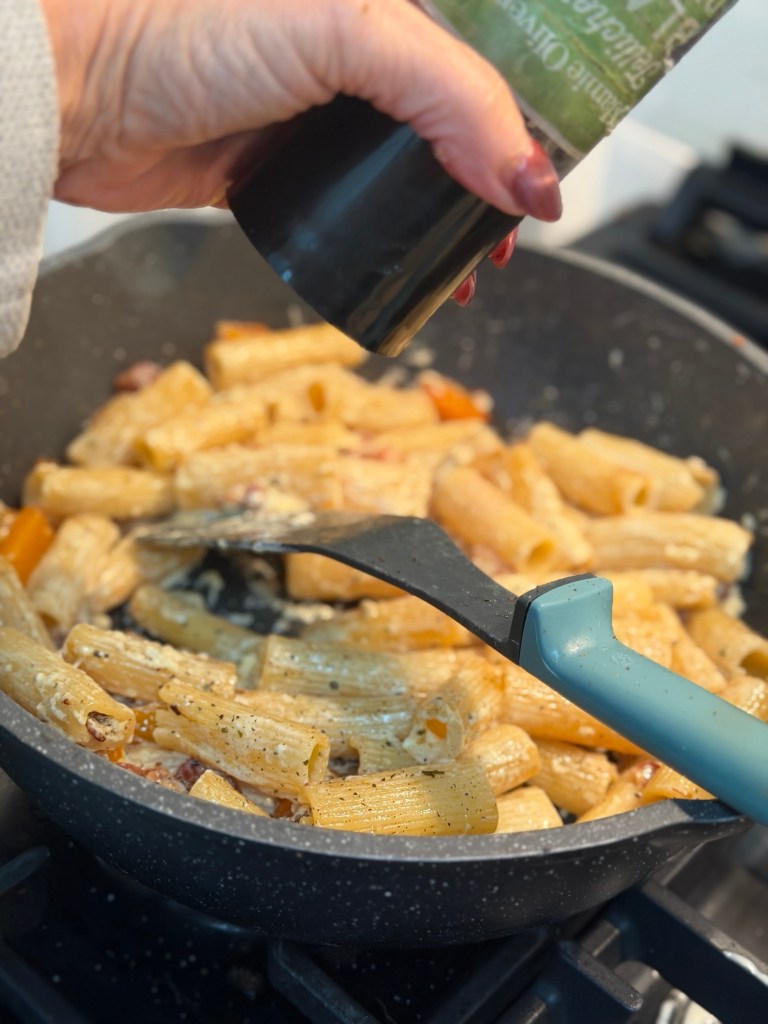
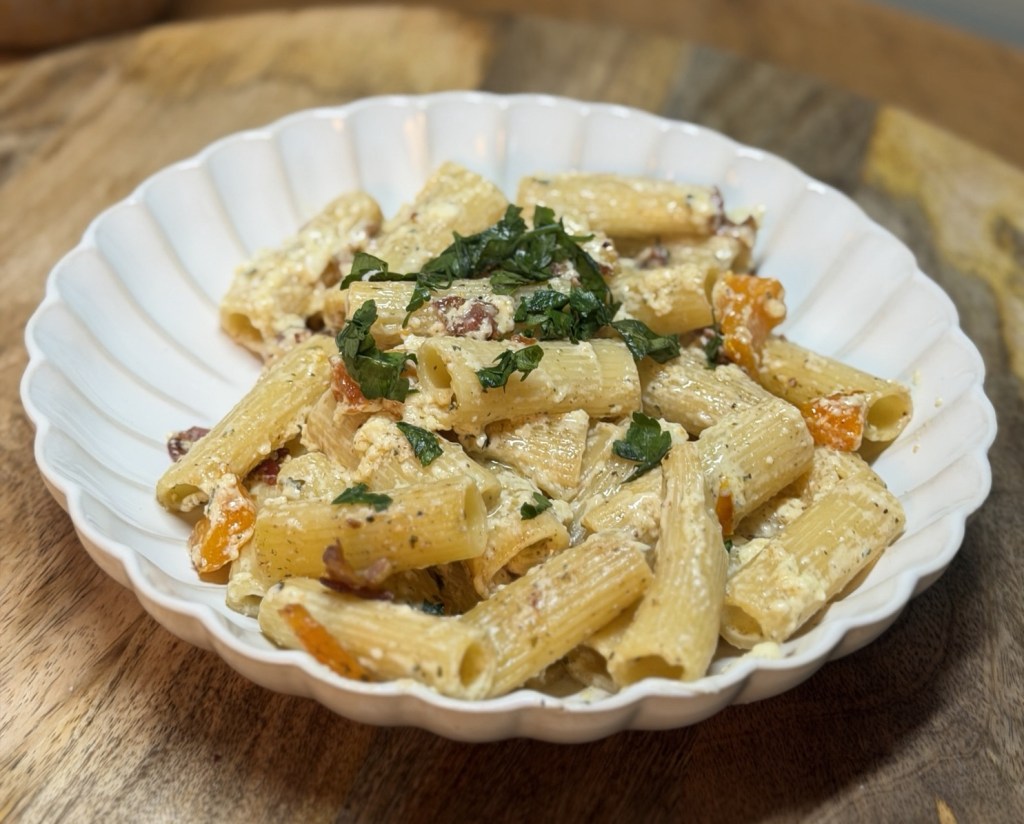
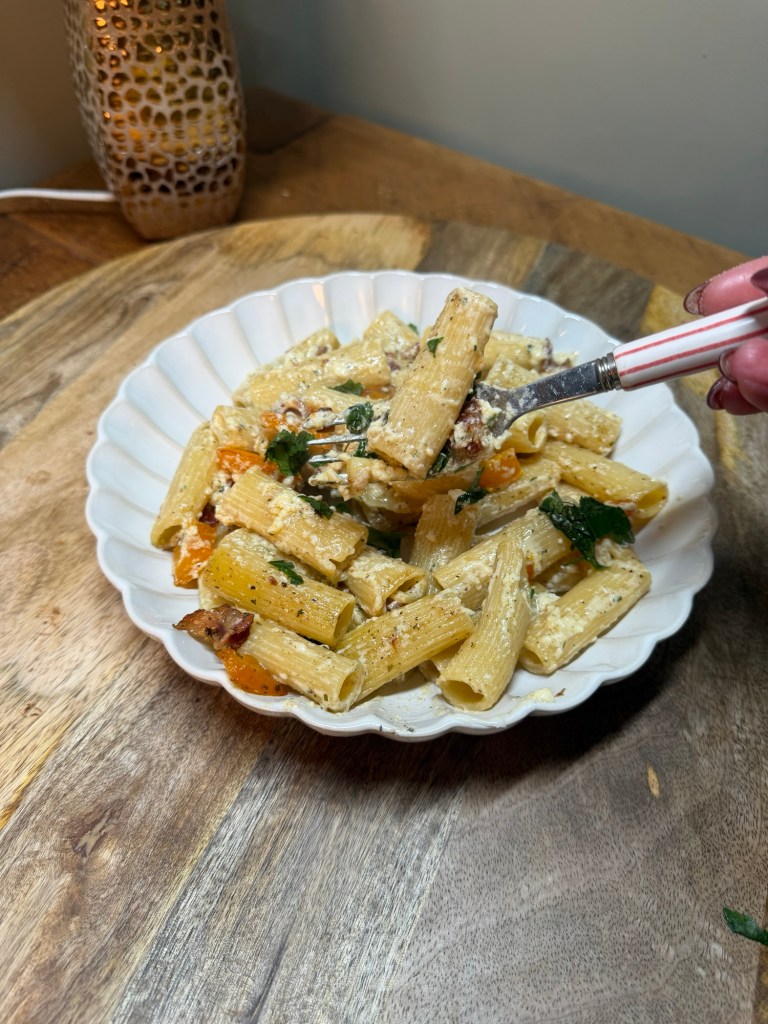
Tonight’s dinner started with one question: “What on earth can I make with pasta, mascarpone, soft goat’s cheese, eggs, streaky bacon and a lonely pepper?”
Spoiler: you can make the creamiest, boujiest mid‑week pasta that tastes like carbonara’s glam cousin who moved to Italy, discovered goat’s cheese and never looked back.
The Accidental “I Just Threw It Together” Pasta Let’s be honest: this is classic “kitchen clear‑out” cooking. You know the vibe – a few rashers of bacon, half a tub of mascarpone from that “I’ll definitely make a dessert” phase, a soft goat’s cheese you bought because it looked fancy, and one pepper slowly giving you side‑eye from the veg drawer. Instead of letting any of it go sad and shrivelled, we’re turning it into a silky, glossy pasta for two that looks like you planned it. You absolutely did not, but we’ll keep that between us. This dish is: • Creamy without being heavy • Salty and smoky from the bacon • Tangy and lush from the goat’s cheese • A little bit sweet from the peppers
• Ready in about 20 minutes if you can multitask like a pro (or just vaguely manage not to burn the bacon)
Ingredients for 2 Hungry People • 180–200 g dried pasta (any shape you fancy) • 4–5 slices streaky bacon, chopped • 1 pepper, sliced or diced • 3 heaped tbsp mascarpone • 40–50 g soft goat’s cheese • 1 egg • 1 small clove garlic, finely chopped (optional but lovely) • Salt and black pepper • A mug of pasta cooking water (liquid gold, don’t skip this)
• Optional: pinch of chilli flakes, squeeze of lemon, or a grating of Parmesan if you’re feeling extra
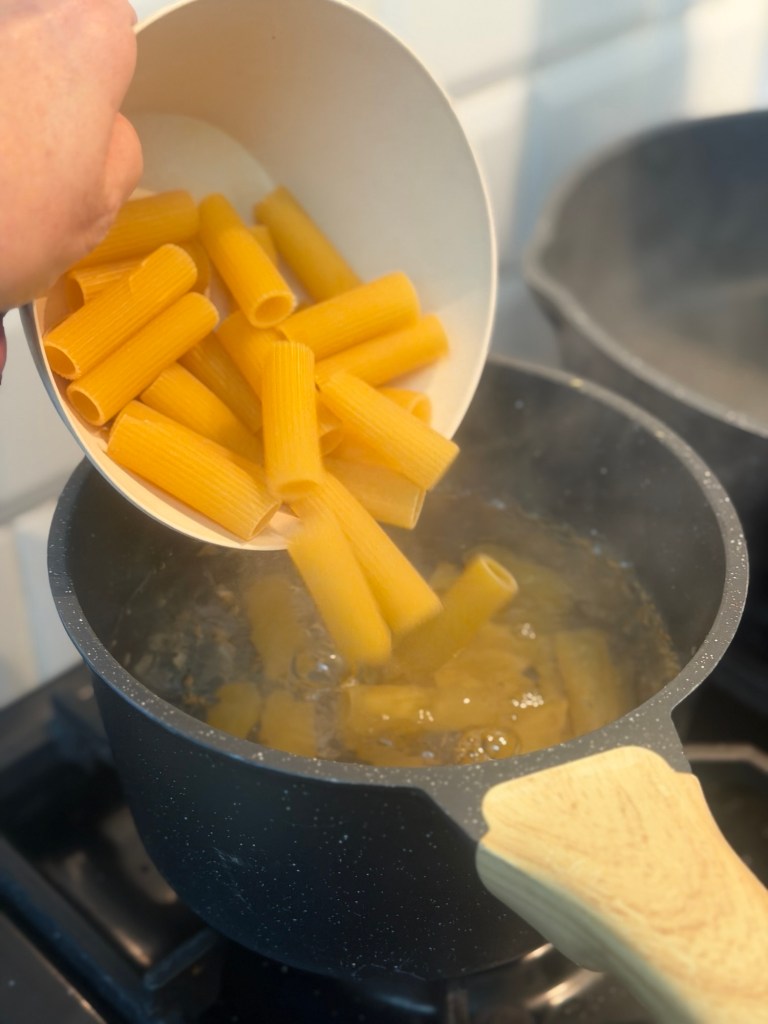
Step 1: Cook the Pasta (Yes, First) Yes, you cook the pasta first. No, we are not doing one‑pot chaos today. Bring a big pan of well‑salted water to the boil – it should taste like the sea, not a faintly disappointed puddle. Add your pasta and cook it until just al dente. Don’t walk away “just to check TikTok” unless you’ve set a timer.
Before you drain it, scoop out a mug of that starchy pasta water. This is the secret to sauces that cling rather than sulk at the bottom of the bowl. Then drain the pasta and keep it warm.
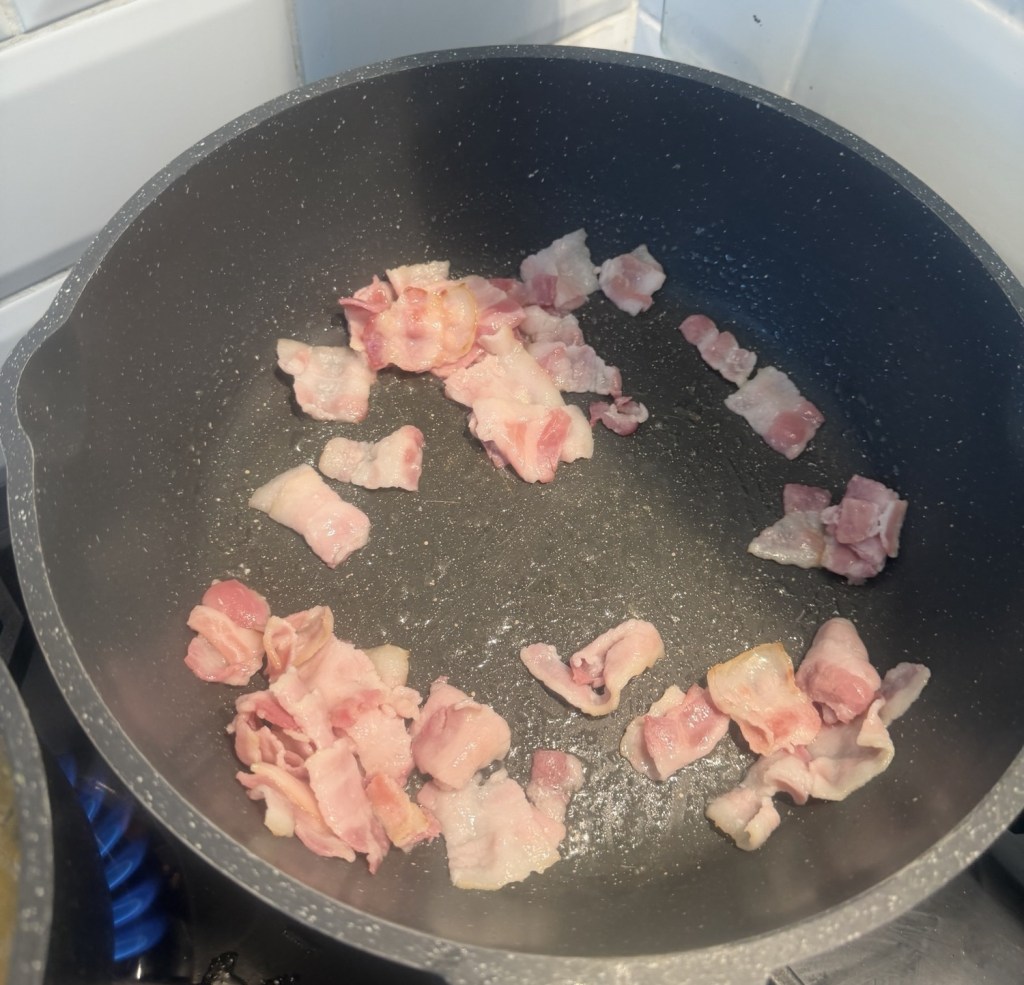
Step 2: Crispy Bacon, Sweet Peppers While the pasta is doing its thing, grab a large frying pan. • Add the chopped streaky bacon to a cold pan, then put it on medium heat. Starting it cold helps the fat render out slowly and makes everything extra crisp. • Fry until the bacon is golden and crisp. Try not to eat it all straight from the pan. (Good luck.) • Push the bacon to one side or lift it out onto a plate, leaving the glorious bacon fat in the pan. • Add your sliced/diced pepper (and garlic if you’re using it) to the pan. • Cook until the peppers are soft and slightly charred at the edges. Season lightly with salt and black pepper.
At this point your kitchen smells like you actually know what you’re doing.
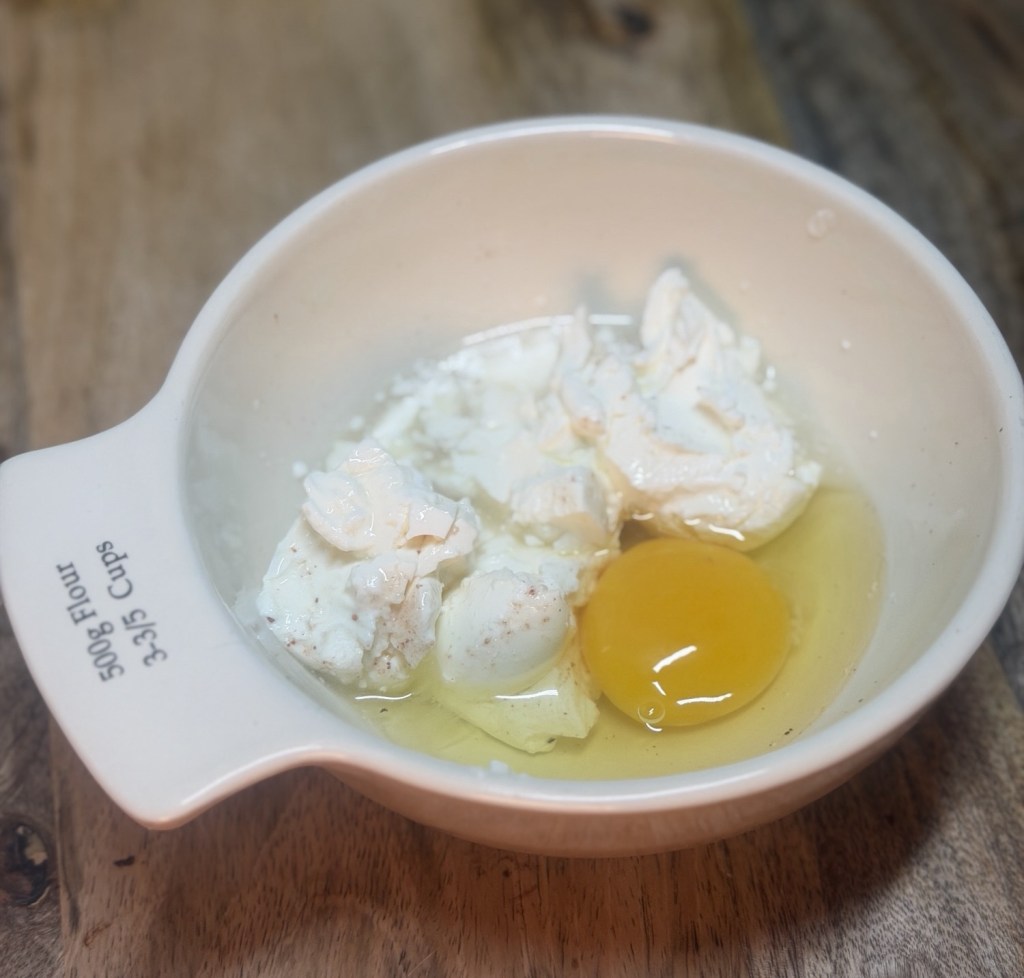
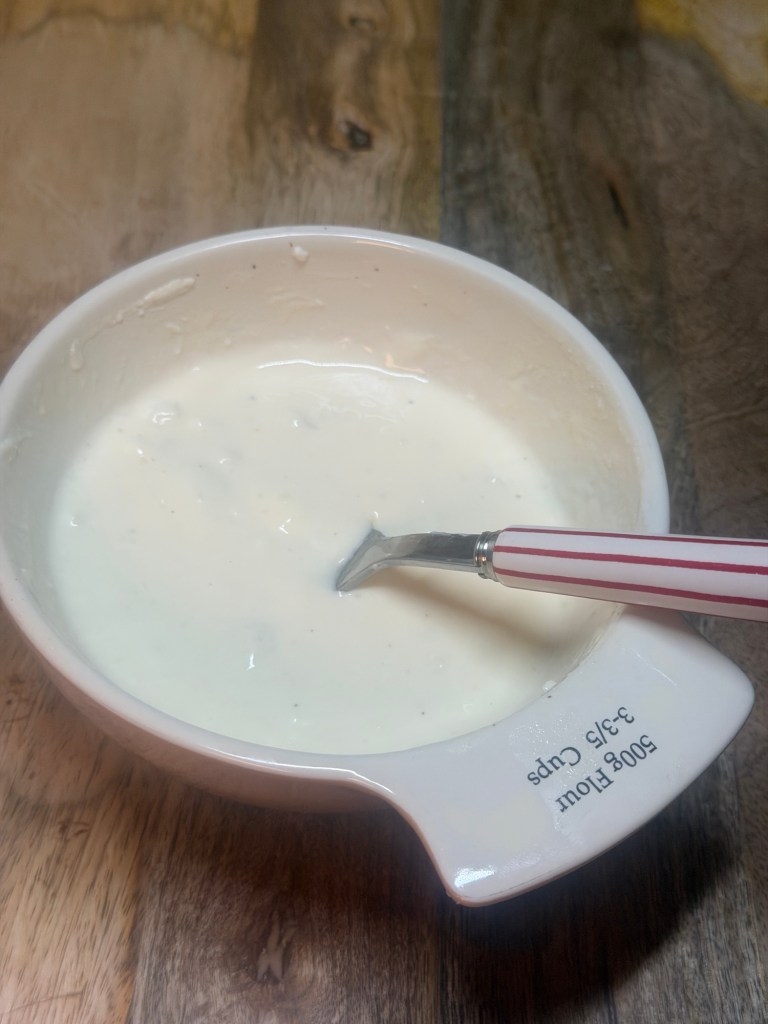
Step 3: The Silky Mascarpone & Goat’s Cheese Magic Now for the part that makes this feel restaurant‑level with almost zero effort. In a bowl, whisk together: • 3 heaped tbsp mascarpone • 1 egg • A splash or two of hot pasta water (start with 2 tbsp) • A pinch of salt • Plenty of black pepper You want a smooth, pourable mixture – not too thick, not too runny. Think “luxurious single cream”.
Now crumble or dollop in about half your soft goat’s cheese and stir it through. It doesn’t need to be perfectly smooth; a few streaks and tiny lumps are perfect. That tangy goat’s cheese cuts through the richness of the mascarpone and stops the whole thing feeling heavy.
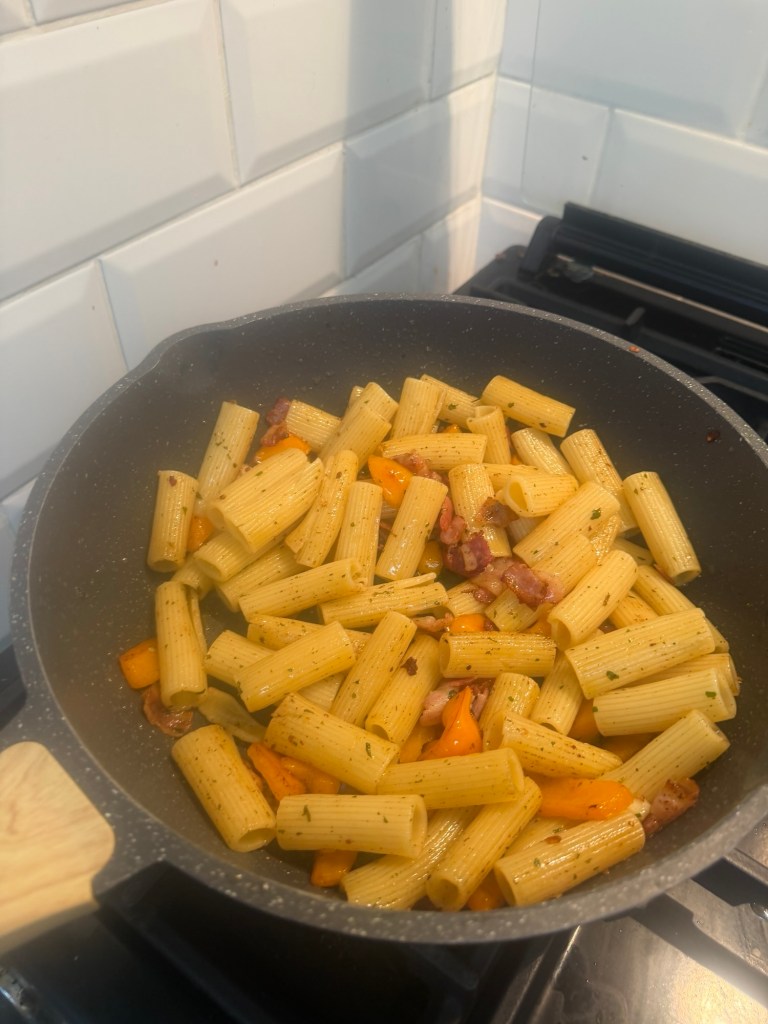
Step 4: The Carbonara‑Style Moment (No Scrambled Eggs Allowed) This is where we channel carbonara energy without the stress. • Add your hot drained pasta into the pan with the peppers and bacon. Toss everything together so the pasta is well coated in the bacon fat and pepper juices.
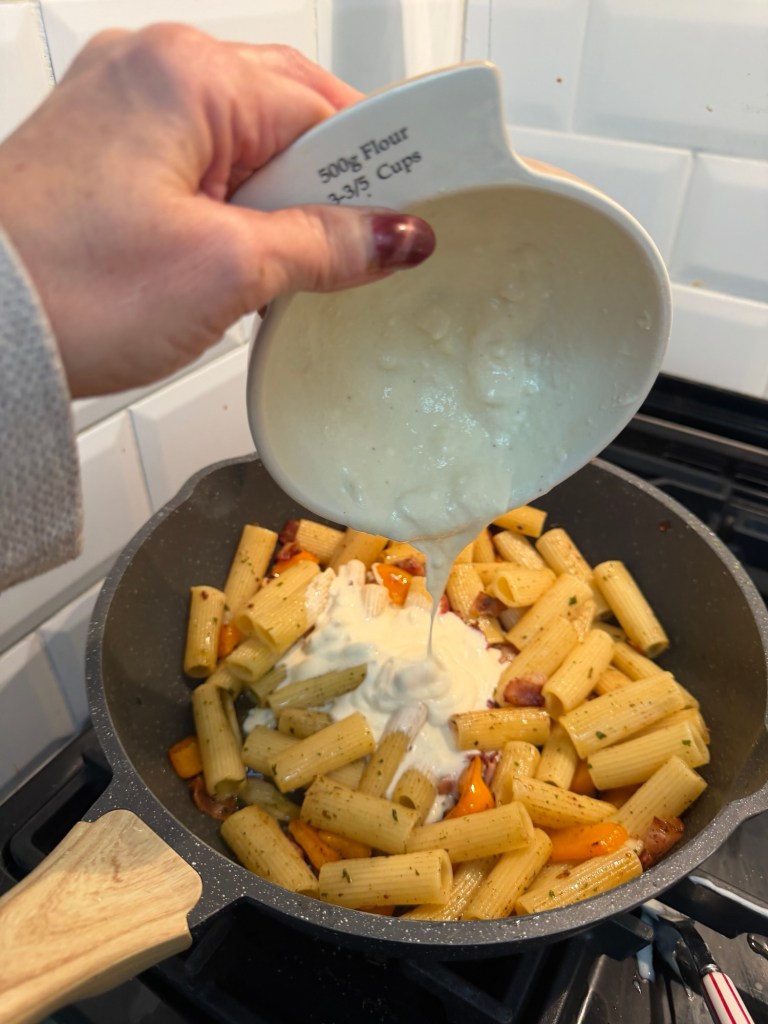
• Turn the heat off under the pan. This is important. If it’s on, your egg mixture will scramble and you’ll have fancy breakfast pasta. • Pour over your mascarpone–egg–goat’s cheese mixture.
• Toss and stir vigorously, like you mean it. Add splashes of your reserved pasta water as needed until the sauce turns glossy and coats every piece of pasta.
The heat from the pasta and pan will gently cook the egg and melt the cheeses, giving you a beautifully creamy sauce instead of sad curds.
Step 5: Finishing Touches (a.k.a. The Show‑Off Bit) Now taste it. This is your “what does it need?” moment. You can: • Add more black pepper • Add a tiny pinch more salt if needed • Squeeze in a bit of lemon for brightness • Sprinkle over some chilli flakes if you like a little kick Finally, dollop or crumble the remaining soft goat’s cheese over the top. You’ll get gorgeous little creamy, tangy pockets as you eat – like little surprise flavour bombs.
Serve immediately in warm bowls, twirl it high for maximum drama, and pretend you haven’t just cooked this in 20 minutes using odds and ends from the fridge.
Make It Extra (Optional Little Twist) If you want to take it to the next level: • Tip the finished pasta into a small oven dish. • Add a few extra blobs of goat’s cheese on top. • Pop it under a hot grill for a couple of minutes until you get golden, slightly toasted spots of cheese.
Now it looks like a pasta bake that took an hour. You and I both know it absolutely did not.
Why This Works So Well This little recipe hits that sweet spot between comfort food and “I could serve this to guests and not be ashamed”: • The mascarpone makes the sauce ultra velvety without faffing with flour or roux. • The egg gives you that carbonara‑style silkiness and richness. • Soft goat’s cheese adds tang and personality so it’s not just “creamy for the sake of it”. • Bacon brings salt, smoke and crunch. • Peppers add sweetness and colour, stopping it from being a beige bowl of doom.
It’s the kind of meal you can throw together on a weeknight that still feels a bit special – like you’ve made an effort when you absolutely considered toast.
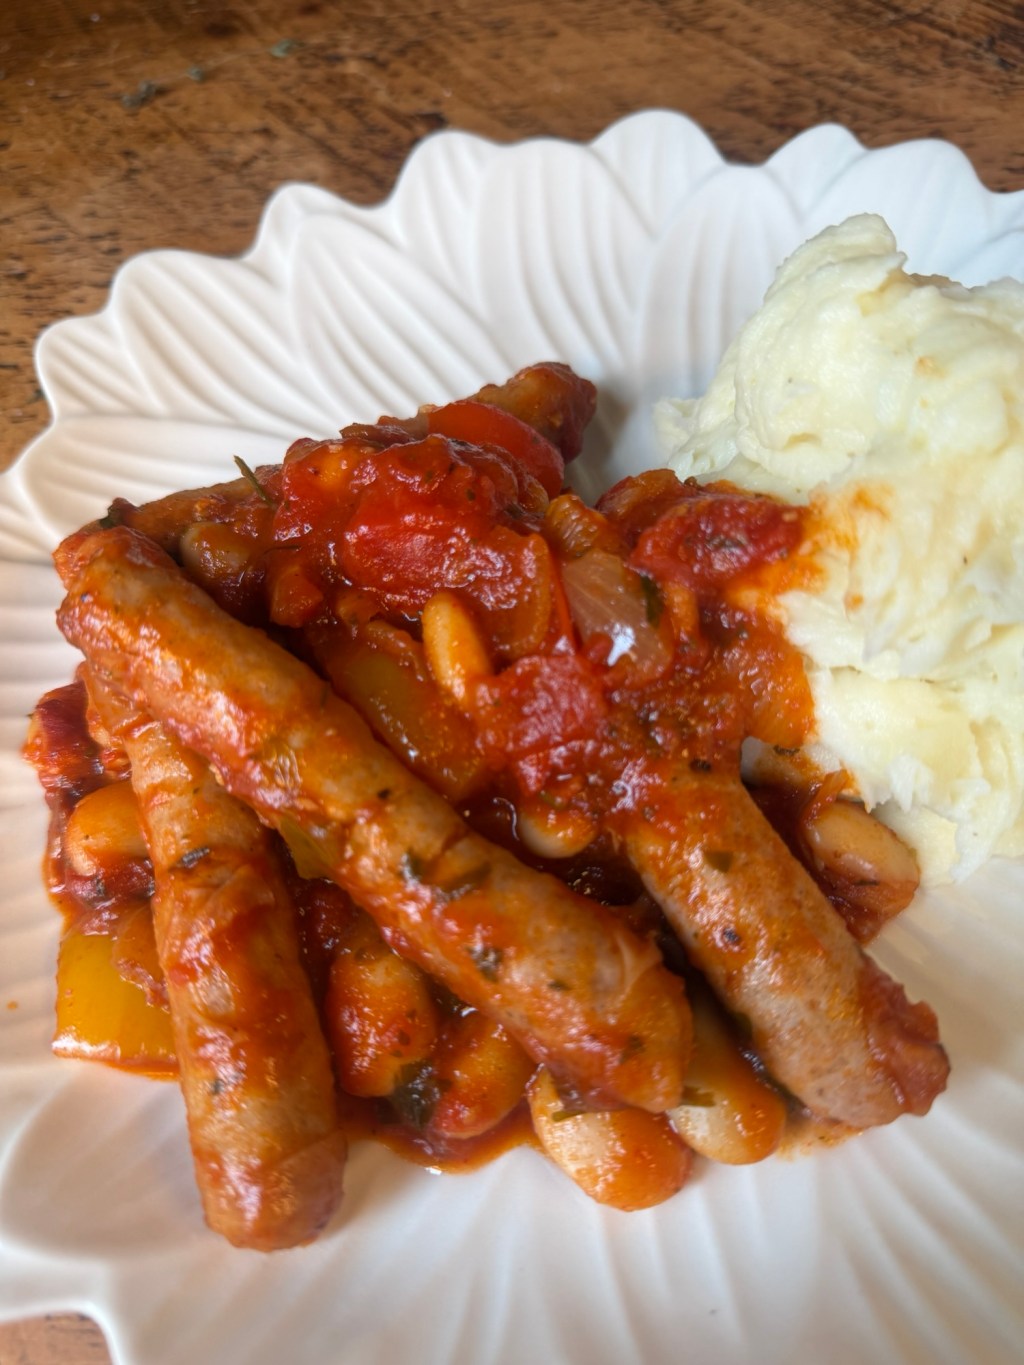
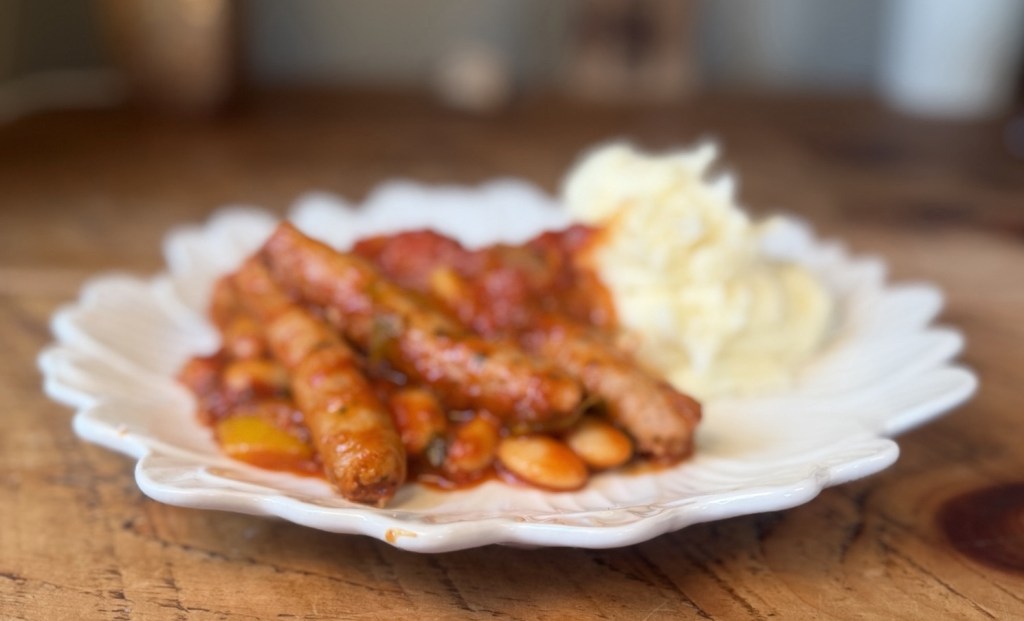
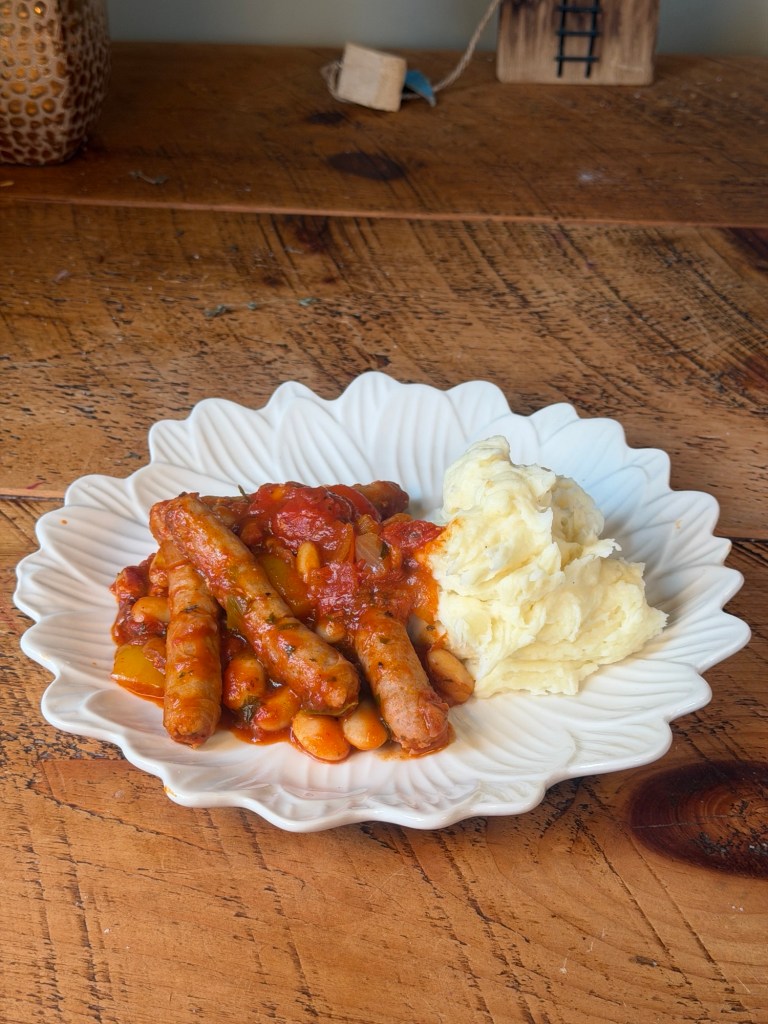
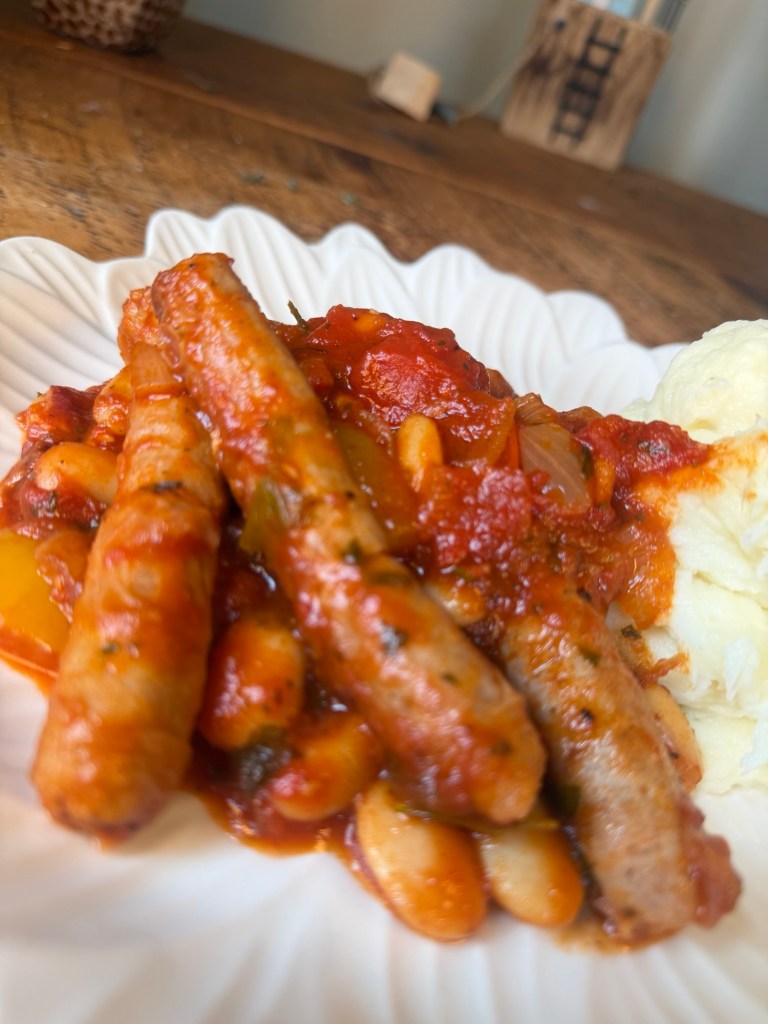
If there’s one dish that feels like a warm hug on a plate, it’s this sausage and bean casserole. It’s the kind of meal that looks after you, feeds leftovers into lunches, and makes the house smell like proper home cooking. I always make enough to feed a family of four with plenty left over for tomorrow’s lunch tucked neatly in the freezer.
What I Use
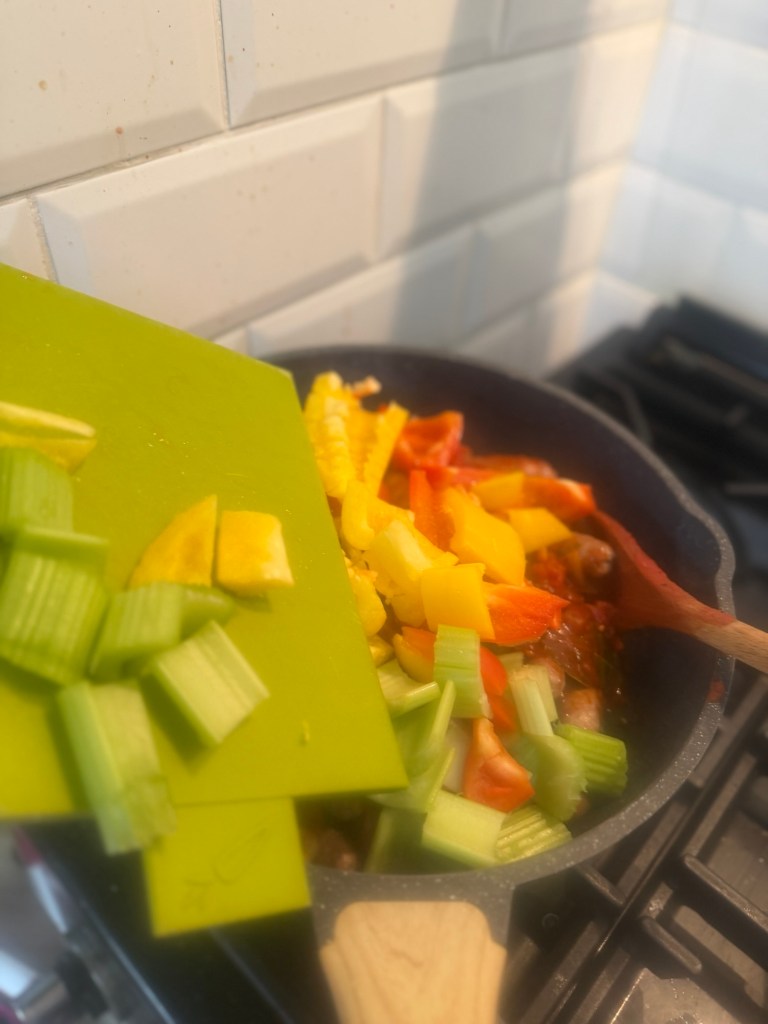
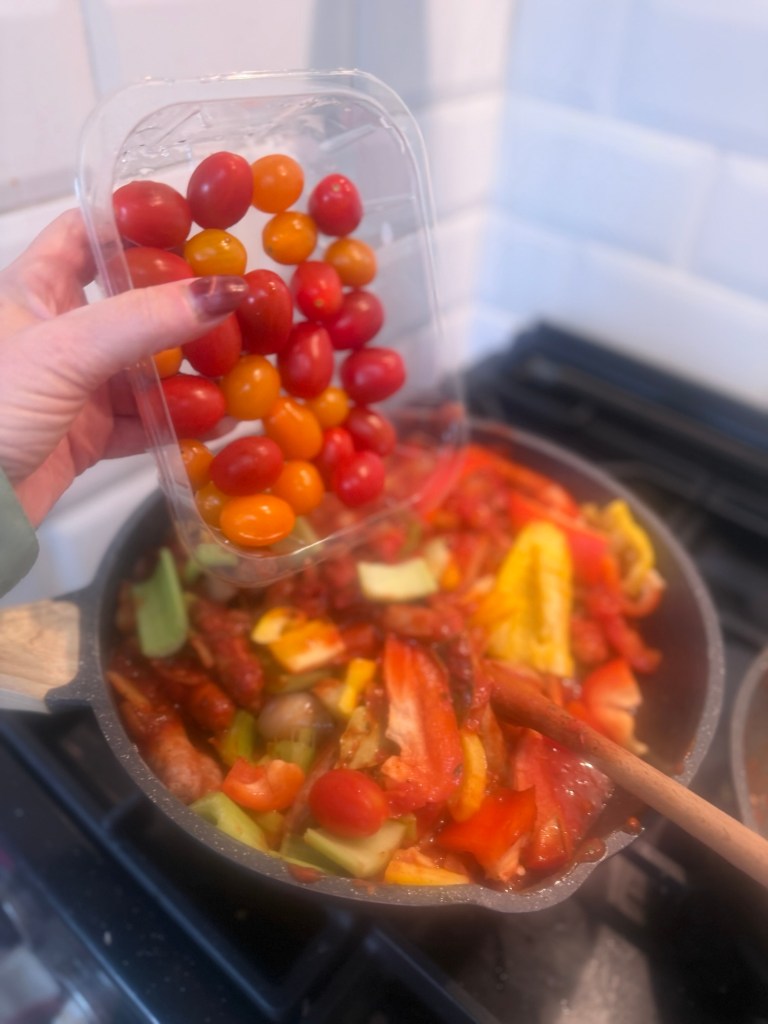
For me, getting the base ingredients right makes all the difference. I’ll usually grab: • Good quality pork sausages (I always go for Heck chipolatas because they’re 97% pork and packed with flavour, not additives). • Rashers of rindless streaky bacon for that savoury, salty hit. • A couple of onions, a good handful of garlic, and the soft bits from the fridge that need using. • A tin of chopped tomatoes plus a dollop of tomato purée for depth. • A tin of butter beans (or mixed beans) and some good chicken stock. • Fresh herbs, a pinch of chilli or smoked paprika, and those little extras that make it feel like yours. On this particular day, I had 1 red pepper and 2 sticks of celery, plus a big bunch of flat leaf parsley sitting in the fridge, all begging to be used. If there are any soft cherry tomatoes lurking at the back, I’ll chop them up and throw them in too—no waste, all flavour.
Ingredients
• 12 good pork sausages (I use Heck chipolatas, 97% pork) • 6 rashers rindless streaky bacon, chopped into small pieces • 2 onions, sliced or finely chopped • 1 red pepper, sliced or diced • 2 sticks of celery, finely chopped • 3–4 garlic cloves, finely chopped • 1 tbsp cooking oil (sunflower or olive) For the sauce: • 1 tbsp tomato purée • 1 × 400 g tin chopped tomatoes • 300 ml chicken stock (about ½ bottle) • 1 tbsp Worcestershire sauce • 1 tbsp dark brown sugar or muscovado sugar • ½–1 tsp chilli powder or 1 tsp smoked paprika (adjust to taste) • ¼ tsp dried marjoram • ¼ tsp dried basil • ¼ tsp dried oregano • ¼ tsp dried thyme • 2 bay leaves • A few fresh thyme sprigs (optional, but lovely if you have them) For the beans & finish: • 1 × 400 g tin butter beans or mixed beans, drained and rinsed • A big bunch of flat leaf parsley, chopped (plus a little extra to sprinkle on top) • Salt and freshly ground black pepper, to taste Optional but encouraged: • Any soft or slightly over‑ripe cherry tomatoes from the fridge, chopped (toss in with the sauce)
My Method (In My Kitchen)
Brown the meat I start by heating a little oil in a big frying pan or my cast‑iron casserole dish. The sausages go in first. I like to brown them all over so they get a little golden crust without drying out. Then they go into the casserole while I cook the bacon in the same pan until it’s crisp and golden. All that tasty bacon fat stays in the pan—that’s the start of flavour magic. Top tip: Always buy more sausages than you think you’ll need. It’s hard not to eat one here, one there as you’re cooking, and by the end you’ll still want plenty in the pot!
Soft veg base In a separate pan go the onions, I let them cook down slowly until they’re soft and starting to caramelise. When they’re ready, I add the garlic, stirring for just a minute so it doesn’t burn. If I have any soft cherry tomatoes, I’ll add them now too—they’ll break down into the sauce and give it a lovely natural sweetness.
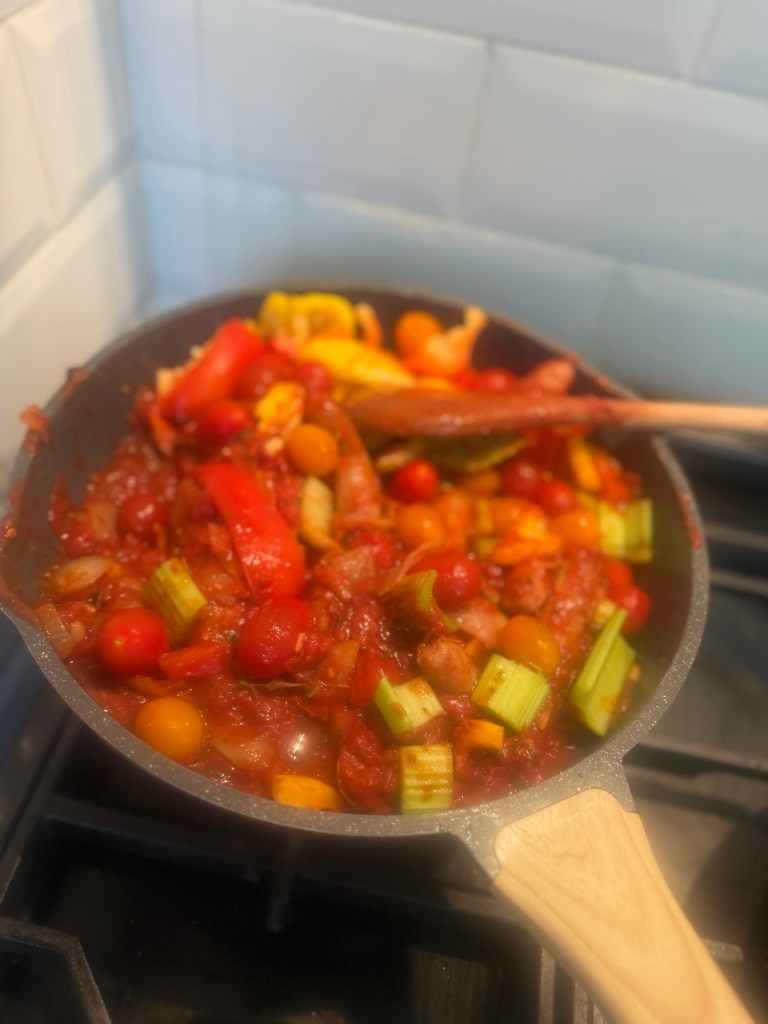
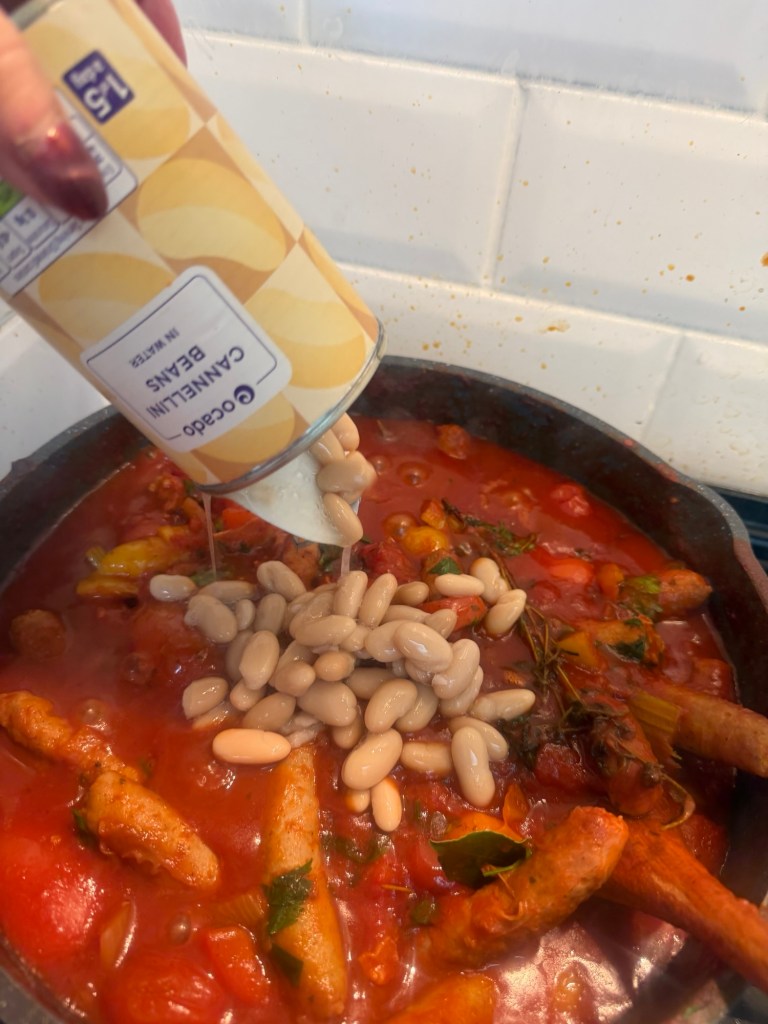
Build the sauce Next I stir in a bit of chilli powder or smoked paprika (enough so you can feel it but not so much it takes over), then the chopped tomatoes, a tablespoon of tomato purée, and enough chicken stock to just cover the bottom of the pan. A splash of Worcestershire sauce and a teaspoon of brown sugar help balance the acidity, and in go my dried herbs—usually a mix of marjoram, basil, oregano and thyme, plus bay leaves and a few sprigs of fresh thyme if I have them. Once it’s bubbling gently, I pour everything into the casserole with the sausages and bacon. Everything simmers together, the sausages soaking up all that rich, tomato‑y goodness. I put in the celery, tomatoes and chopped peppers then combine.
The gentle simmer I cover the pot loosely and let it simmer for about 20 minutes on a low heat. I’ll give it the occasional stir to stop anything catching, but otherwise it pretty much looks after itself. This is when the house really starts to smell amazing.
Add beans and finish
After the sauce has thickened slightly, I stir in the drained beans and let it all go for another 10 minutes until the sausages are cooked through and the casserole feels thick and comforting. If the sauce is a touch too thin, I’ll let it bubble uncovered for a few extra minutes; if it’s too thick, a splash of stock or water sorts it out.
Right at the end, I pull out the bay leaves, tear in the flat leaf parsley, and give it one final stir. The result is a deep, hearty casserole with soft veg, tender beans, and juicy sausages coated in a rich, glossy sauce.
How I Serve It I live for this served with creamy mashed potato—it soaks up the sauce beautifully and makes it feel like proper comfort food. If you’re in a rush, a spoonful over rice or alongside crusty bread works just as well.
Leftovers heat up brilliantly and taste even better the next day, and the whole thing freezes really well in portion‑sized containers.
If you’re batching this into content‑ready dinners, freeze it flat in freezer‑safe containers so it thaws faster and stacks neatly in the freezer. It’s my go‑to “no‑stress” family meal that still looks and tastes like love on a plate.
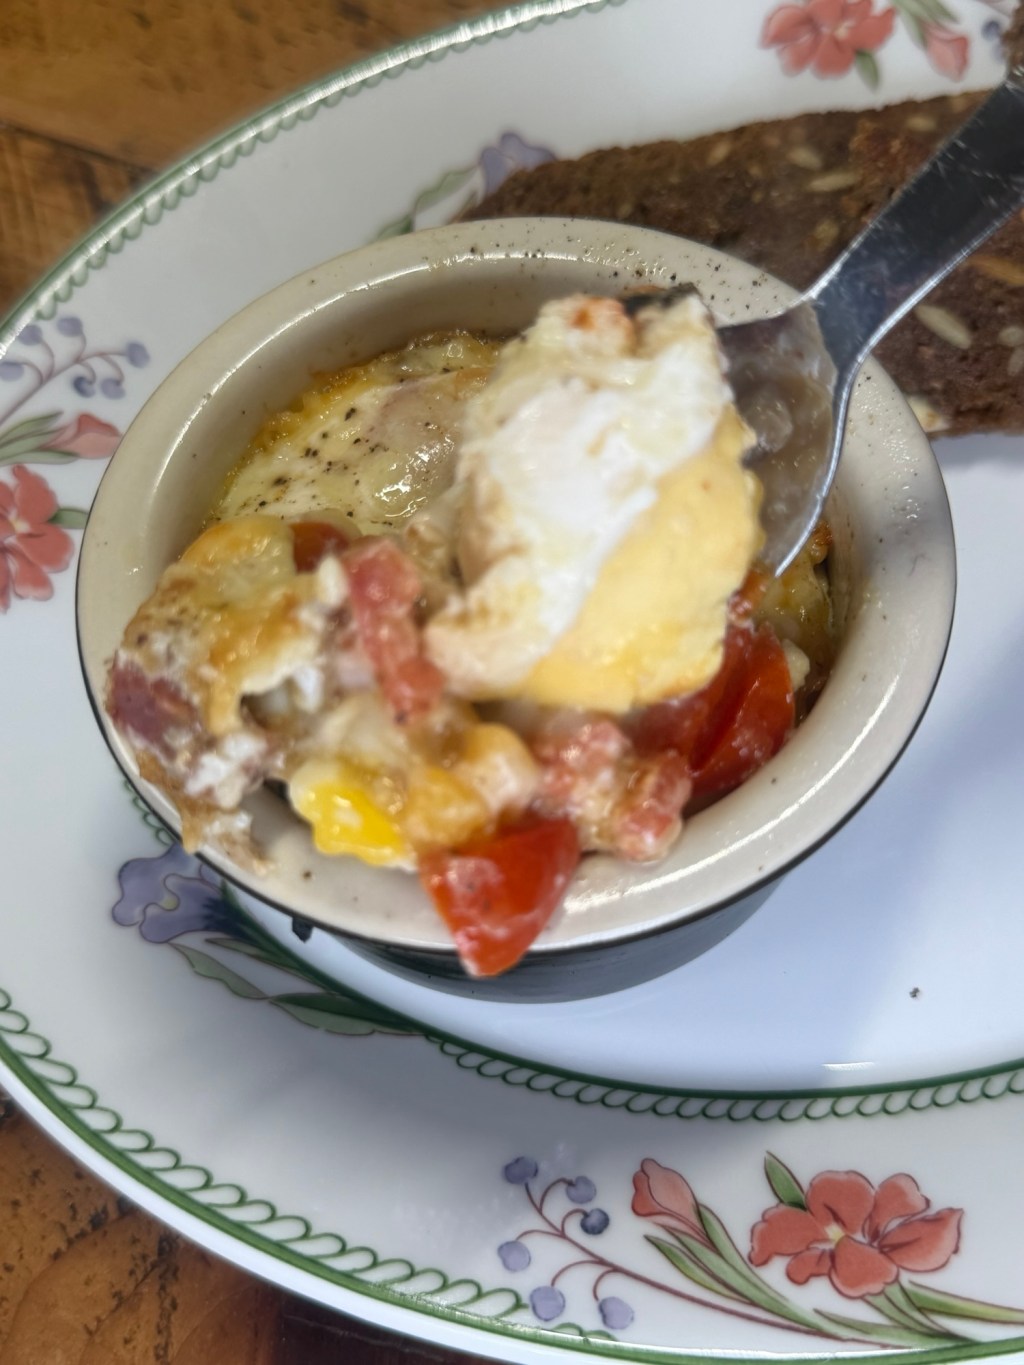
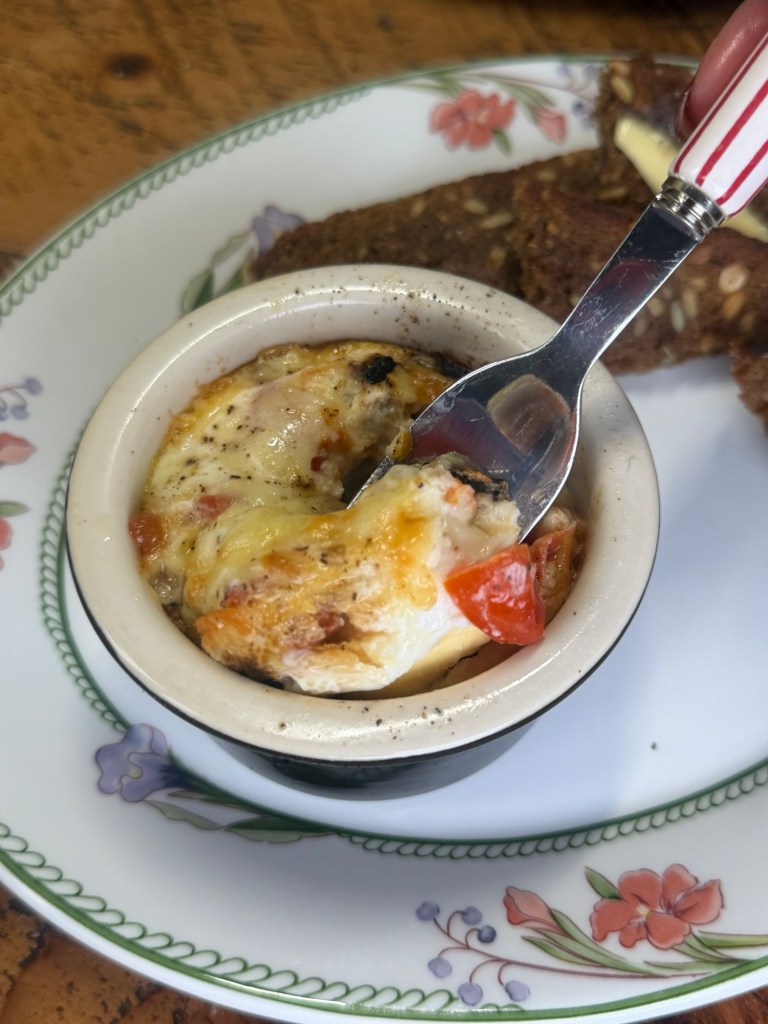
Café‑style brunch without leaving the house? Yes please. These baked eggs are my current obsession: a little ramekin filled with creamy egg, tangy crème fraîche, juicy cherry tomatoes and smoky chorizo, all finished with a blanket of melted cheddar.
It looks like something you’d order with a flat white in a trendy brunch spot, but it’s secretly a very low‑effort, “use what’s in the fridge” kind of recipe. I started with a simple baked eggs base and then threw in what I had on hand – and it turned into the kind of dish you immediately want to make again tomorrow. What makes these baked eggs special Here’s how my version differs from a plain baked egg: • I use crème fraîche instead of milk or cream for extra tang and richness. • Cherry tomatoes add juicy sweetness and stop things feeling heavy. • Chorizo brings smoke, spice and those gorgeous orange oils. • Everything is built directly in the ramekin – egg first, goodies on top. • A good sprinkle of cheddar melts into a golden, bubbly top. You still get that soft, just‑set egg from baking the ramekins in a water bath, but with way more flavour and texture going on.
Step‑by‑step: Café‑Style Baked Eggs with Chorizo and Cheddar
Heat the oven Preheat your oven to 180–190°C and put the kettle on to boil. Lay a clean tea towel in the bottom of a roasting tin to stop the ramekins sliding around.
Grease the ramekins Lightly butter your ramekins so the eggs don’t stick and the edges stay lovely and soft.
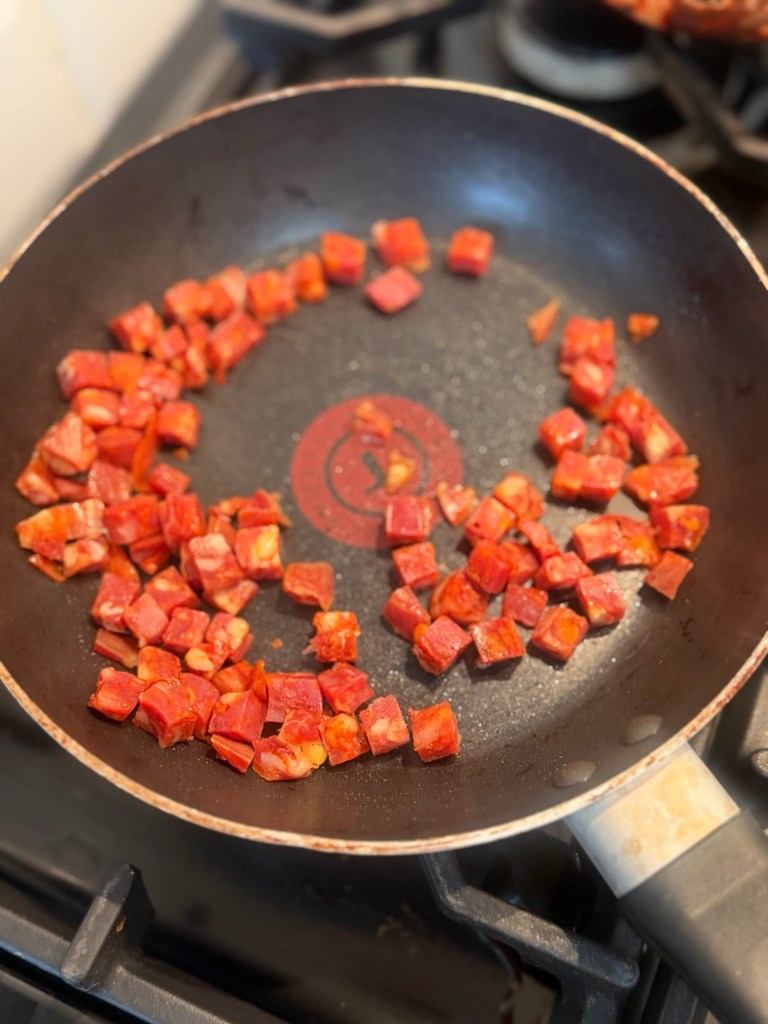
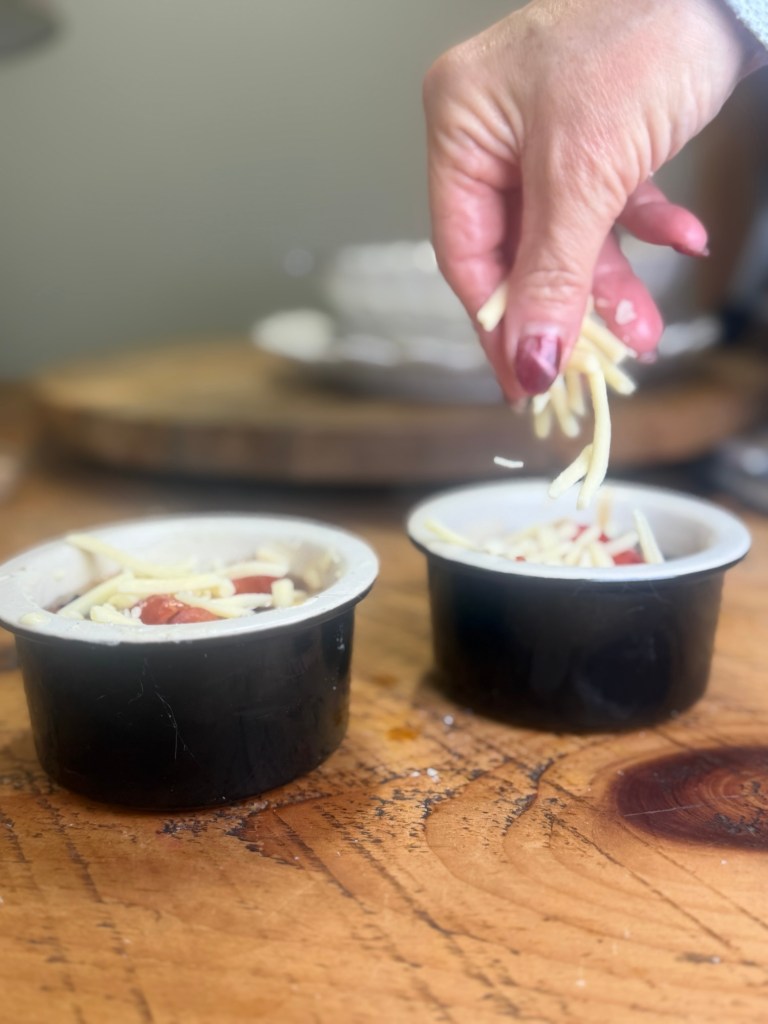
Fry the chorizo Add the diced chorizo to a dry frying pan over medium heat. Cook for a few minutes until it starts to crisp and releases its oil, then take it off the heat.
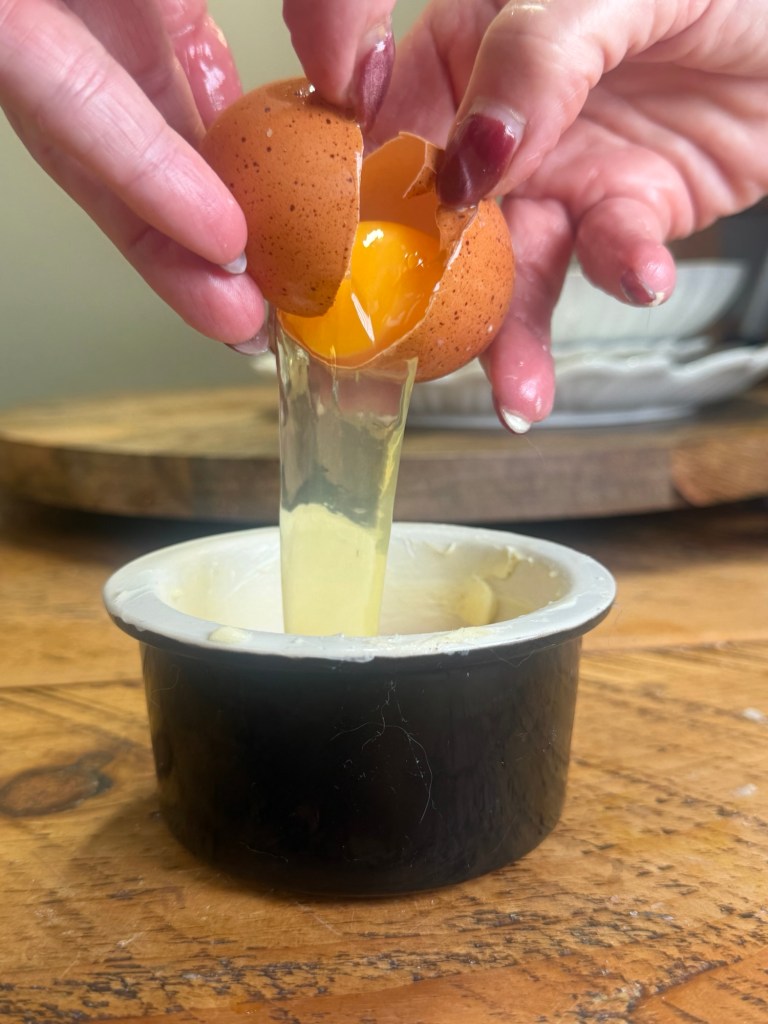
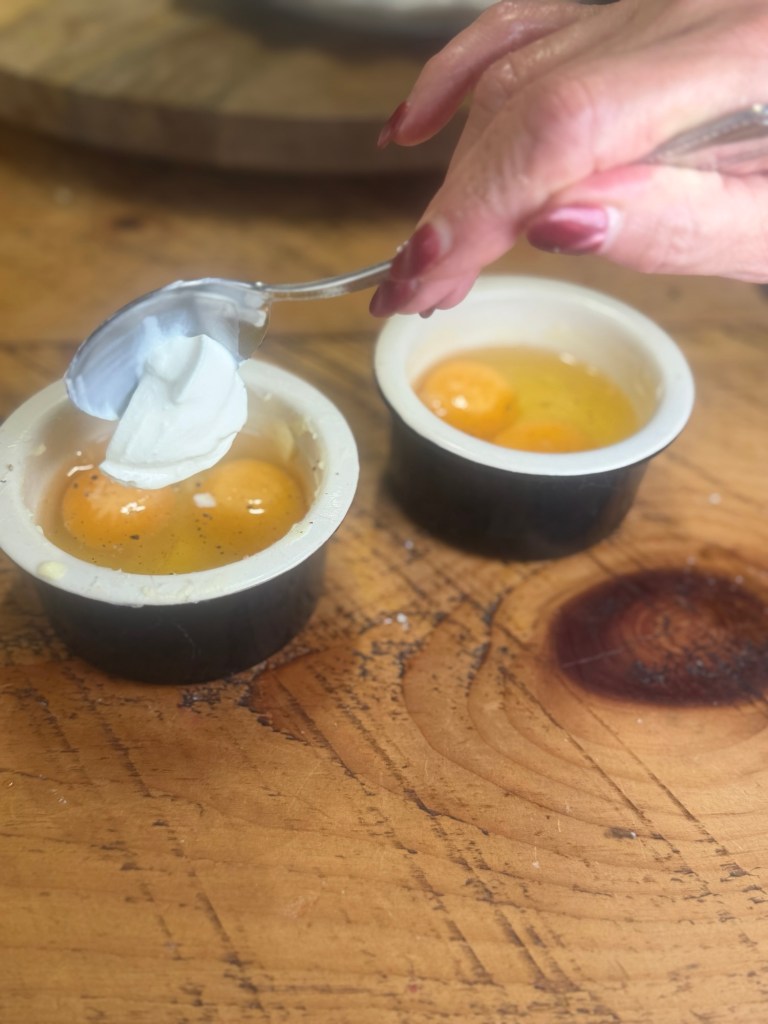
Start with the eggs and crème fraîche Crack one egg into each buttered ramekin. Add about 1 tablespoon of crème fraîche, dotting it around the yolk
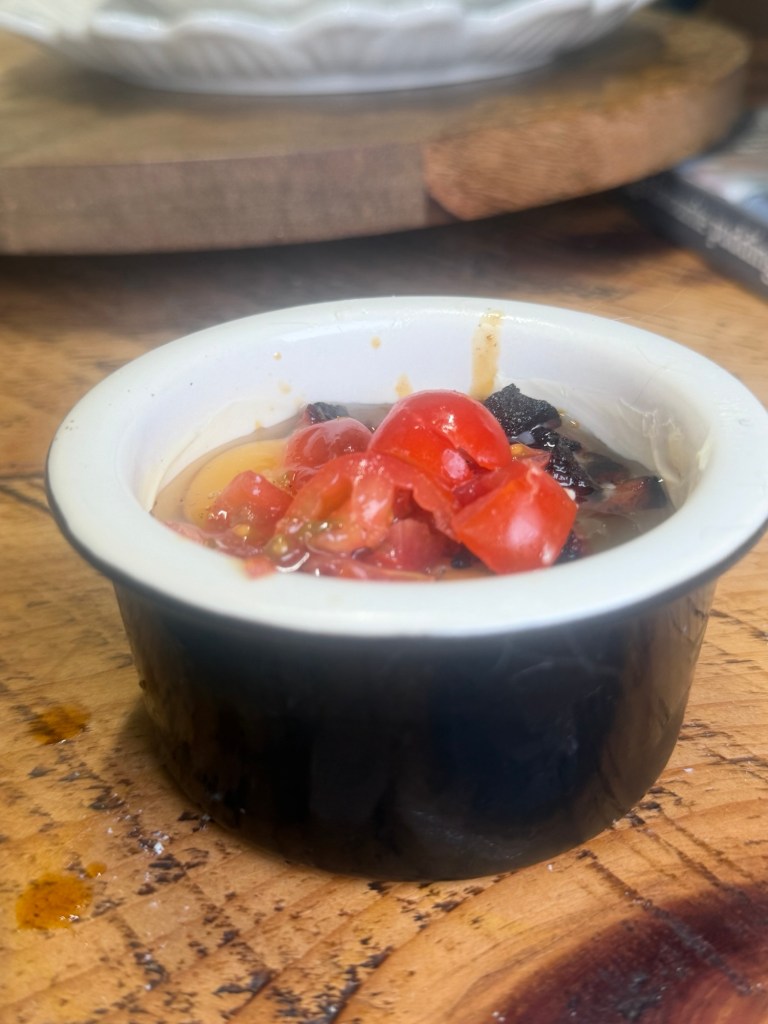
Tomatoes and chorizo on top Scatter the chopped cherry tomatoes over the egg, then spoon the fried chorizo on top, making sure you get some of that flavourful oil too.
Season and cheese Sprinkle with a little salt and plenty of black pepper. Finish with a generous handful of grated cheddar over everything.
Bake in a water bath Place the ramekins in the roasting tin. Carefully pour in the hot water until it comes about halfway up the sides of the ramekins.
Transfer to the oven and bake for 10–15 minutes, depending on how runny you like your yolks.
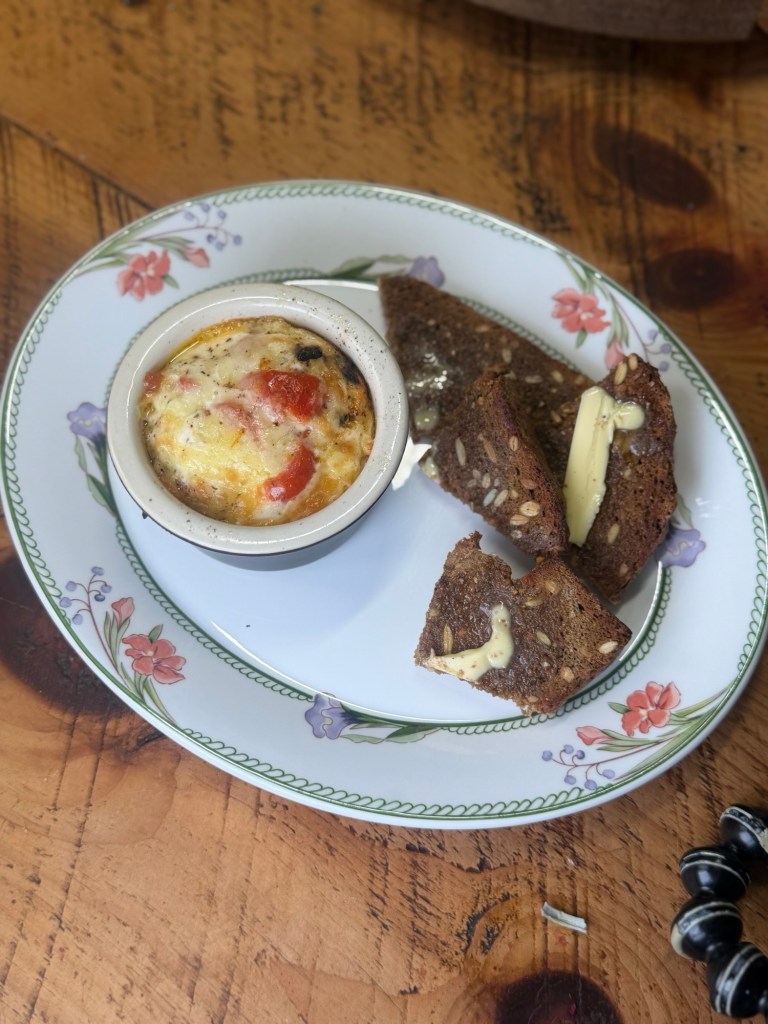
Serve and dunk When the whites are just set and the cheese is melted and golden, lift the ramekins out of the tray and dry the bottoms. Serve immediately with hot buttered toast or savoury muffins for dunking.
One ramekin per person is perfect for a light brunch or lazy lunch, but you can easily double up if you’re extra hungry.
Easy twists and swaps Once you’ve nailed this method, you can mix and match whatever you’ve got in the fridge: • Swap the chorizo for bacon, ham or smoked salmon. • Add spinach, mushrooms or leftover roasted veg for extra veg. • Use feta, goat’s cheese or Parmesan instead of cheddar. • Add chilli flakes or smoked paprika if you like more heat.
It’s one of those recipes that feels a bit fancy but is actually very forgiving – perfect for lazy Sundays, solo “treat yourself” breakfasts or a quick, impressive brunch when you’ve got people round.