Author: LCchaosandhome

  • Creamy White Kinder Bueno Overnight Oats (The Ultimate Dessert for Breakfast)

    Creamy White Kinder Bueno Overnight Oats (The Ultimate Dessert for Breakfast)

    If you are firmly of the belief that breakfast should taste like dessert, welcome to your new obsession.

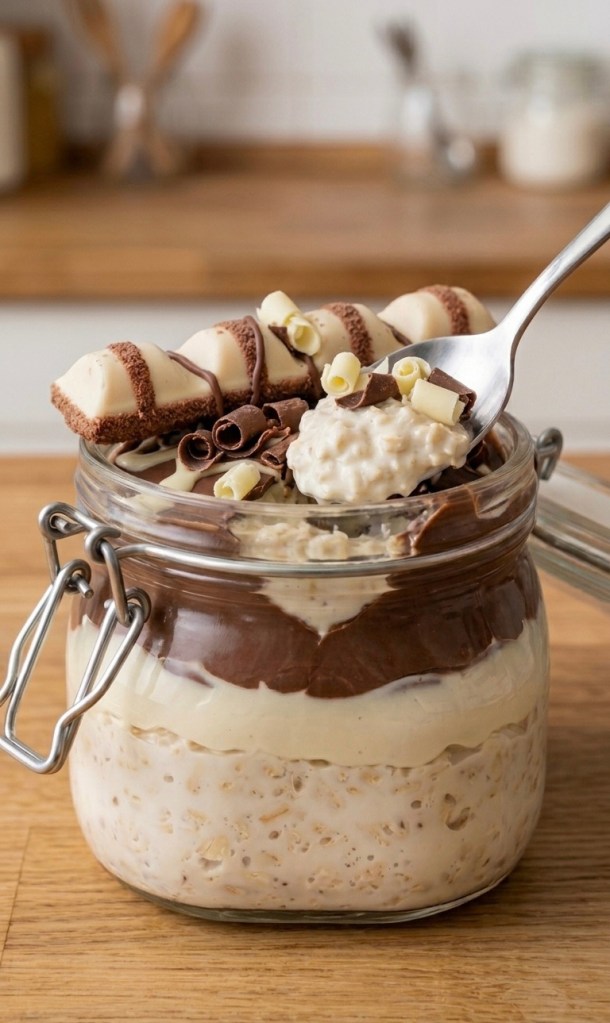
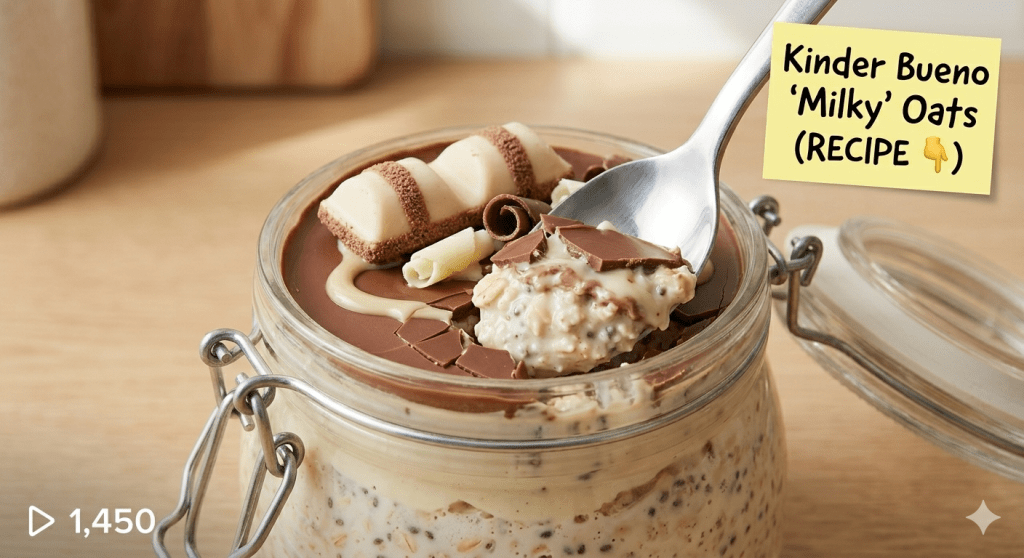
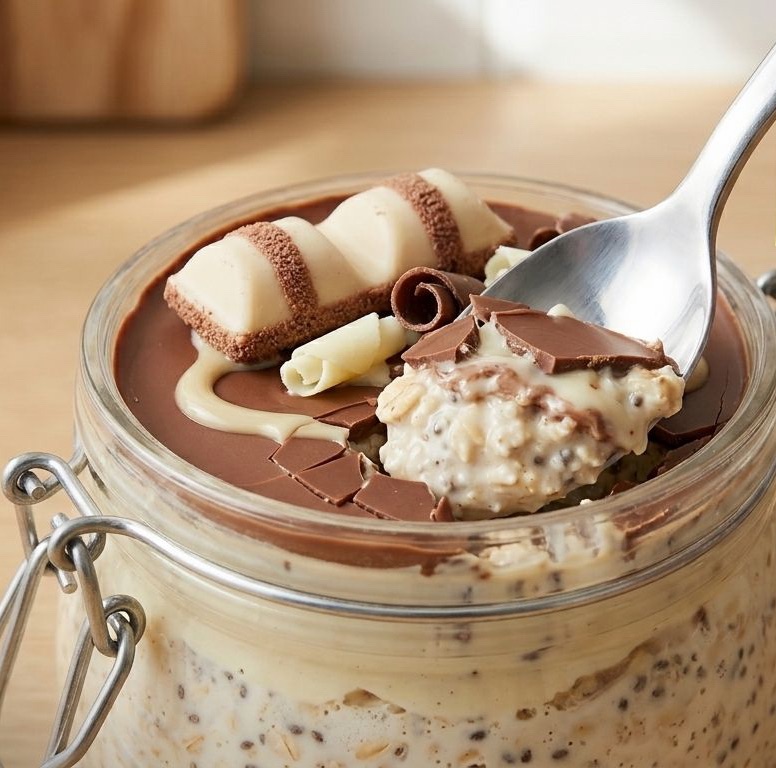
    We’ve all had standard overnight oats. They’re practical, they’re healthy, and let’s be honest—sometimes they’re a little bit boring. This recipe is the exact opposite of boring. This is a rich, velvety, ultra-creamy White Kinder Bueno Overnight Oats jar, complete with a crackable chocolate shell that makes waking up the best part of your day.

    If you love the iconic, milky, hazelnut cream filling of a classic Kinder Bueno, this recipe recreates that exact flavor profile using a few simple ingredients. It’s perfect for meal prep, takes less than 5 minutes to whip up, and feels like an absolute cheat meal.

    Why You’ll Love This Recipe

     That Satisfying Chocolate Crack: The melted chocolate top hardens in the fridge, giving you a perfect ASMR “spoon crack” moment before you dive into the creamy layers.

     The Secret Ingredient: By using a white chocolate hazelnut spread instead of traditional Nutella, you get that authentic, milky Kinder filling taste.

     Meal-Prep Friendly: Whip it up tonight in less than 5 minutes, and breakfast is ready to grab and go all week.

    Ingredients You’ll Need

    Here is everything you need to grab from your pantry to assemble these dream jars.
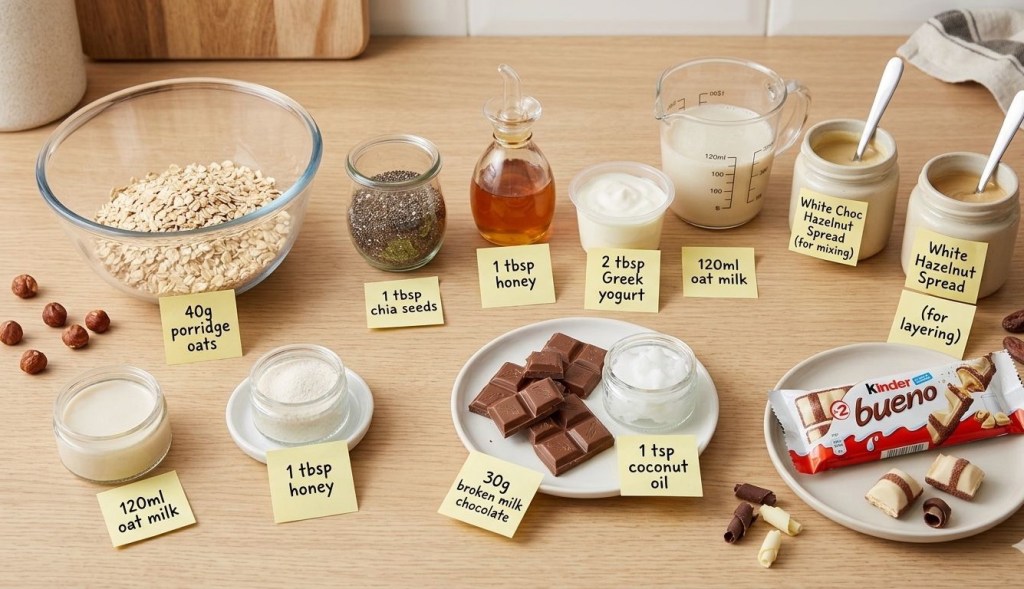
    The Creamy Oat Base

     Porridge Oats (40g): Rolled oats work best for absorbing the liquid without becoming mushy.

     Chia Seeds (1 tbsp): The secret to getting that thick, pudding-like texture.

     Milk of Choice (120ml): Almond, oat, or dairy milk all work perfectly.

     Honey or Maple Syrup (1 tbsp): For just a touch of natural sweetness.

     Greek Yogurt (2 tbsp): This is non-negotiable for achieving maximum creaminess and adding a nice protein boost.

     White Chocolate Hazelnut Spread (1 tbsp): Warmed up slightly so it mixes easily. Look for this in the spread aisle at your local supermarket (Tesco, Morrisons, and M&S all make incredible versions!).

    The Layer & Topping

     White Hazelnut Spread (1 tbsp): For a hidden surprise layer in the middle.

     Milk Chocolate (30g): Melted down to create the hard top shell.

     Coconut Oil (1 tsp): Mixed into the melted chocolate to make it beautifully glossy and easier to crack with a spoon.

     White Kinder Bueno (1 piece): The ultimate finishing touch.

    Step-by-Step Instructions

    Step 1: Mix the Base

    In a small mixing bowl or directly inside your glass jar, combine the porridge oats, chia seeds, milk, honey, Greek yogurt, and 1 tablespoon of the white hazelnut spread. Stir vigorously until everything is completely smooth and well combined.

    Step 2: Create the Hidden Layer

    Pour half of your oat mixture into the bottom of a clean, clip-top glass jar. Take your extra tablespoon of white hazelnut spread and smooth it evenly over the oats. Pour the remaining half of the oat mixture right on top.

    Step 3: Melt the Chocolate Shell

    Break your milk chocolate into a microwave-safe bowl, add the teaspoon of coconut oil, and microwave in 20-second bursts, stirring in between, until completely melted and smooth.

    Step 4: Assemble and Chill

    Pour the melted chocolate over the top layer of oats, tilting the jar slightly to ensure it creates an even, edge-to-edge seal. Press a fresh piece of White Kinder Bueno gently into the center of the wet chocolate.

    Pop the lid on and place it in the fridge overnight (or for at least 4 hours) to let the oats thicken and the chocolate shell set rock-solid.

    💡 Pro-Tip for the Perfect Crack: If the chocolate shell feels a bit too hard straight out of the fridge, let the jar sit on the counter for 3 to 5 minutes before eating. The chocolate will soften just enough to give you that perfect, satisfying spoon-crack without smashing the glass!

    Frequently Asked Questions

    Where can I find white hazelnut spread?

    Most major supermarkets now stock a white chocolate hazelnut spread right next to the regular chocolate spreads. Brands like Nutoka, Morrisons, and various imported brands offer a “milky hazelnut” paste that perfectly mimics the inside of a Kinder Bueno.

    Can I make this high-protein?

    Absolutely! Simply swap out the standard Greek yogurt for a high-protein vanilla yogurt, or stir half a scoop of your favorite vanilla or white chocolate protein powder directly into the oat base before layering. You may just need to add an extra splash of milk if the protein powder makes it too thick.

    If you tried this White Kinder Bueno Overnight Oats recipe, make sure to leave a comment below and let me know how satisfying your chocolate shell crack was! Don’t forget to tag me in your breakfast creations on socials.

  • The Secret to the Ultimate Creamy Strawberry Smoothie (TikTok’s Favorite Hack)

    The Secret to the Ultimate Creamy Strawberry Smoothie (TikTok’s Favorite Hack)

    If you’ve been scrolling through your feed lately, you’ve probably seen a dozen different ways to make a fruit smoothie. But let’s be honest—half the time, they either turn out too icy, too watery, or just plain bland.

    That stops today. This ultra-creamy strawberry smoothie tastes less like health food and more like a decadent milkshake, but it’s packed with clean ingredients to fuel your morning.

    The secret? A tiny splash of fresh lemon juice. It sounds simple, but it completely cuts through the richness and makes the strawberry flavor absolutely explode.

    🛒 The Ingredient Breakdown

    Here is everything you need to grab from your kitchen:

     Frozen Strawberries (2 cups): Essential for keeping the smoothie thick and frosty without needing to add ice (which just dilutes the flavor).

     Greek Yogurt (½ cup): Go for whole milk Greek yogurt if you want maximum creaminess and a solid protein boost.

     Frozen Banana (½): Just half a banana adds the perfect natural sweetness and velvet texture without overpowering the strawberry flavor.

     Honey or Maple Syrup (1 tbsp): For a touch of natural, unrefined sweetness.

     Fresh Lemon Juice (1 tsp): The game-changer. Don’t skip it!

    🥛 The Great Milk Debate: Which One is Best?

    The beauty of this recipe is its flexibility. Depending on what you pour into your blender, you can completely customize the vibe of your breakfast:

    Whole Milk: The undisputed champion for the richest, most milkshake-like texture.

    Oat Milk: The absolute best plant-based option. It has a naturally thick consistency and a slight sweetness that pairs perfectly with berries.

    Almond Milk: Your go-to if you want to keep things light, crisp, and low-calorie.

    🌪️ How to Make It

    1 Layer the Blender: Put your liquid in first (this helps the blades spin smoothly), followed by the yogurt, honey, lemon juice, and finally the frozen fruit.

    2 Blend on High: Whirl it all together until completely smooth. If it’s looking a little too thick to move, don’t panic—just add an extra splash of milk a tablespoon at a time.

    3 Garnish and Serve: Pour it into a tall glass, pop in a reusable glass straw, and top with a few fresh strawberry slices if you’re feeling fancy.

    📝 Prep Ahead: Meal Prep Smoothie Packs

    Love this recipe but short on time in the morning? You can prep your ingredients ahead of time!

    Method:

    1 Grab a reusable silicone freezer bag or a heavy-duty freezer Ziploc.

    2 Place the frozen strawberries and frozen banana (the core frozen components) directly in the bag.

    3 Add the optional honey if you prefer it pre-frozen (though it blends fine fresh).

    4 Squeeze out as much air as possible, seal, and store in the freezer.

    5 In the morning: Grab your pre-packed bag, dump it into the blender, add the milk, Greek yogurt, and the key teaspoon of fresh lemon juice. Blend and go!

    This saves valuable minutes and ensures you have a thick, cold base every time.

    📊 Nutritional Breakdown (Estimated, per serving)

    This breakdown assumes you are using whole milk Greek yogurt and whole dairy milk, and that the recipe makes one large or two moderate-sized servings.

     Calories: ~350 – 450 kcal

     Protein: ~18g – 22g (great for muscle recovery)

     Carbohydrates: ~45g – 55g

     Total Fat: ~10g – 14g (from the whole dairy and yogurt)

     Sugars: ~30g – 35g (mostly natural from fruit, plus 1 tbsp honey)

     Dietary Fiber: ~6g – 8g (keeps you full longer)

     Vitamin C: High (from strawberries and lemon)

     Calcium: Good source (from milk and yogurt)

    ✨ Final Thoughts

    Whether you’re blending this up for a quick weekday breakfast or treating yourself on a lazy Sunday morning, this creamy strawberry smoothie is bound to become a permanent staple in your routine. It’s fast, incredibly satisfying, and that simple lemon juice trick will make you feel like an absolute blending genius. Give it a try, experiment with your favorite milk combo, and leave a comment below to let me know how yours turned out. Happy blending!

  • Lemon Butter Parmesan Pasta For Tea Tonight

    Lemon Butter Parmesan Pasta For Tea Tonight


    Some nights you just want something quick, comforting and a bit special without spending ages in the kitchen. That’s cwhere this lemon butter parmesan pasta comes in. It’s bright, buttery, garlicky and on the table in about 15 minutes, so it’s perfect for busy weeknights or those evenings when you can’t be bothered but still fancy a nice tea.
    It’s made with simple cupboard and fridge bits – pasta, butter, garlic, lemon and parmesan – but it feels like a proper “restaurant at home” dinner. You can keep it exactly as it is for a meat‑free meal, or add cooked chicken, prawns or a handful of peas if you want to bulk it out a bit more.

    If you’ve seen lemon pasta all over TikTok and wondered if it’s actually worth trying, this is a really easy place to start. Everything happens in one pan plus your pasta pot, and a bit of that starchy pasta water helps create the silkiest, glossiest sauce without needing loads of cream.

    Ingredients
    Serves 2–3
    • 200 g pasta (spaghetti, tagliatelle or any long pasta)
    • 2 tbsp butter
    • 1 tbsp olive oil
    • 3 garlic cloves, finely chopped or crushed
    • Zest of 1 lemon
    • Juice of 1/2–1 lemon (to taste)
    • 30–40 g grated Parmesan or Grana Padano
    • Salt and black pepper
    • A ladle of pasta water (from the pan)

    • Fresh basil or parsley to serve (optional)

    Method

    1. Cook the pasta
      Bring a large pan of salted water to the boil and cook the pasta according to the packet instructions until al dente. Before you drain it, scoop out a mugful of the starchy pasta water and set it aside.
    2. Start the sauce
      While the pasta cooks, add the butter and olive oil to a large frying pan or shallow casserole over a low–medium heat. Let the butter melt gently into the oil.
    3. Add garlic and lemon zest
      Stir in the chopped garlic and cook for about a minute until fragrant. You want it soft and smelling amazing rather than browned or crispy. Add the lemon zest and stir it through the butter mixture.
    4. Bring the pasta and sauce together
      Add the drained pasta straight into the pan with the lemon butter and garlic. Pour in a small splash of the pasta water and toss everything together so the pasta is nicely coated.
    5. Add cheese off the heat
      Take the pan off the heat, then sprinkle over the grated Parmesan. Toss well so the cheese melts into the lemony butter and pasta water, turning into a silky, glossy sauce. Add extra splashes of pasta water as needed until it looks creamy and coats the pasta nicely.
    6. Season and adjust the lemon
      Squeeze in the juice of half a lemon, give it a taste and add more lemon if you like it extra zingy. Season with a good twist of black pepper and a little salt if it needs it (remember the Parmesan is already salty).
    1. Finish and serve

    Finish with a handful of chopped basil or parsley and a bit more Parmesan on top. Serve straight away while it’s hot and glossy.

    Tips and Variations
    • Make it extra creamy: Stir in a spoonful of cream cheese or mascarpone with the Parmesan if you want a richer sauce.
    • Add protein: Toss through some cooked chicken, prawns or crispy bacon at the end to make it more filling.
    • Keep it budget‑friendly: Swap Parmesan for a basic hard cheese and use whatever pasta you have in the cupboard – it will still work.

    • For garlic lovers: Add an extra clove or two of garlic or a pinch of garlic granules at the end for more punch.

    How to Serve
    This lemon butter parmesan pasta is lovely on its own in a big bowl, but it also works really well with a simple green salad or some garlic bread on the side. It’s the kind of easy, cosy meal you can throw together after a long day, but it still feels like a bit of a treat.
    If you do make it, let me know how you get on and what you’d rate it out of 10 – especially if you’ve spotted it on my TikTok and come over here for the full recipe.

  • Thought for the day Tuesday 16th June 2026

    Thought for the day Tuesday 16th June 2026

    What is something you wish you could tell your 20-year-old self?

    If I Could Sit Down With My 20-Year-Old Self
    I often think about that younger version of me—insecure, shy , and a quiet uncertainty that I didn’t always show on the outside. If I could sit across the table from them now, cup of tea in hand, I wouldn’t overwhelm them with advice. I’d keep it simple. Honest. Grounded in what truly matters.
    First, I would say this: everything will be okay.
    Not perfect. Not smooth. Not without heartbreak, wrong turns, or moments where you feel completely lost—but okay. Life has a way of working itself out, even when it doesn’t look like it in the moment. Some of the things you’ll worry about most won’t matter in a few years, and some of the hardest moments will quietly shape your strength.
    I would tell them to believe in yourself.
    Not in a loud, overconfident way—but in a steady, quiet knowing that you are capable. You don’t need to have all the answers right now. You don’t need to prove yourself to everyone in the room. The confidence you’re looking for comes from doing, trying, failing, and getting back up again. Trust that you are building something, even when it feels slow.
    Then I’d lean in and say: follow your gut.
    That instinct you sometimes ignore? It’s there for a reason. It will guide you better than outside noise ever can. When something feels right, pay attention. When something feels off, don’t brush it aside just to keep the peace. Listening to yourself will save you time, energy, and heartache.
    And maybe most importantly: don’t believe everything everyone tells you.
    People will project their fears, limitations, and opinions onto you—sometimes without even realizing it. Just because someone says you can’t do something doesn’t make it true. Question things. Think for yourself. Stay open, but don’t hand over your sense of direction to someone else.
    Life won’t unfold exactly how you imagine it—and that’s not a failure, it’s the point. The unexpected turns often lead to the most meaningful chapters.
    If I could leave my younger self with one feeling, it would be reassurance. That you don’t need to rush. That you’re allowed to grow at your own pace. And that one day, you’ll look back and realise—you made it through more than you ever thought you could.

  • Thought for the day Monday 15th June 2026

    Thought for the day Monday 15th June 2026

    Write your guide to setting healthy boundaries in relationships.

    Healthy relationships are not built on constant sacrifice or silence. They are built on respect, honesty, and the ability to protect your own emotional wellbeing. Boundaries are not about pushing people away; they are about making sure you are treated in a way that aligns with your values.
    One of the most important lessons is to trust your gut. If something feels off, it probably is. Red flags are easy to ignore when emotions are strong, but they rarely disappear on their own. Pay attention to patterns, not just promises. Actions speak louder than words ! I believe in giving people the benefit of the doubt -everyone make mistakes and can be truly remorseful- if it’s repeated behaviour then it’s a habit not a mistake . If your inner voice is raising concerns, listen to it instead of explaining it away.
    Protecting your heart matters. You are not here just to make someone else comfortable while you feel uncertain or drained. Your feelings, your time, and your energy are valuable. Being kind should never come at the cost of your own wellbeing. I have been so guilty of this in the past and still bear the scars and think I always will .


    A simple but powerful rule is this: do not ask someone to accept behaviour you would not accept yourself. Respect should go both ways. If something would make you uncomfortable, it is reasonable to expect the same standard from others.
    Past experiences can leave lasting marks. Being gaslighted, for example, can make you question your own reality and instincts. But those instincts are still there for a reason. If something does not feel right, do not ignore it. Love bombing, mixed signals, or manipulation can feel intense at first, but healthy love does not confuse you or make you doubt yourself constantly. However hard it may be to do, walk away don’t waste your energy and heart thinking you can change people – you can’t .. protect you, get out while you can !
    Boundaries are an act of self-respect. The right people will not only accept them, they will appreciate them.

  • The Ultimate 5-Minute Breakfast: Creamy Peanut Butter Banana Smoothie

    The Ultimate 5-Minute Breakfast: Creamy Peanut Butter Banana Smoothie

    Struggling to find time for breakfast in the morning? We’ve all been there. You want something that actually keeps you full until lunch, doesn’t taste like cardboard, and—most importantly—doesn’t require a masterclass in culinary arts to prepare.

    Enter the Peanut Butter Banana Smoothie. It’s the perfect blend of creamy, sweet, and satisfying, and it takes less than five minutes to whip up.

    Why You’ll Love It

     The Texture: Using a frozen banana creates a thick, “milkshake-like” consistency without needing a ton of dairy.

     The Staying Power: Thanks to the whole rolled oats, this isn’t just a sugar spike; it’s a balanced breakfast that keeps your energy steady.

     The Versatility: This recipe is essentially a blank canvas. Whether you want to add a scoop of protein powder, a shot of espresso for a morning buzz, or some cocoa powder for a “dessert for breakfast” vibe, it works every single time.

    What You’ll Need

     1 Frozen Banana: Pro-tip: Wait until your bananas have spots before freezing them for maximum sweetness. Peel them first, then store in an airtight bag for up to 3 months.

     ⅓ Cup Whole Rolled Oats: These provide fiber and help thicken the smoothie.

     3 Tbsp Natural Peanut Butter: Creamy works best for a smooth finish.

     ¾ Cup Unsweetened Almond Milk: Or any milk you have on hand.

     A Handful of Ice: For that frosty, refreshing temperature.

     Optional Toppings: A sprinkle of chocolate chips or a drizzle of peanut butter.

    The Simple Process

    1 Prep the Base: Add your banana, oats, peanut butter, and milk into the blender. Blend on high until the oats are fully broken down and the mixture is smooth.

    2 Add the Chill: Throw in your handful of ice (and any extras like protein powder or cocoa). Pulse until you reach that perfect, creamy consistency.

    3 Pour & Enjoy: Pour into a glass, top with your favorite extras, and head out the door!

    Make It Your Own (Optional Add-ins)

    Don’t be afraid to experiment with these boosters:

     Protein Boost: One scoop of vanilla protein powder.

     Morning Perk: A splash of cold brew coffee.

     Superfood Kick: A teaspoon of maca powder.

     Chocolate Fix: A tablespoon of cacao or cocoa powder.

    Whether you’re meal-prepping for a busy week or just need a quick win before work, this smoothie is about to become your new morning go-to. Give it a try and let me know your favorite way to customize it in the comments below!

    What’s your go-to ingredient for making a smoothie feel like a complete meal?

  • Finding Calm in the Chaos: A Lesson from 1,750 miles

    Life is what happens to you whilst you’re busy doing other things. Unexpected occurrences are a necessary part of living, but they feel particularly unjust when you are ticking along merrily, only to be pole-vaulted into a crisis.
    When that timing feels crippling, it can temporarily debilitate you, pushing your mental endurance to its absolute threshold. You find yourself fighting to reclaim the life you are trying to lead, struggling under the weight of the severity.
    And yet, just when that threshold threatens to break, a little talking cat thousands of miles away takes center stage. Meet Chaos: a cat who makes the most beautiful, entertaining array of sounds—a cat that pole-vaults you right back into appreciation.
    When Chaos met chaos, everything changed.

    Pic: Chaos, I so would have.

  • Creamy Chorizo Rigatoni Pasta (Quick & Easy)

    Creamy Chorizo Rigatoni Pasta (Quick & Easy)

    If you are looking for a comforting, restaurant-quality dinner that comes together in under 20 minutes, this Creamy Chorizo Rigatoni is about to become your new weekly obsession.

    It is smoky, velvety, and packed with bold flavours. The secret to making this sauce taste like it simmered for hours? A chef’s trick called flavour layering. By frying off the tomato purée and paprika directly in the rendered chorizo oils before adding the double cream, you build an incredible depth of flavour in seconds.

    Why You’ll Love This Recipe

     Fast & Foolproof: Ready in the time it takes to boil your pasta.

     Minimal Ingredients: Uses simple, high-impact ingredients you can grab at any UK supermarket.

     Unbelievably Creamy: Double cream and finely grated Parmesan create a glossy, luxurious sauce that perfectly clings to the rigatoni.

    The Ingredients You’ll Need

     200g dried rigatoni pasta (or 300g fresh)

     120g chorizo sausage, sliced into 0.5cm rounds

     ½ small red onion, finely diced

     2–3 fresh garlic cloves, minced

     3 tablespoons tomato purée

     1 teaspoon paprika

     180ml double cream

     40g Parmesan cheese, very finely grated

     1 tablespoon fresh lemon juice

     ½ cup fresh Italian parsley, finely chopped

     Salt and pepper to taste

    Step-by-Step Instructions

    1. Cook the Pasta

    Boil your rigatoni in salted water according to the package instructions. Top tip: Cook it for 1 minute less than the packet says so it stays al dente—it will finish cooking and absorb the sauce later. Crucial step: Reserve roughly a mug full of pasta water before draining!

    2. Crisp the Chorizo

    While the pasta boils, heat a large frying pan over medium-high heat. Add the sliced chorizo and cook for 3 minutes until lightly golden. You won’t need oil, as the chorizo releases its own delicious, smoky oil.

    3. Soften the Aromatics

    Add the diced red onion and a big pinch of salt to the pan. Cook for 3 to 5 minutes until the onion softens. Turn the heat down if the onions start to catch or brown. Stir in the minced garlic and cook for just 30 seconds more until fragrant.

    4. Layer the Flavours

    Add the tomato purée and paprika straight into the pan. Stir it into the chorizo oil and let it cook down for 2 minutes. This darkens the purée and unlocks the rich, smoky profile of the paprika.

    5. Build the Creamy Sauce

    Pour in the double cream and mix well, bringing it to a very gentle simmer. Turn the heat down if necessary—the sauce should bubble gently, never boil. Stir in about 80ml (⅓ cup) of your reserved pasta water.

    6. Add the Cheese and Acid

    Push the chorizo to one side of the pan. Add the grated Parmesan in two separate batches, stirring and letting the first lot melt completely before adding the second. Quickly whisk in the fresh lemon juice to cut through the richness.

    7. Toss and Serve

    Tip your cooked rigatoni straight into the pan. Toss everything together and let it gently bubble for 1 to 2 minutes so the sauce thickens and coats every single tube of pasta.

    Toss the fresh parsley through right before serving, dish it up into a rimmed pasta bowl, and enjoy!

    💡 Recipe Pro-Tips:

    Don’t skip the pasta water: The starches in the reserved water act as an emulsifier, binding the rich double cream and melted Parmesan into a smooth, glossy sauce rather than a greasy one.

    Turn down the heat: Double cream can split if it gets too hot. Keep the pan at a gentle simmer once the dairy goes in.

  • Thought for the day 13.06.2026

    Thought for the day 13.06.2026

    What notable things happened today?

    Today’s notable event? Not a global headline—just a personal plot twist: I pulled my back… ten days before a big birthday. Timing so impeccable it almost feels deliberate.

    There’s something uniquely humbling about a back injury. One minute you’re thriving—eating well, exercising, feeling smug about your life choices—and the next, you’re negotiating with your spine like it’s a disgruntled employee.
    “Please,” you whisper, attempting to stand up, “we’ve had a good run.”
    And yet, here we are.
    What makes it particularly offensive is the lack of a good story. No dramatic sporting triumph. No heroic DIY accident. Just a quiet betrayal—perhaps while reaching for something mundane, like a sock or a cup of tea. This, apparently, is how it begins. For me . Nothing .. no idea how it has happened !
    Which leads to the inevitable question: is this a sign of growing old?
    Well… not exactly. But it is a sign of something.
    Bodies are funny like that. You can do all the right things—move regularly, eat properly, stay active—and still get caught out by one awkward twist or one overconfident stretch. It’s less about age and more about accumulated mileage. Even well-maintained machines occasionally make strange noises.
    The real shift isn’t the injury itself—it’s your reaction to it. Ten years ago, you might have bounced back without a second thought. Now, there’s a brief moment of reflection. A pause. Maybe even a Google search or two about lumbar support cushions.
    But here’s the reassuring part: this isn’t decline, it’s awareness. You’re more tuned in, more cautious, and perhaps slightly less willing to pretend you’re invincible. That’s not ageing—that’s evolving (with the occasional complaint from your lower back).
    So no, pulling your back ten days before a big birthday isn’t a sign that things are falling apart, especially If anything, it’s a reminder that you’re still very much in the game—just playing it with a bit more strategy (and maybe a heat pack).
    And who knows? By the time the birthday rolls around, you might be upright, mobile, and armed with a far better appreciation for the simple joy of standing up without wincing.
    Now that’s worth celebrating.

  • Better Than Restaurant Salmon Alfredo (In Just 20 Minutes!) 🤫✨

    Better Than Restaurant Salmon Alfredo (In Just 20 Minutes!) 🤫✨

    Want restaurant-quality pasta without leaving the house? This ultra-creamy, foolproof Salmon Alfredo takes just 20 minutes, using fresh salmon baked perfectly in the oven and a rich sauce made on the hob


    Look, we’ve all been there. It’s 6:00 PM on a weekday, you’re completely wiped out, but you’re absolutely craving something fancy and comforting. You could spend a small fortune ordering a lukewarm pasta delivery… or you could make this.

    Honestly, this Creamy Salmon Alfredo is a total game-changer.

    We are using ordinary fresh salmon fillets for this, baking them to absolute perfection in the oven so they stay incredibly juicy and tender. While the oven does the heavy lifting with the fish, you’ll whip up a velvety, rich Parmesan cream sauce right on the hob. Then, you just flake those beautiful, tender salmon chunks straight into the glossy fettuccine. It is absolute luxury in a bowl.

    Let’s get cooking!


    🔥 Why This Recipe Is A Total Winner

    • Hands-Off Salmon: Baking the salmon in the oven locks in all the moisture and means you don’t have to stand over a spitting pan flipping delicate fish. It’s pretty much impossible to overcook it this way!
    • The “Liquid Gold” Secret: We’re using starchy pasta water on the hob to bind everything together. It turns a basic cream-and-cheese mix into that glossy, silky sauce you usually only get at high-end Italian spots.
    • Super Fast: Because the salmon bakes while your pasta boils, the whole meal comes together in about 20 minutes flat.

    🛒 What You’ll Need

    Here’s your quick shopping list. This recipe makes enough for 2 to 3 very happy people. Ingredient Quantity My Personal Notes Fresh Salmon Fillets 250g Just standard raw fillets (skin-on or skinless is fine) Dried Fettuccine 250g Tagliatelle or linguine work perfectly too Unsalted Butter 50g Use unsalted so your sauce isn’t a total salt bomb Shallot 1 small Chop this up as finely as you can Double Cream 125ml Don’t skimp here—double cream gives it that signature thickness Parmigiano Reggiano 60g Grate it fresh! The pre-packaged powder won’t melt right Salt & Black Pepper To taste A bit for the fish, a bit for the sauce Fresh Parsley A handful Optional, but it makes it look pretty


    👩‍🍳 Let’s Make It!

    1. Bake the Salmon

    Preheat your oven to 200°C (180°C Fan / Gas Mark 6). Line a tray with baking paper, lay your fresh salmon fillets down, and rub the flesh with a tiny bit of oil or butter. Pop a pinch of salt and pepper on top.

    Bake for 12 to 15 minutes until it flakes easily with a fork. Pull it out of the oven, slide the skin off (if it had any), and gently flake the meat into big, rustic chunks. Set them aside for the very end.

    2. Boil Your Pasta on the Hob

    While the salmon is in the oven, get a big pan of salted water to a rolling boil on the hob. Drop in your fettuccine and cook until it’s al dente (cooked through but still has a bit of a bite).

    🛑 DO NOT SKIP THIS: Before you drain the pasta, grab a mug and scoop out 120ml (about ½ cup) of that cloudy pasta water. This is our secret weapon! Now you can drain the rest of the pasta in a colander.

    3. Start the Cream Base

    Melt your 50g of butter in a deep frying pan on the hob over a medium heat. Throw in your chopped shallot and sauté for about 2 minutes until soft and sweet. Pour in the 125ml of double cream and bring it to a quick bubble, then turn the heat straight down to medium-low and let it simmer for 3 minutes to thicken up.

    4. Make It Cheesy

    Take the frying pan completely off the heat source. Stir in your 60g of grated Parmigiano Reggiano, a final ¼ tsp of salt, and a generous grind of black pepper. Keep stirring until the cheese completely melts into a silky, smooth sauce.

    5. Bring It All Together on the Hob

    Toss your drained fettuccine, that 120ml of saved pasta water, and your gorgeous oven-baked salmon chunks right into the sauce. Put the pan back on the hob over a medium heat.

    Toss very gently for 1.5 to 2 minutes so you don’t break up the salmon. You’ll see the magic happen right before your eyes—the starchy water and cream will marry together into a glossy sauce that clings beautifully to every single noodle without pooling at the bottom of the pan.


    💡 Quick Tips for Perfection

    • Seriously, Grate Your Own Cheese: Pre-shredded cheese in packets is coated in starch to stop it clumping, which means it will make your sauce grainy. Grate a block yourself for that ultra-smooth finish.
    • Keep the Salmon Large: When you’re mixing everything at the end, channel your inner chef and toss gently. If you stir too hard, those lovely oven-baked salmon pieces will disintegrate into mush. Bigger chunks mean a much better texture!

    💬 Over To You!

    Are you team parsley or do you like a squeeze of fresh lemon juice on your salmon pasta? Let me know in the comments below if you try this out!