People ask this question and expect grand answers. A career. A cause. A lifelong ambition. But when I sit quietly and ask myself what truly lights me up, what gives my days their shape and meaning, the answer is straightforward: my cats and my family.
That is it. That is everything.
Millie and Moon — and Ruby I am passionate about my cats in a way that only cat people will fully understand. Millie and Moon are very different souls. Moon is quiet and affectionate — she finds you, settles beside you, and stays. There is a steadiness to her that I find genuinely comforting. Millie, on the other hand, is an absolute character. Full of opinions, endlessly entertaining, living life entirely on her own terms. She makes me laugh every single day. And then there is Ruby, who we lost recently. Her absence has left a gaping hole in this house that I was not fully prepared for. She was woven into our routines, our quiet evenings, the ordinary moments that you do not realise you are treasuring until they are gone. Grief for a cat is real grief — and I make no apology for feeling it deeply.
Caring for animals is something I feel strongly about. They give so much — calm, comfort, companionship — and ask for so little in return.
Evie, Hope, Lance, and the Life We Have Built I am passionate about my family with the same wholehearted certainty. Evie is 24 and Hope is 21 — both flown the nest now, out living their own lives, which is exactly what you raise them to do and still somehow takes your breath away. The love does not go anywhere when they leave. It just travels further.
At home now it is me and Lance, and the cats, and the life we have built together. And that is more than enough.
What I Have Come to Believe “The love we give to those who depend on us — whether they have two legs or four — is never wasted. It comes back to us in purrs, in laughter, in the quiet comfort of knowing we matter to someone.” That is what passion looks like for me. Not something loud or dramatic — just a deep, steady commitment to the people and animals I love. Showing up for them, day after day, in the small and ordinary ways that turn out to matter most. That is what I am passionate about. And I would not have it any other way.
Are you tired of the same old morning routine? If you’re looking to level up your breakfast game with something that feels like a café-style treat but is incredibly easy to make at home, you have come to the right place.
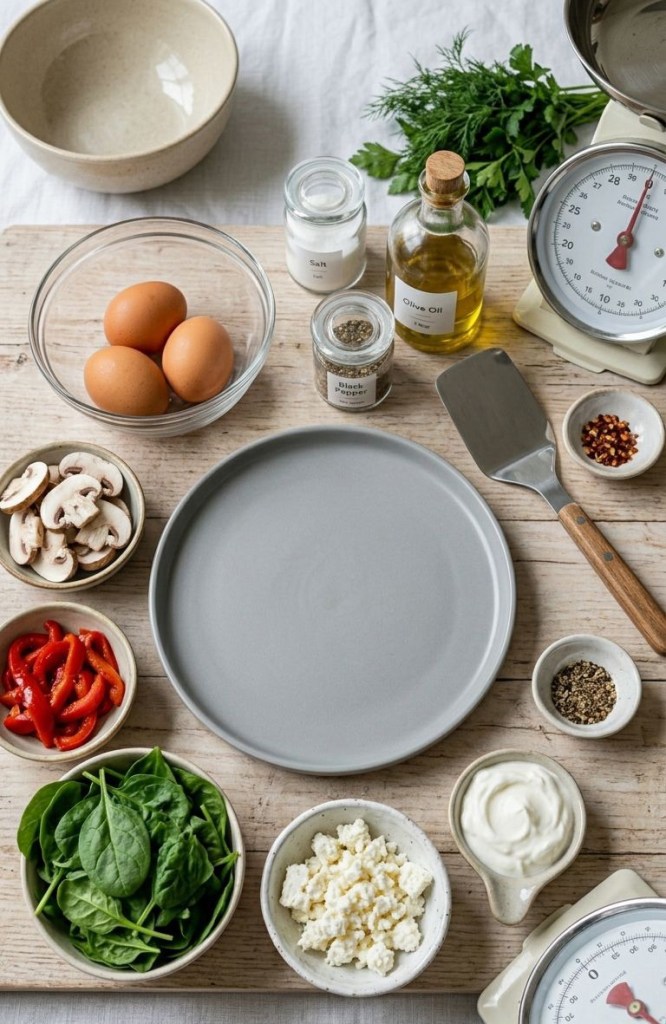
Today, we are talking about the Mediterranean Omelette with Whipped Greek Yogurt. It’s light, vibrant, and packed with enough protein to keep you satisfied all morning long.
Why You Need This in Your Life
Beyond the incredible flavour combination, this dish is a nutritional powerhouse. Thanks to the combination of eggs, creamy Greek yogurt, and tangy feta, each serving packs a serious punch—coming in at approximately 30g–35g of protein per portion. It’s the perfect way to hit your macros without sacrificing flavour.
The Recipe
Serves 1
Ingredients
3 large eggs
1 tbsp olive oil (for frying)
A handful of fresh spinach
50g roasted red peppers, sliced
50g chestnut mushrooms, sliced
30g feta cheese, crumbled
2 tbsp thick Greek yogurt (for the topping)
A handful of fresh herbs (dill or parsley work beautifully)
A pinch of chilli flakes
Salt and black pepper to taste
Instructions
1 Whisk: In a small bowl, whisk your eggs with a pinch of salt and pepper until smooth.
2 Sauté: Heat the olive oil in a non-stick pan over medium heat. Add the mushrooms and roasted peppers, cooking until they start to soften. Toss in the spinach and cook until just wilted.
3 Cook: Pour the whisked eggs into the pan over the vegetables. Let them set slightly.
4 Add the Feta: Once the edges start to set, sprinkle the crumbled feta over one half of the omelette.
5 Fold & Serve: Gently fold the omelette over. Slide it onto your plate, top it with a generous dollop of cold, whipped Greek yogurt, fresh herbs, and a final dusting of chilli flakes for a little kick.
Pro-Tips for Success
Don’t overcook the eggs: For the best texture, remove the pan from the heat while the top still looks slightly moist. The residual heat will finish the cooking process.
The Yogurt Trick: Use full-fat Greek yogurt for the creamiest topping. The cold, creamy yogurt against the warm, savoury omelette is a complete game-changer!
Have you tried adding Greek yogurt to your eggs before? Let me know in the comments below—I’d love to hear how you customise your brunch!
If you are tired of spending £3+ on individual store-bought energy bars that are secretly loaded with artificial sweeteners and preservatives, you are in the right place.
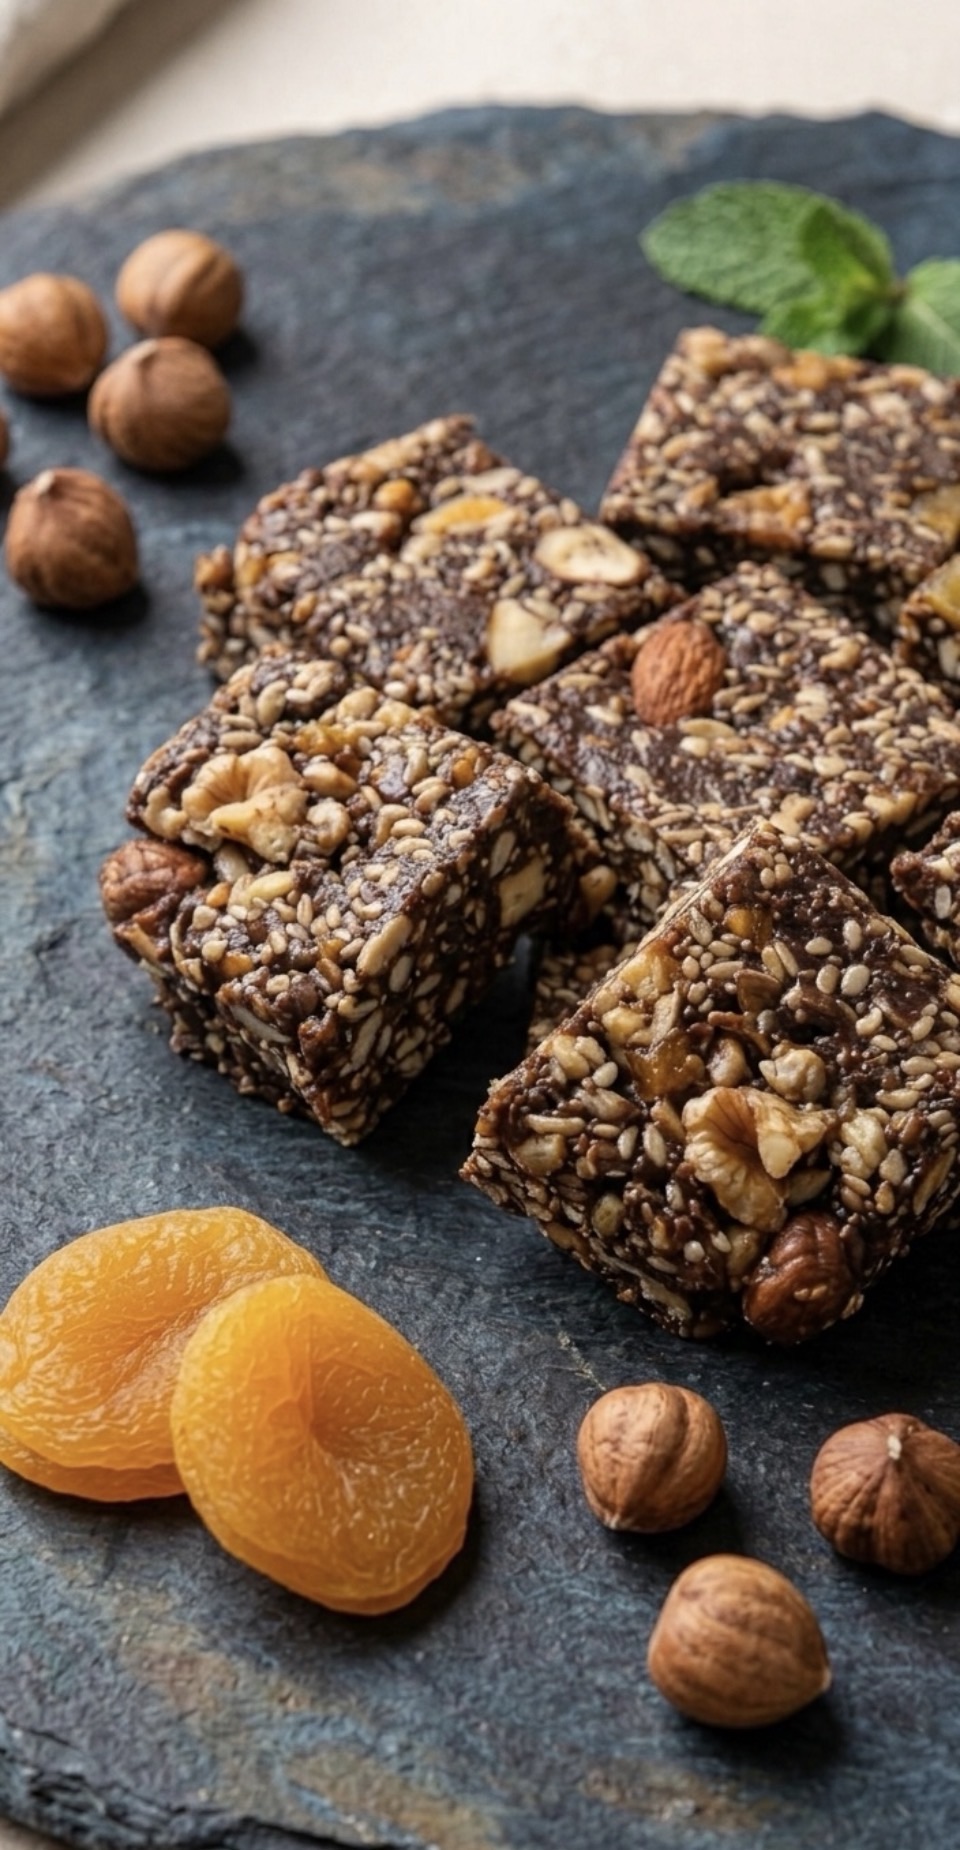
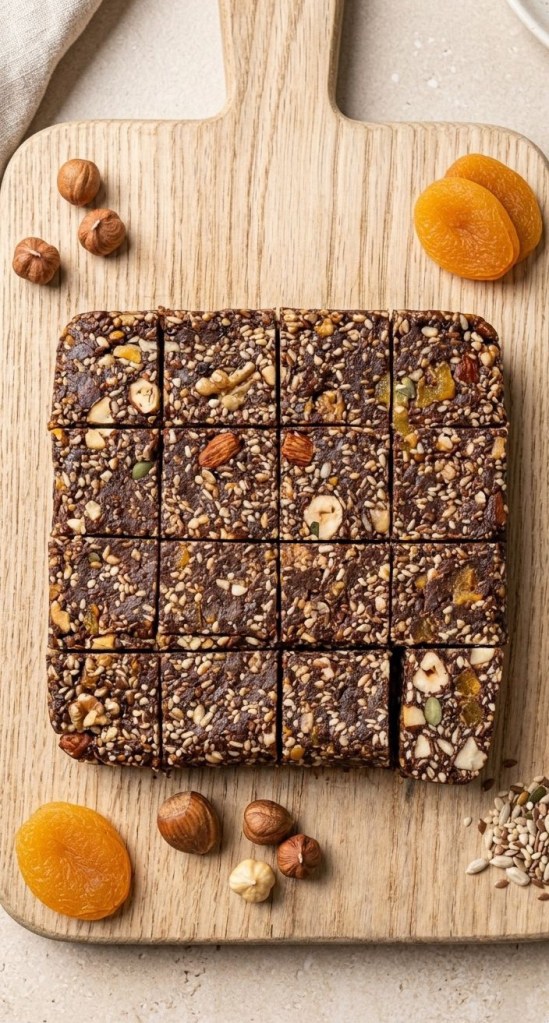
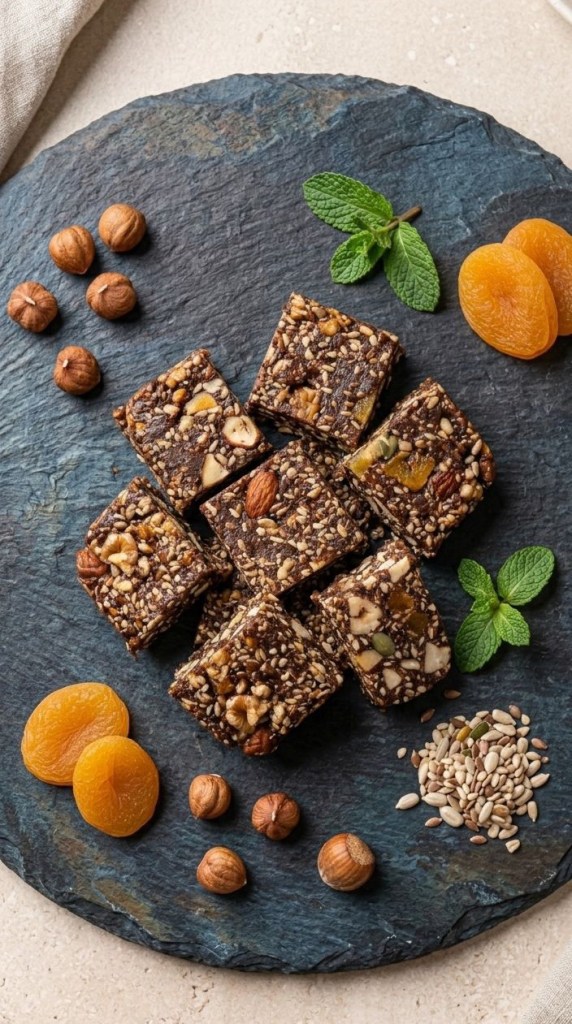
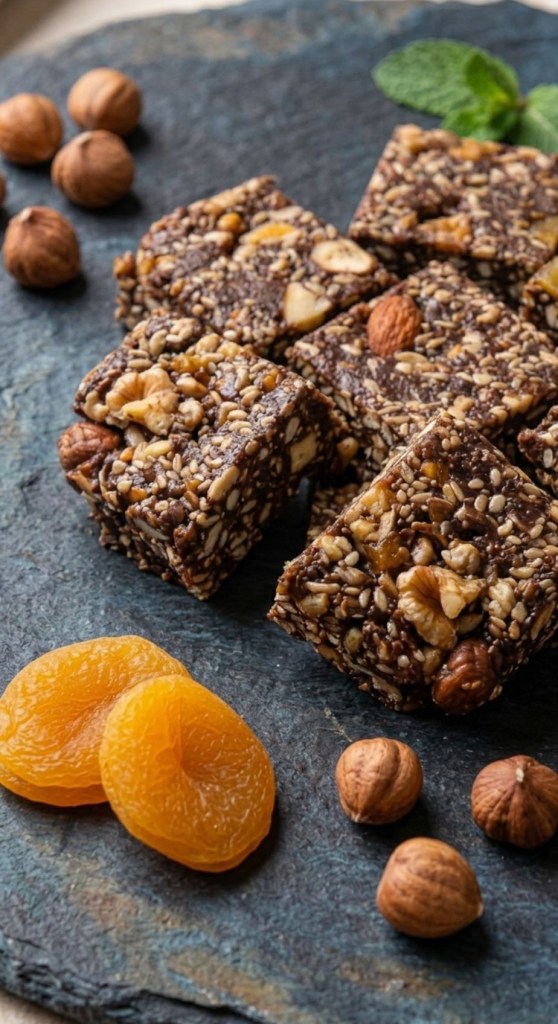
These homemade Apricot and Chocolate Bars are the ultimate healthy snack solution. They are rich, fudgy, and packed with satisfying crunch, tasting remarkably like chocolate fudge—but made entirely from wholesome, unrefined ingredients.
The best part? There is absolutely no baking required. You just need a food processor, 5 minutes of prep time, and a little bit of patience while they set in the freezer.
Let’s dive into why these will become your new weekly meal prep staple!
Why You’ll Love This Recipe
100% No-Bake: No need to turn on the oven. Perfect for quick prep.
Budget-Friendly: Makes 16 bars for a fraction of the price of store-bought alternatives.
Packed with Whole Foods: Healthy fats from the nuts, natural sweetness from the fruits, and antioxidants from the pure cocoa.
Family Friendly: A brilliant, nut-heavy lunchbox snack or midnight sweet-tooth fix.
Equipment Needed
Food processor
20cm (8in) square cake tin
Cling film
Sharp knife
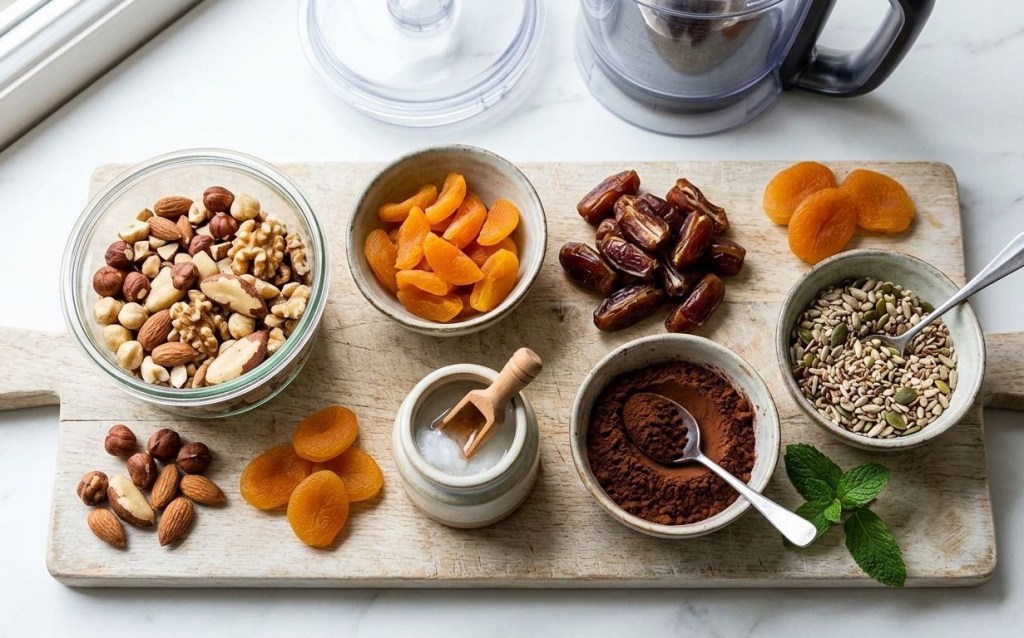
Ingredients
Here is everything you need to grab from the cupboard:
150g mixed nuts (such as almonds, hazelnuts, Brazil nuts, and walnuts), roughly chopped
150g ready-to-eat dried apricots, quartered
200g soft pitted dates, quartered
50g coconut oil
3 tbsp pure cocoa powder
3 tbsp mixed seeds (such as sunflower, pumpkin, sesame, and flax)
Step-by-Step Method
Step 1: Prep the Tin
Line your 20cm square cake tin with cling film, ensuring you leave plenty of excess overhanging the sides. This makes it incredibly easy to lift the bars out later.
Step 2: Blitz the Nuts
Put your mixed nuts into the food processor. Blitz until they are finely chopped, but do not grind them into a powder. You want to keep those distinct pieces to give the bars a lovely, satisfying crunch. Tip the chopped nuts into a separate bowl and set aside.
Step 3: Create the Fruit Paste
Add the quartered apricots and dates into the food processor. Blend them together until they form a thick, sticky paste. Again, don’t let it get completely smooth—a little texture is a good thing here!
Step 4: Bring It All Together
Return the chopped nuts to the food processor along with the coconut oil, cocoa powder, and mixed seeds. Blend until the mixture clumps together into a unified paste. (Tip: You may need to stop the processor once or twice to push the mixture down from the sides with a spatula).
Step 5: Press and Freeze
Spread the chocolate paste evenly over the base of your lined tin, smoothing the surface with the back of a spoon or your spatula. Fold the overhanging cling film over the top to cover it completely. Pop the tin into the freezer for 30 to 60 minutes, or until it feels completely solid.
Step 6: Slice and Store
Take the tray out of the freezer, unwrap it, and place the block onto a chopping board. Using a sharp knife, cut into 16 equal squares.
How to Store Your Bars
No To keep your Apricot and Chocolate bars fresh and fudgy, transfer them to a lidded airtight container.
Top Tip: Interleave the layers with sheets of baking paper (parchment paper). Because these bars are unrefined and contain coconut oil, they will stick together if they touch. Store the container in the fridge to keep them perfectly firm!
Variations & Swaps
Nut-Free Option: Swap the mixed nuts for oats or extra pumpkin and sunflower seeds if making them for a nut-free school run.
Fruit Swaps: If you aren’t a fan of apricots, dried figs or sultanas work beautifully as a direct substitute.
Did you make this recipe? Let me know how they turned out in the comments below, or tag me in your recipe photos on Instagram!
Summer has always been my favourite season, even here in England where it can feel like a rare guest rather than a reliable fixture. After months of grey skies, drizzle, and damp mornings, the arrival of warmer days feels like a reset. The rain loses its grip, the evenings stretch out, and everything seems a little lighter. What I love most is the warmth—not extreme heat, just enough sunshine to sit outside comfortably without layering up. In a place like Warrington, where rain is practically part of the identity, those dry, sunny days feel earned. You appreciate them more because they don’t last forever. Summer also changes the pace of life. Parks fill up, people linger outside longer, and there’s a sense that you should make the most of every clear day. It’s less about big events and more about small, simple moments—walking without a coat, eating outside, or just enjoying an evening that doesn’t disappear by 4pm. We might not get much of it, but maybe that’s exactly why summer stands out. When it arrives, it reminds you how good the weather can be—and how much better everything feels without the rain.
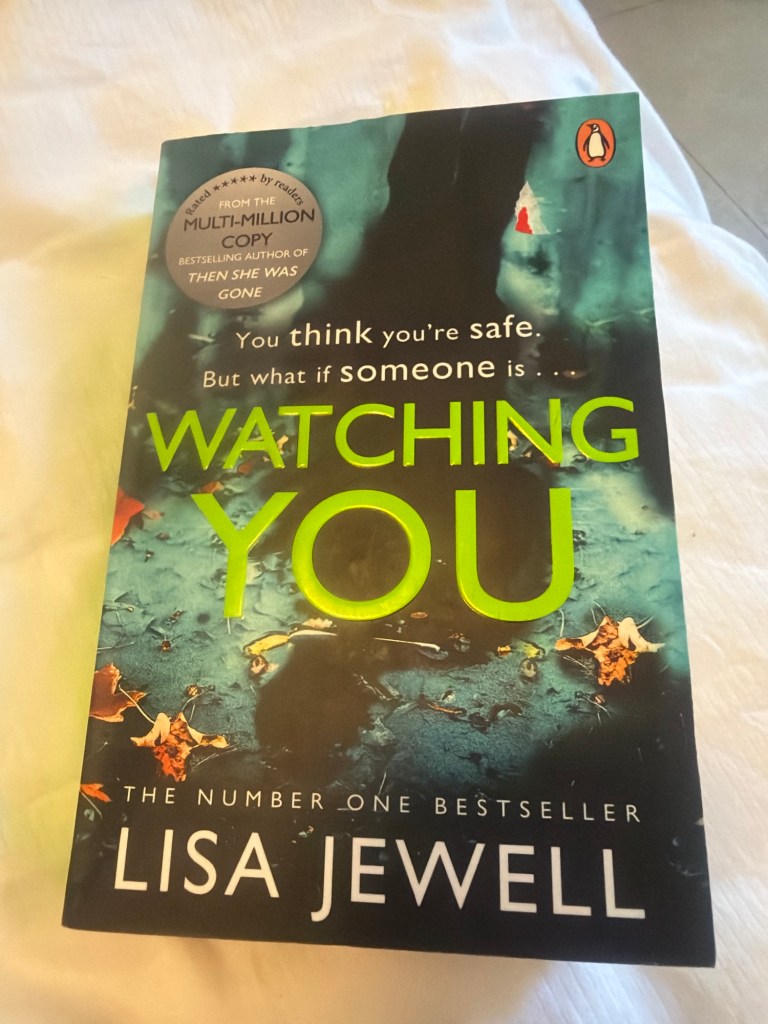
In the posh, leafy enclave of Melville Heights, the houses are large, the lawns are pristine, and the secrets are suffocating. Lisa Jewell’s Watching You is a masterclass in domestic noir that proves how easily an idyllic suburban veneer can crack.
A Tangled Web of Obsession
The story centers on Tom Fitzwilliam, a charismatic headmaster who is practically worshipped by the residents of Melville Heights. He is the “perfect” neighbor—kind, handsome, and endlessly helpful. However, the narrative is framed by a looming tragedy: someone in this neighborhood is determined to kill him.
The plot is masterfully layered, primarily through the eyes of:
Joey Mullins: A young woman who has just moved into the neighborhood with her husband. She becomes deeply, unhealthily obsessed with Tom, convinced there is a sinister side to his “too-perfect” persona.
Jenna Tripp: A teenage girl living in the shadow of a local tragedy. Her mother, Beth, was the victim of a brutal assault years prior, and Jenna is haunted by the past and the strange dynamics of the neighborhood.
The Neighborhood: Jewell masterfully weaves together the viewpoints of various neighbors, each of whom is watching one another. Whether it’s through windows, social media, or whispered gossip, the “watching” in this book is constant and invasive.
Why the Plot is So Compelling
What sets this thriller apart is the dual-timeline approach. We are not just dealing with the current threat against Tom Fitzwilliam; we are simultaneously investigating the long-buried secrets regarding the death of a local teenager named Viva Hart years earlier.
As the present-day plot intensifies—with Joey’s obsession spiraling and the neighborhood tensions reaching a breaking point—the two timelines begin to collide. Jewell forces the reader to act as a detective, connecting the dots between past trauma and current motives.
The Moral Ambiguity: Nothing in Melville Heights is black and white. Jewell purposefully blurs the line between the victim and the villain. Is Joey a worried citizen uncovering a predator, or is she a stalker herself? Is Tom the hero everyone believes him to be, or is he manipulating those around him?
The Slow Burn: The plot thrives on the slow revelation of small, unsettling details—a notebook, a stray lock of hair, a secret glance—that gradually build into a suffocating sense of dread.
The Final Twist: Without giving too much away, the epilogue is a gut-punch. It recontextualizes everything you’ve just read, shifting the blame for the town’s darkest historical tragedy in a way that is as terrifying as it is brilliant.
The Verdict
Watching You is a gripping, multi-layered puzzle. While some might find the middle chapters a deliberate slow burn, it is essential for the character development that makes the final reveal so effective. Jewell doesn’t just write a thriller; she writes a sharp, uncomfortable commentary on how obsession blinds us and how the most dangerous secrets are often hidden in plain sight.
Who should read this? If you crave psychological depth, complex character studies, and a twist that stays with you long after the final page, put this at the top of your reading list.
This post may contain affiliate links, which means I may earn a small commission if you purchase through them — at no extra cost to you. As an Amazon Associate, I earn from qualifying purchases
The Luxury of Silence is my one “must-have” luxury is. People would usually when asked this question expect me to name something material—a designer item, a travel destination, or a gadget.
But my true luxury is much harder to find: Silence.
In a world that is obsessed with noise—with constant notifications, endless chatter, and the pressure to always have a response—silence is the ultimate form of self-care. It isn’t just the absence of sound; it’s the presence of peace. It is the only place where I can truly hear myself think, where I can decompress, and where I can reclaim my own energy.
For me, silence isn’t empty. It’s full—full of clarity, rest, and the quiet freedom to just be. The opportunity to just be to think and just be in the moment
Ooh this is a good one . I think mine would be “authentic, still here .. still trying and laughing as I do it “
It’s important to keep going through good times and bad, to work on yourself to make yourself the best version of you and to keep laughing along the way ! Humour is important and mine is the gallows type !
Authentic is the most valuable .. be true to you . Always !’
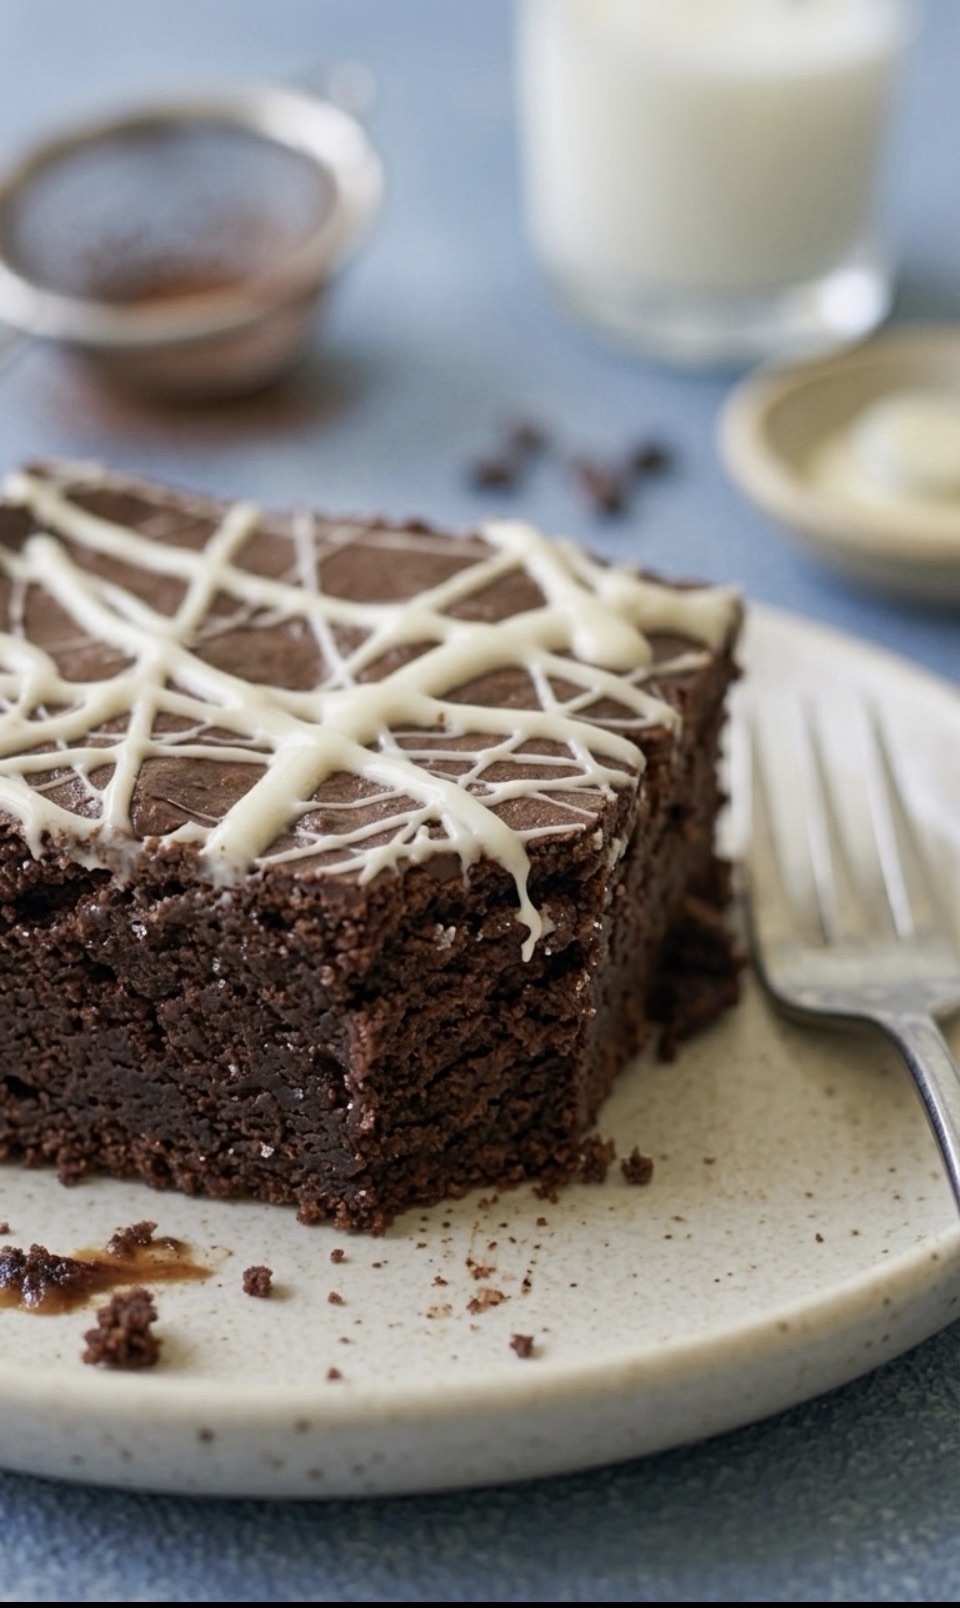
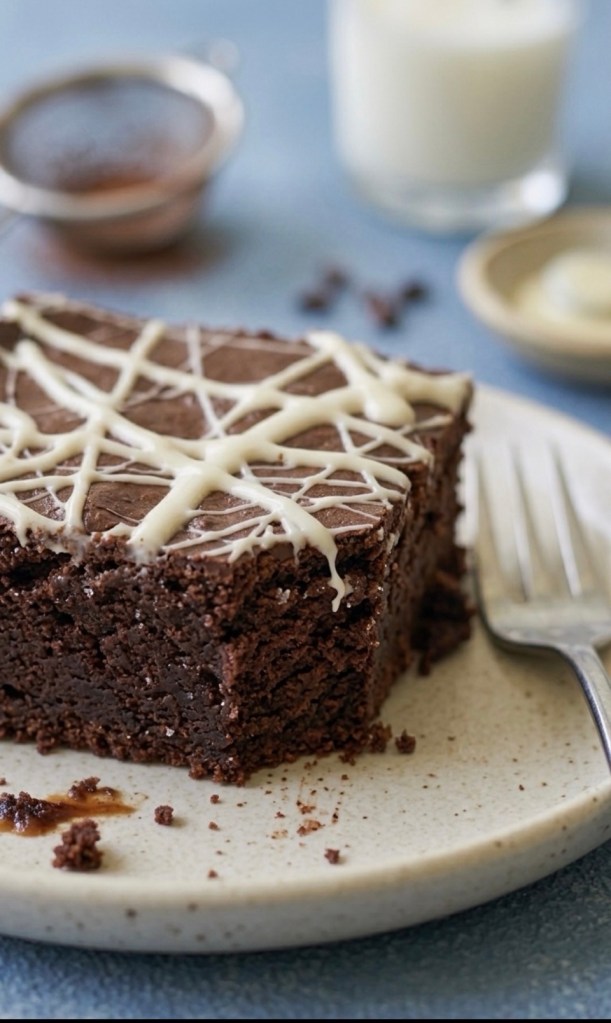
If you are looking for a brownie that is thin, cakey, or has a messy, liquid-caramel center that pools all over your plate, you’ve come to the wrong place.
These are the ultimate fudgy salted caramel brownies. They are dense, incredibly rich, intensely chocolatey, and feature a layer of homemade salted caramel that bakes directly into the brownie crumb. The result? A perfectly chewy, cohesive bite that doesn’t collapse into a puddle. Finished with a striking white chocolate spiderweb drizzle, these brownies look like they walked straight out of a luxury bakery window.
Whether you’re baking for a weekend treat or looking to impress on social media, this foolproof recipe delivers every single time.
Why You Will Love This Recipe
The Perfect Texture: No cakey layers here. Thanks to a high ratio of chocolate and butter to flour, these brownies are dense, fudgy, and satisfyingly chewy.
Baked-In Caramel: Instead of a runny, messy middle, the homemade caramel merges with the batter during baking to create an ultra-decadent, chewy caramel layer.
Striking Presentation: The intricate white chocolate drizzle contrasts beautifully with the dark chocolate crust, making it highly photogenic (and even more delicious).
The Secret to Fudgy Brownies
The secret to achieving that coveted, dense, crinkle-top brownie lies in how you handle the eggs and sugar. Whisking the eggs and sugars together until they are pale, thick, and fluffy creates a stable foam. When the warm, melted chocolate and butter are folded in, this foam rises slightly in the oven and creates that delicate, glossy paper-crust on top, while keeping the inside perfectly fudgy.
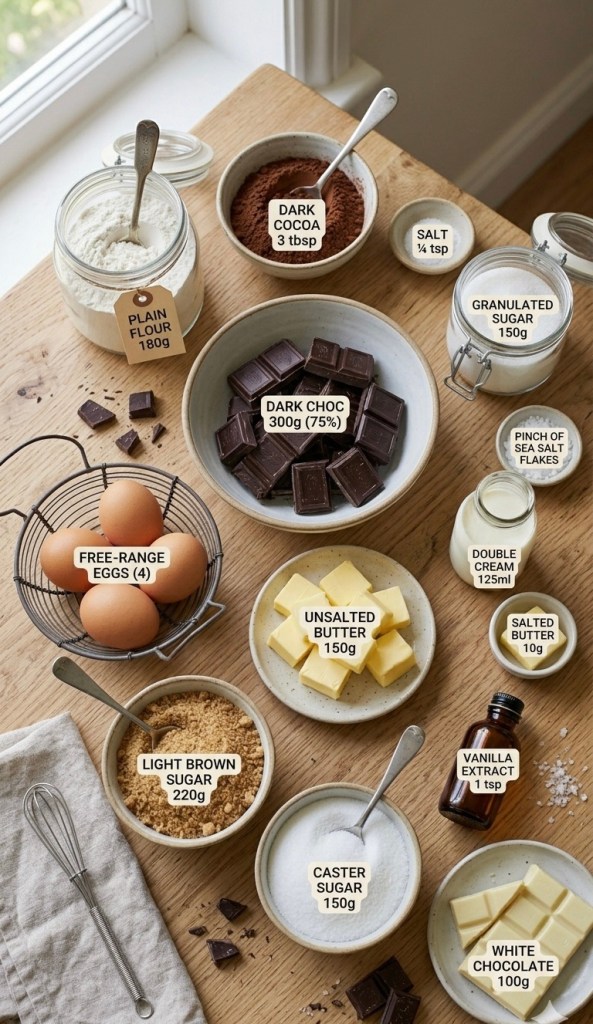
Ingredients You’ll Need
For the Salted Caramel Filling
150g (5½ oz) Granulated sugar
Pinch of Sea salt flakes
125ml (4 fl oz) Double cream
10g (¼ oz) Salted butter, softened
For the Fudgy Brownie Batter
300g (10½ oz) Dark chocolate (minimum 65-75% cocoa solids)
150g (5½ oz) Unsalted butter
4 Free-range eggs (room temperature)
220g (8 oz) Light brown sugar
150g (5½ oz) Caster sugar
1 tsp Vanilla extract
180g (6¼ oz) Plain flour
3 tbsp Cocoa powder
¼ tsp Salt
To Decorate
100g (3½ oz) Good-quality white chocolate
Step-by-Step Instructions
Step 1: Prepare the Homemade Salted Caramel
1 Place the granulated sugar in a clean, dry saucepan over medium heat. Allow the sugar to melt completely. Do not stir the sugar with a spoon; instead, gently swirl the pan occasionally to ensure it melts evenly.
2 Watch closely until the melted sugar turns a deep, golden amber color.
3 Immediately remove the pan from the heat. Carefully whisk in the softened salted butter and a generous pinch of sea salt.
4 Slowly pour in the double cream while whisking continuously. The mixture will bubble up rapidly, so be cautious. Keep whisking until the caramel is completely smooth and glossy. Pour it into a heatproof bowl and set it aside to cool to room temperature.
Step 2: Melt the Chocolate and Butter
1 Preheat your oven to 180°C / 160°C fan / Gas Mark 4. Line a 20cm (8-inch) square baking tin with baking parchment, leaving a bit of overhang on the sides for easy removal later.
2 Roughly chop the dark chocolate and dice the unsalted butter. Place them together in a heatproof bowl set over a pan of gently simmering water (making sure the bottom of the bowl doesn’t touch the water).
3 Stir occasionally until completely melted and smooth. Remove the bowl from the heat and allow it to cool slightly while you prepare the rest of the batter.
Step 3: Whisk the Egg and Sugar Base
1 In a large mixing bowl (or the bowl of a stand mixer fitted with the whisk attachment), combine the 4 free-range eggs, light brown sugar, caster sugar, and vanilla extract.
2 Whisk vigorously on medium-high speed for about 3 to 5 minutes. The mixture should become pale, thick, and visibly expanded in volume. When you lift the whisk, it should leave a distinct trail (or ribbon) on the surface for a few seconds.
Step 4: Combine and Bake
1 Gently pour the melted chocolate and butter mixture into the whisked egg base. Use a rubber spatula to gently fold the mixture together until just combined, taking care not to knock too much air out of the batter.
2 Sift the plain flour, cocoa powder, and ¼ teaspoon of salt directly into the bowl. Fold gently until no pockets of dry flour remain.
3 Pour exactly half of the brownie batter into your prepared baking tin and smooth it into an even layer.
4 Take your cooled salted caramel and drizzle it uniformly over the batter layer.
5 Carefully spoon the remaining brownie batter over the caramel layer. Use a spatula to gently smooth it out to the edges, sealing the caramel inside.
6 Bake in the preheated oven for 25 to 30 minutes. When done, the edges should be completely set, but the center should still have a very slight, gentle wobble.
Step 5: Cool and Decorate
1 Remove the tin from the oven and place it on a wire rack. Let the brownies cool completely in the tin. As they cool, the center will firm up into a dense, fudgy masterpiece.
2 Once cooled, use the parchment paper overhang to lift the brownie block out of the tin.
3 Break the white chocolate into a microwave-safe bowl and melt it in 20-second bursts, stirring between each, until completely smooth.
4 Pour the melted white chocolate into a piping bag (or use a spoon) and drizzle it back and forth across the top of the brownie block in an intricate, intersecting web pattern.
5 Allow the white chocolate decoration to set completely before using a sharp, warm knife to slice into clean squares.
Top Baker’s Tips for Success
Don’t Overbake: Brownies continue cooking in the hot tin even after they are removed from the oven. If a toothpick inserted into the center comes out completely clean, they are overbaked. You want a few moist crumbs attached to the tester!
Room Temperature Eggs: Cold eggs can shock the melted chocolate mixture and cause it to seize or clump. Ensure your eggs are at room temperature before you begin.
Clean Slices: For perfectly clean, bakery-style squares, place the cooled, decorated brownie block into the fridge for 30 minutes before slicing. Wipe your knife blade with a hot, damp cloth between every single cut.
How to Store Your Brownies
Keep your brownies in an airtight container at room temperature for up to 4 days, or in the refrigerator for up to a week. If you prefer them ultra-chewy, eat them straight from the fridge! They also freeze beautifully—simply wrap individual squares tightly in plastic wrap and freeze for up to 3 months.
What are the most important things needed to live a good life?
The most important things to have are love, health peace & cats !!🐈⬛
Love can conquer all and it comes in many forms. There is the love you have for a partner which is totally different to the love you have a parent . To love and be loved is the most wonderful thing in the world.
Peace is the moment when everything aligns and you can just be.
Health is self explanatory but it’s important to help it along with good nutrition, exercise and self care
Cats .. doesnt need any explanation !! They are life, complex adorable and the icing on the cake.
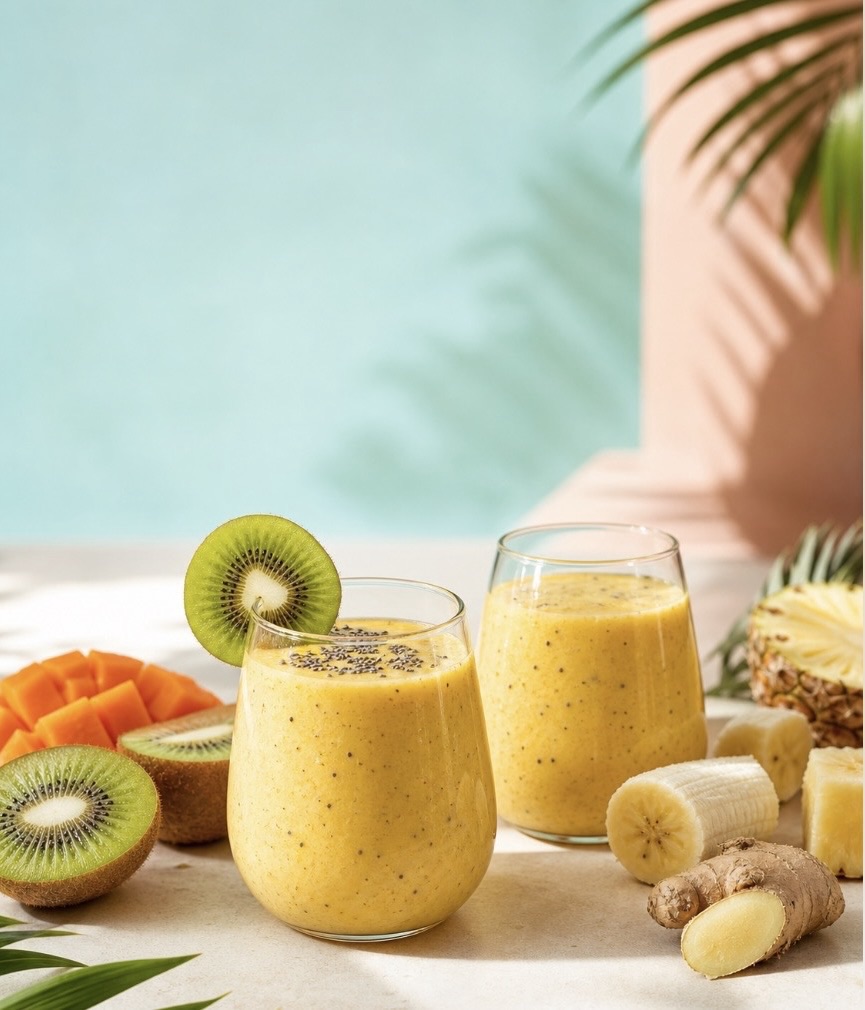
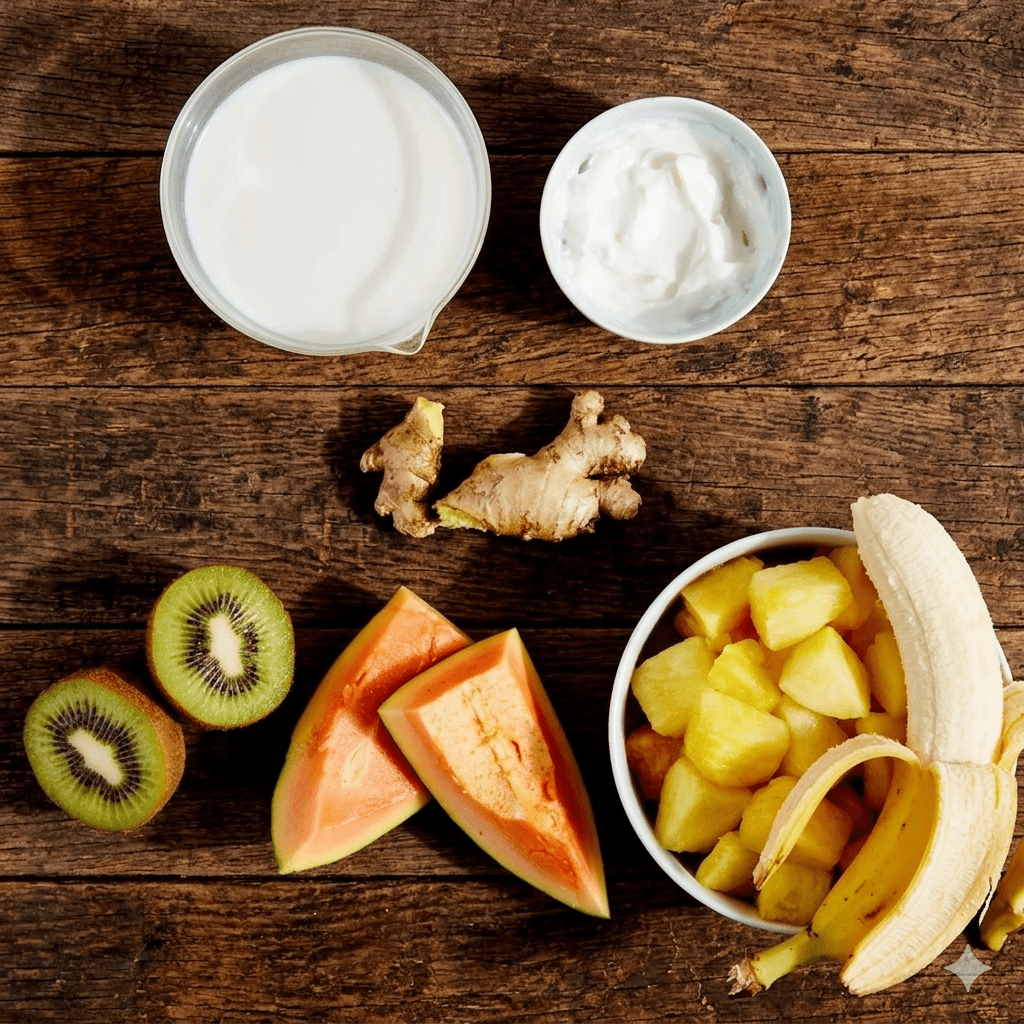
If you ever feel like your stomach blows up like a balloon after meals, you’re not alone. Many of us struggle with that heavy, over‑full feeling, especially after eating quickly, eating out, or during certain times of the month. Instead of reaching for expensive “debloat” supplements, this simple tropical smoothie uses everyday ingredients that may help soothe bloating while tasting like a beach holiday in a glass.
This Tropical Debloat Smoothie is packed with fiber‑rich fruits, live cultures and a touch of ginger heat. It’s gentle enough for everyday sipping but powerful enough to become your new go‑to on “why am I so bloated again?” days.
Why These Ingredients Can Help with Bloating Each ingredient in this smoothie earns its place in the blender: • Kiwi – Naturally high in fiber and an enzyme called actinidin, kiwi can support digestion and help things move more comfortably through your system. • Papaya – Contains the enzyme papain, which can help break down proteins and may ease that heavy, “brick in the stomach” feeling. • Pineapple – Another enzyme‑rich fruit, pineapple contains bromelain, often used to support digestion and reduce puffiness. • Banana – Provides soluble fiber and potassium, which can help with fluid balance and reduce the feeling of water retention. • Yogurt – Whole‑milk plain yogurt adds creaminess and beneficial bacteria that can support a happier gut. • Ginger – A classic choice for nausea and bloating; ginger may help calm the digestive system and reduce gas.
Put them together and you get a creamy, tropical‑tasting smoothie that feels more like a treat than a “remedy.”
Tropical Debloat Smoothie Recipe This recipe makes 2 servings – perfect for sharing, or for you now and you later. Ingredients • 1 medium frozen peeled banana, sliced (about 1 cup) • 1 cup seeded, peeled and chopped fresh papaya • 1 cup frozen pineapple chunks • ¾ cup unsweetened almond milk • ¼ cup whole‑milk plain yogurt • 1 small kiwi, peeled and chopped (¼ cup), plus extra for garnish • ½ teaspoon freshly grated ginger
Method
Prep your ingredients If your banana isn’t already frozen, peel, slice and freeze it ahead of time for the best creamy texture. Peel and chop the papaya and kiwi, and measure out the pineapple, almond milk and yogurt.
Add everything to the blender Add the sliced banana, papaya, pineapple, almond milk, yogurt, chopped kiwi and grated ginger to your blender jug.
Blend until silky smooth Start on a low speed, then gradually increase to high. Blend for 1–2 minutes, or until the mixture is completely smooth and creamy. Use a tamper if your blender has one to help everything combine.
Serve and garnish Pour into 2 glasses. Garnish with extra kiwi slices on the rim or a few small cubes of pineapple or papaya on top if you’re feeling fancy.
Sip slowly
Enjoy your smoothie slowly rather than chugging it in one go – that can help reduce extra air intake, which also contributes to bloating.
When to Drink This Smoothie You can enjoy this Tropical Debloat Smoothie whenever you like, but there are a few moments when it can feel especially helpful: • As a light breakfast after a heavier dinner the night before • Mid‑afternoon when your jeans suddenly feel tighter • As a gentle, soothing option when your digestion feels “off” • Around your period, when water retention and bloating tend to spike
If you’re sensitive to large amounts of fruit sugar, you can start with a smaller serving and see how your body feels.
Tips & Variations You can easily tweak this smoothie to suit your preferences: • Make it dairy‑free – Swap the yogurt for a dairy‑free alternative or extra almond milk. • Add protein – Add a scoop of protein powder or a spoonful of nut butter to make it more filling as a breakfast. • Extra fiber – Add a spoonful of chia seeds or ground flaxseed if your gut tolerates them well.
• Adjust sweetness – If you prefer it sweeter, add a date or a small drizzle of honey; if it’s too sweet, increase the yogurt slightly.
Final Thoughts Bloating can be uncomfortable and frustrating, but small daily habits can make a big difference. This Tropical Debloat Smoothie is a simple, delicious way to support your digestion with whole foods – no harsh detoxes, no complicated ingredients. If you try this recipe, let me know how it works for you and whether you notice a difference in how your tummy feels over a week or two of regular use.