Author: LCchaosandhome

  • Amsterdam: A Valentine’s Splurge, Modern Art, and the Cat Who Rules the Singel

    Amsterdam: A Valentine’s Splurge, Modern Art, and the Cat Who Rules the Singel

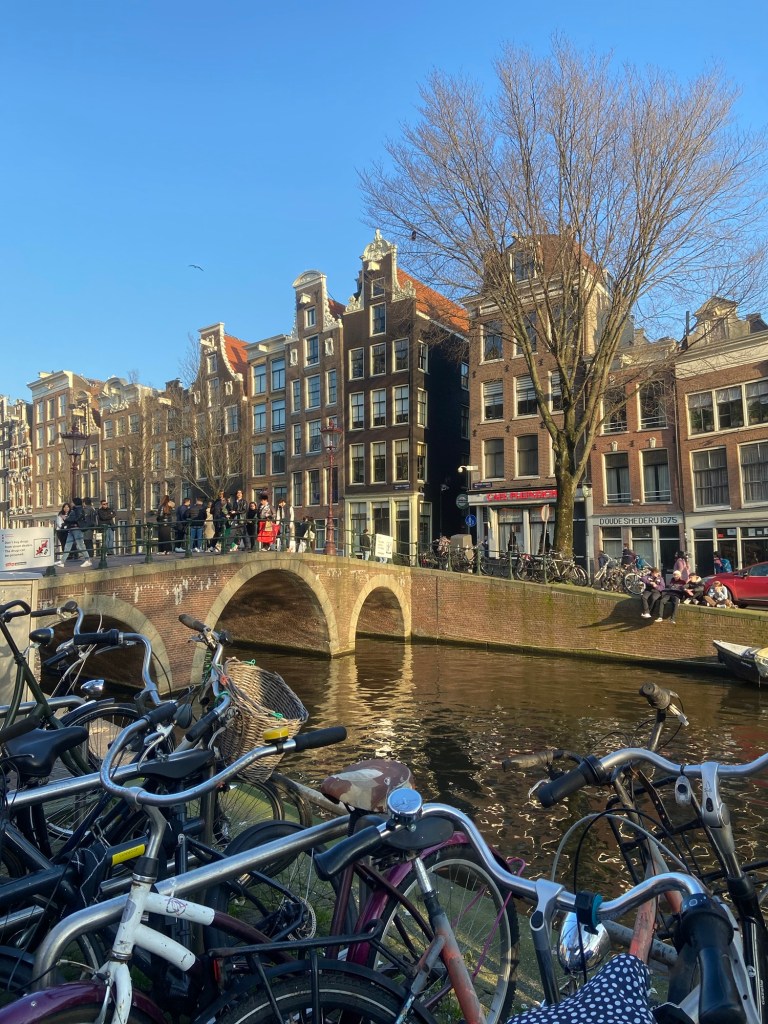
    Amsterdam has a way of getting under your skin. It’s a city of contradictions—where centuries-old history meets a very cool, modern pulse. For a travel lover like me, the best way to see it isn’t through a bus window; it’s by walking until your feet ache and then retreating somewhere spectacular.

    The Ultimate Splurge: The ‘Van Oranje’ Suite

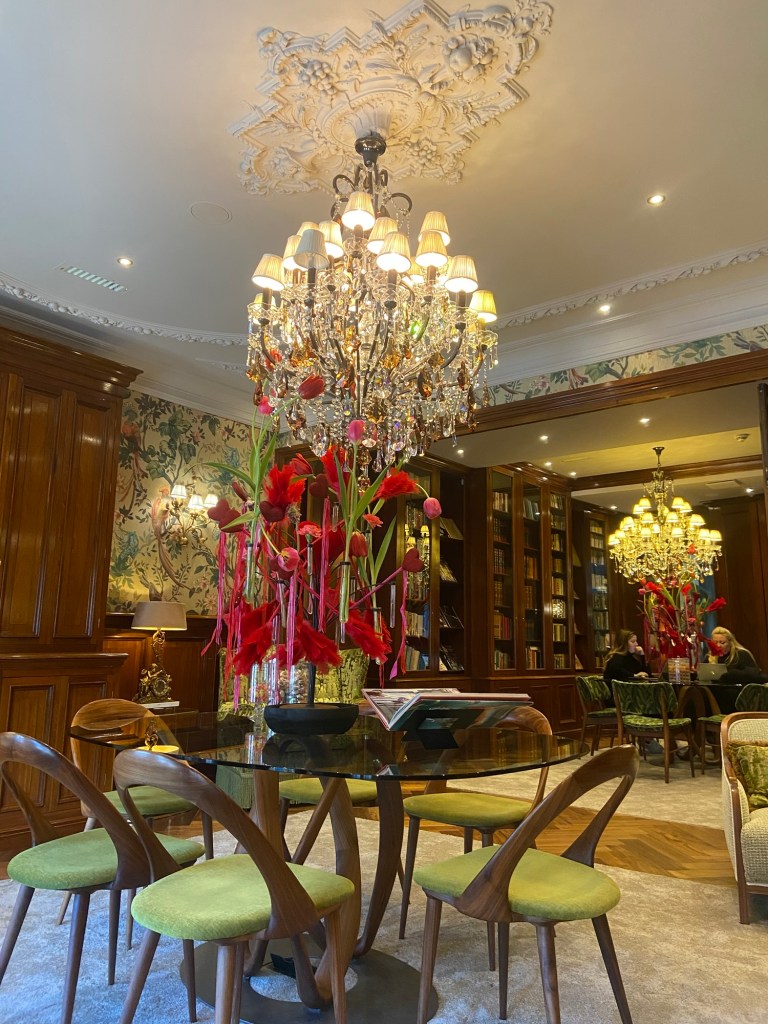
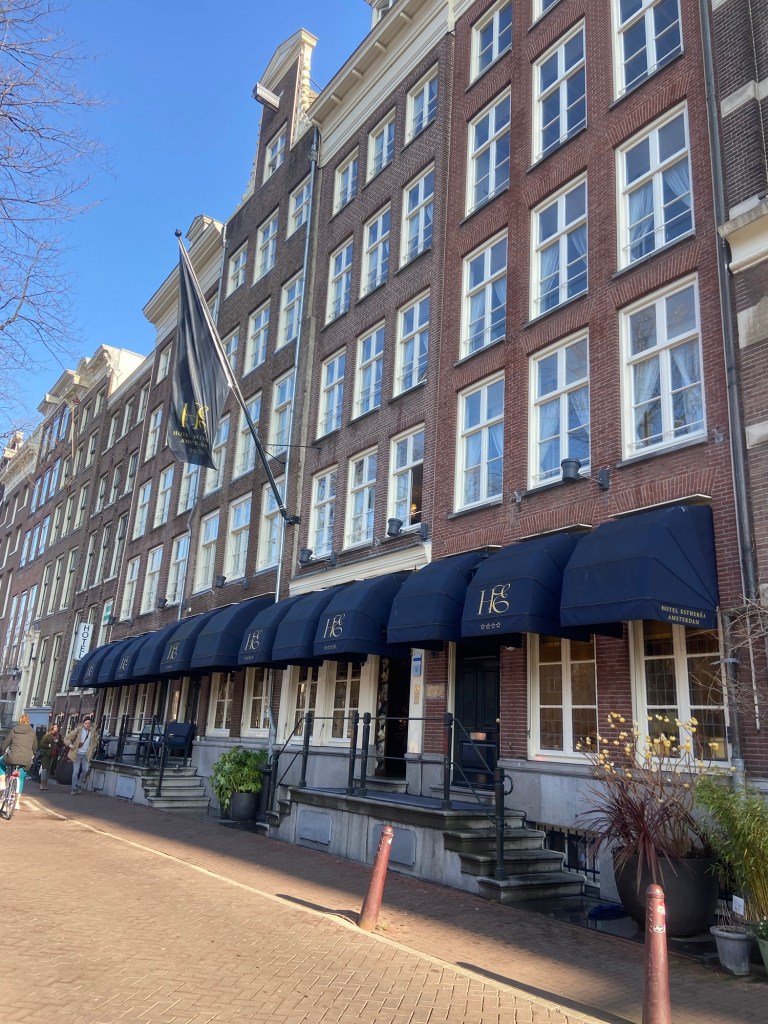
    Since we were there for Valentine’s Day, we decided to break the “budget traveler” rules and go for pure opulence at Hotel Estherea. Tucked into the Singel canal, this place feels like a boutique jewel box.  

    We stayed in the ‘Van Oranje’ suite, and I’m going to be bold: it was the nicest room we have ever stayed in.

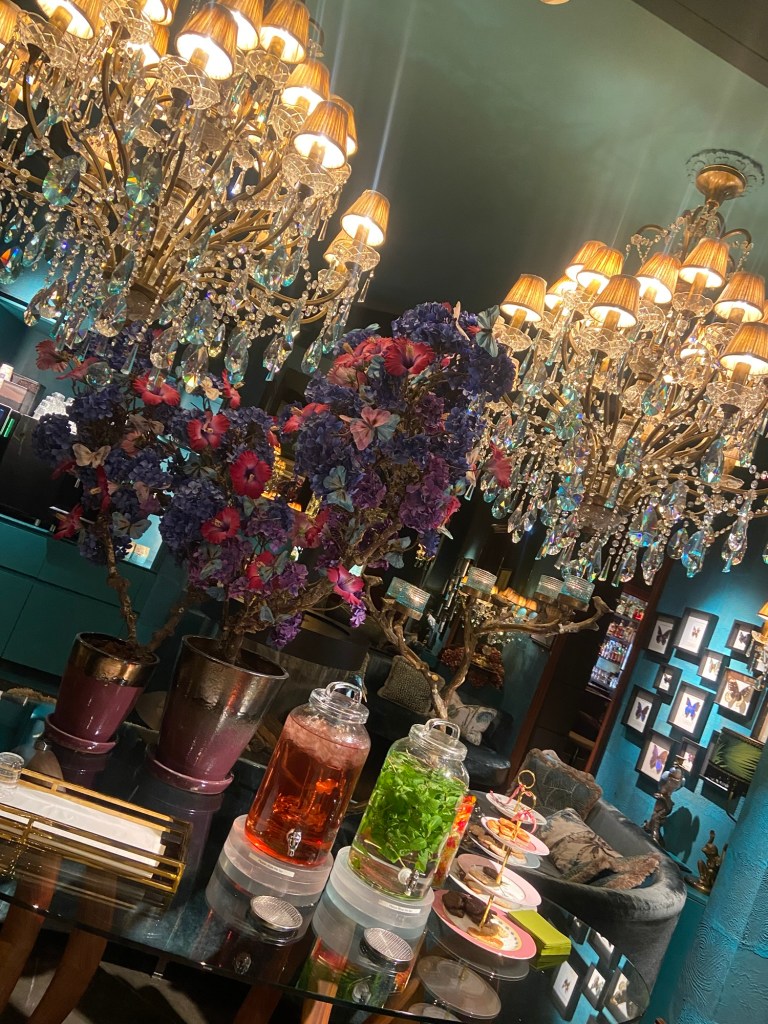
    It features these massive, stunning chandeliers that make the whole place glow. The attention to detail is staggering—from the mahogany accents to the rich, warm orange fabrics.

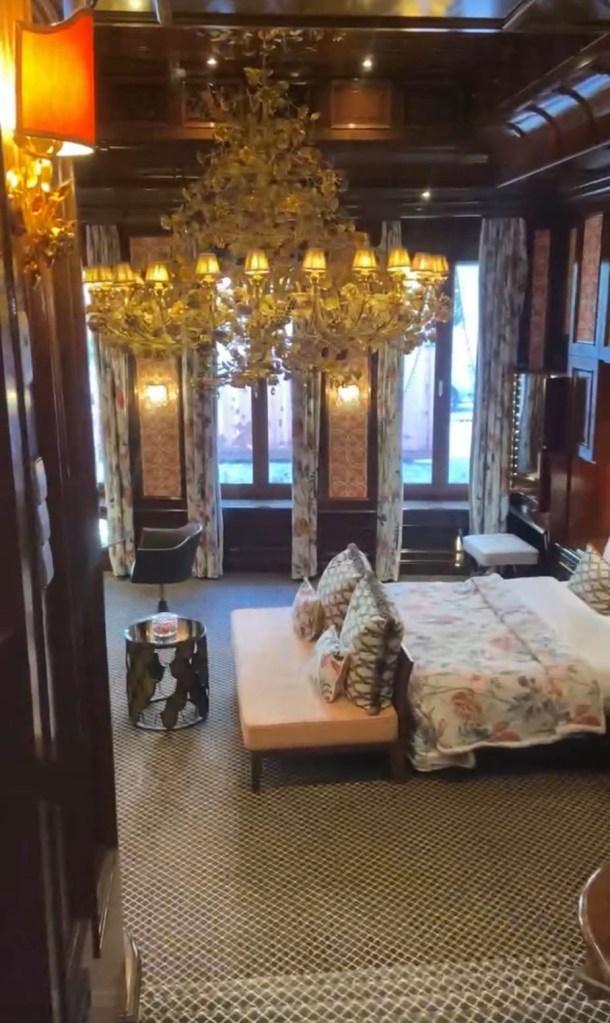
    It’s 55 square meters of pure luxury right in the heart of the city.  

    I

    • The Review: Beyond the “wow” factor of the suite, the hotel feels incredibly welcoming. They have lovely pastries, tea, and coffee waiting for you in the reception area—the perfect “welcome home” after a long walk.

    They even have a tiny gym in the basement, which is impressive for a historic canal house!  

    • The Boss: But the real owner of the building? The resident hotel cat.

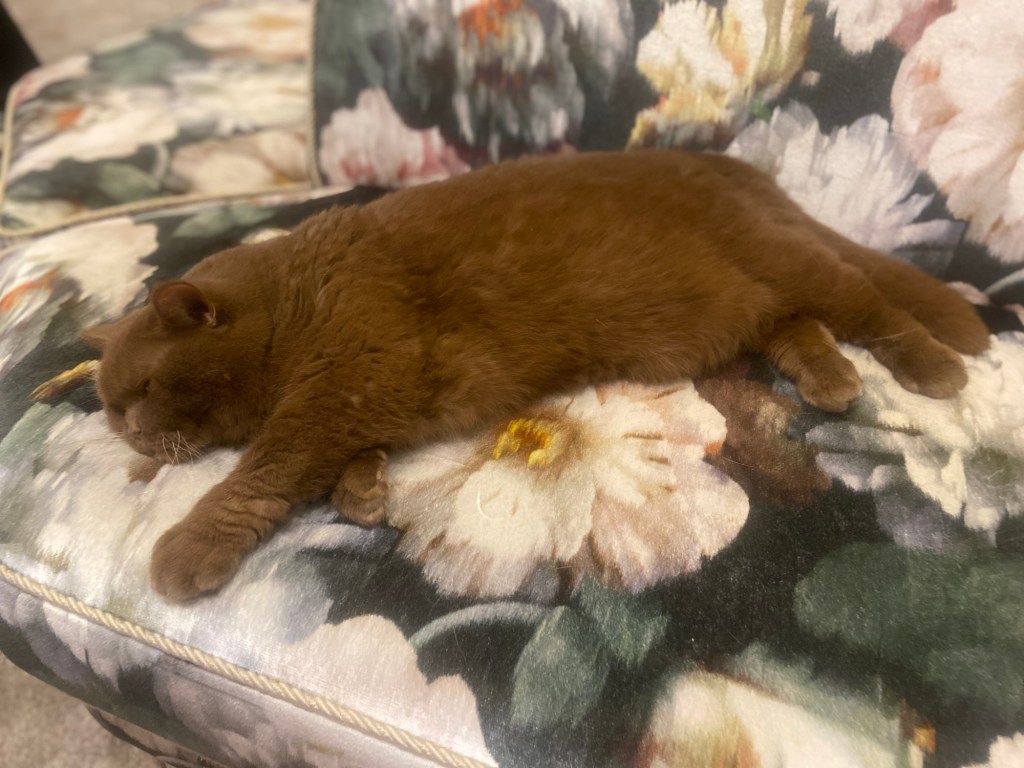
    True to form, it was completely aloof—strolling through the lobby with an air of “I own this place, you’re just paying the mortgage.” It added such a cozy, quirky character to an otherwise high-end stay.  

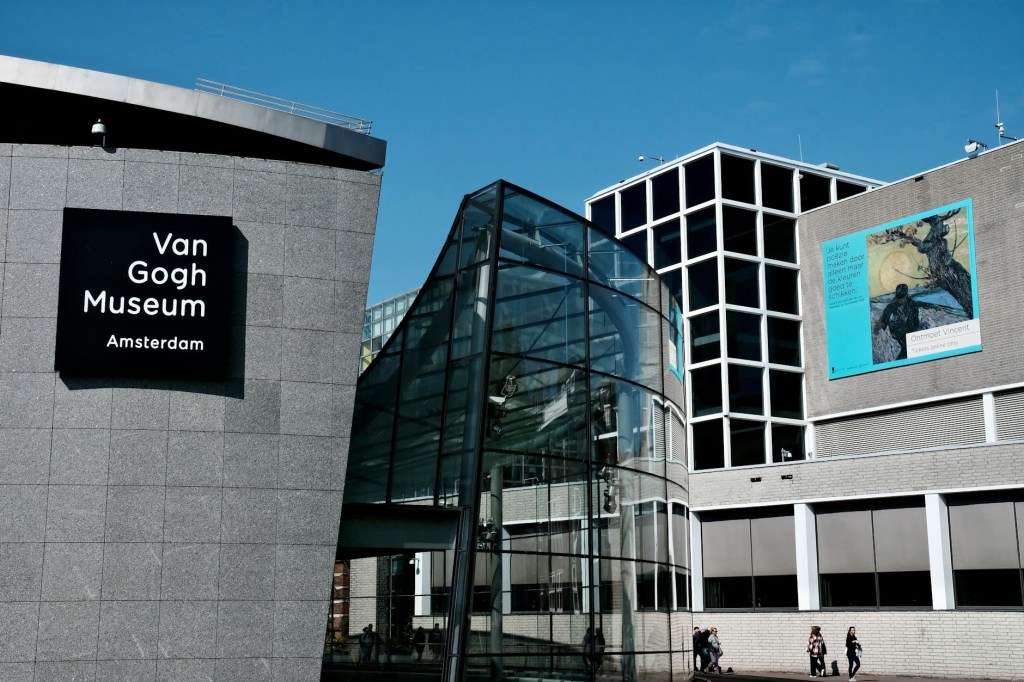
    Museum Talk: Van Gogh vs. The Rest

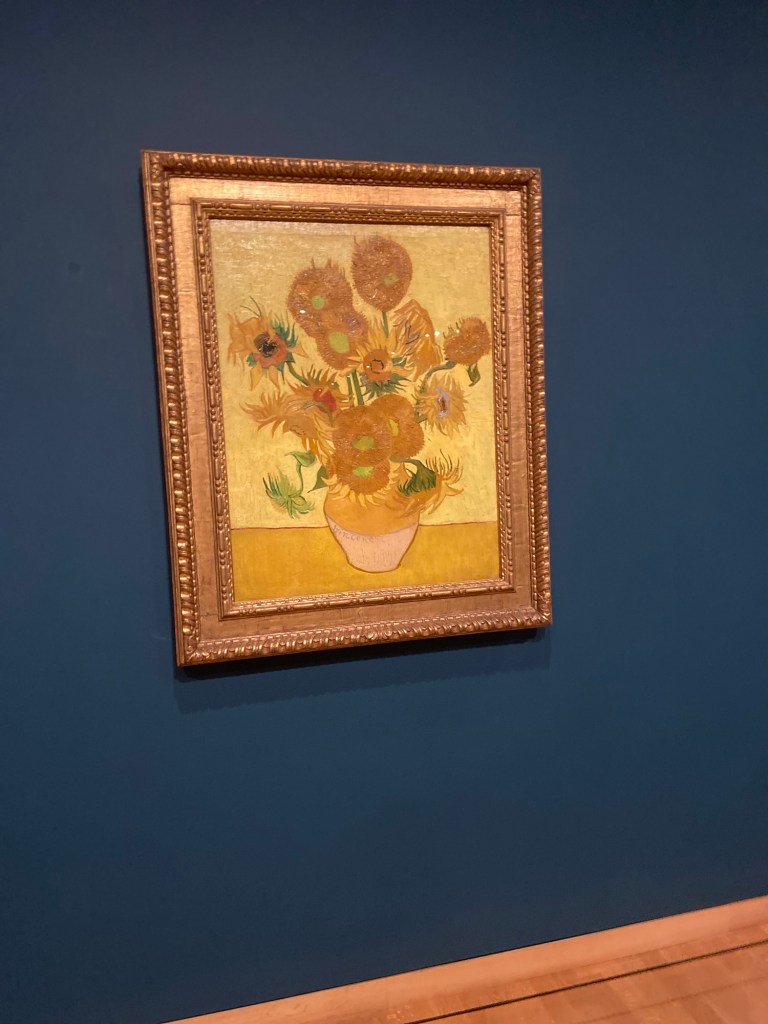
    When it comes to the big museums, everyone talks about the Rijksmuseum, but for me, it felt a bit too traditional and “stiff.” I much preferred the Van Gogh Museum.

    It felt far more modern and aligned with my tastes. The way the gallery is laid out tells a personal, emotional story that makes the art feel fresh rather than like a dusty history lesson. It’s vibrant and intimate—just make sure to book your slot weeks in advance!

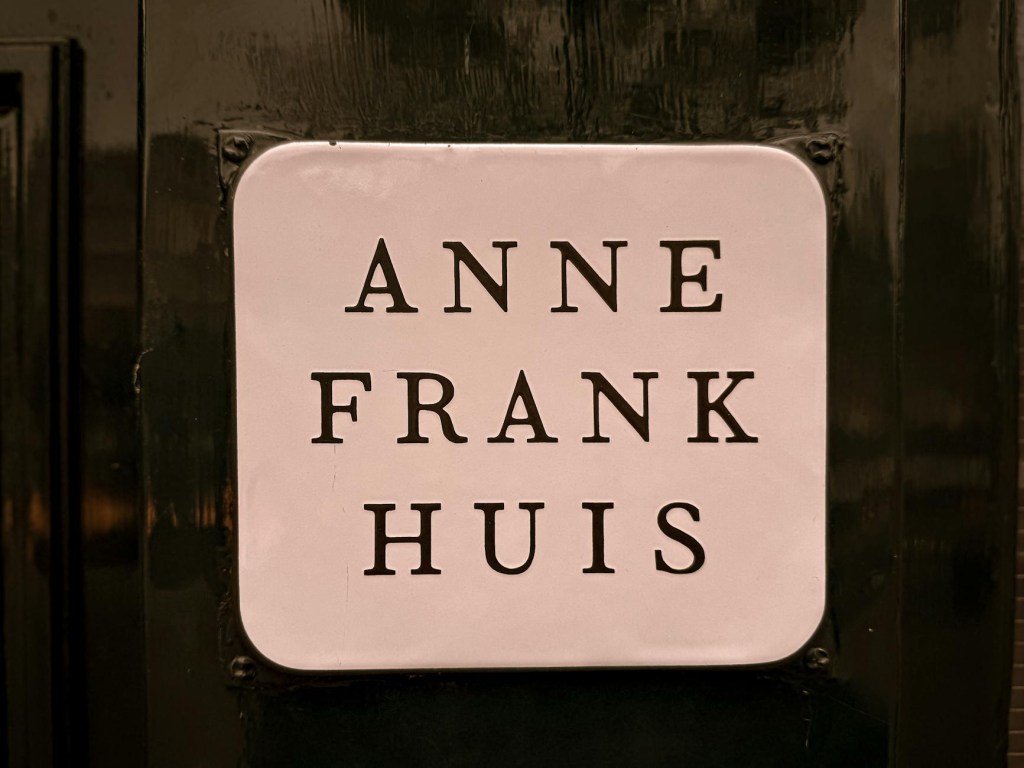
    A Reality Check: The Anne Frank House

    Of course, you can’t visit Amsterdam without spending time at the Anne Frank House. It’s the polar opposite of the luxury at the Estherea—it’s somber, quiet, and deeply moving. Standing in that secret annex is a powerful reminder of the city’s history that really grounds the whole trip.

    The Best (and Cheapest) Activity: Just Walk

    Beyond the fancy suites and the famous art, my favorite thing was just soaking in the atmosphere. Amsterdam is a city built for wandering.

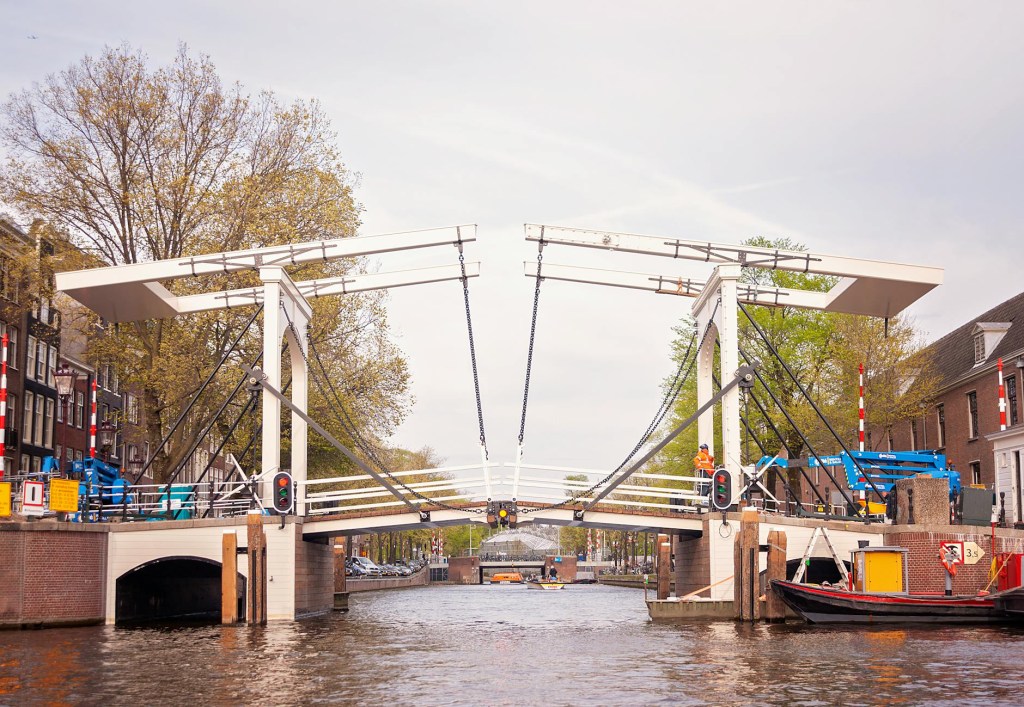
    We spent hours crossing canal bridges and exploring the Jordaan district. There is something so peaceful about just watching the water and the bikes go by.

    Even with all the fancy private options out there, there is something so nostalgic and fun about the classic tourist canal cruise. We hopped on one of the big glass-topped boats near the station, and honestly, it’s a must. You get those perfect panoramic views of the “Skinny Bridge” and the harbor that you just can’t see as well from the street.

    We popped on the headphones, listened to the history of the canal houses, and just relaxed for an hour. It’s the ultimate “low-effort, high-reward” activity—especially if your feet need a break from all that walking!

    How to Balance the Budget:

    • The Library View: Skip the paid observation decks. The top floor of the OBA Library has an incredible panoramic view of the harbor for free.

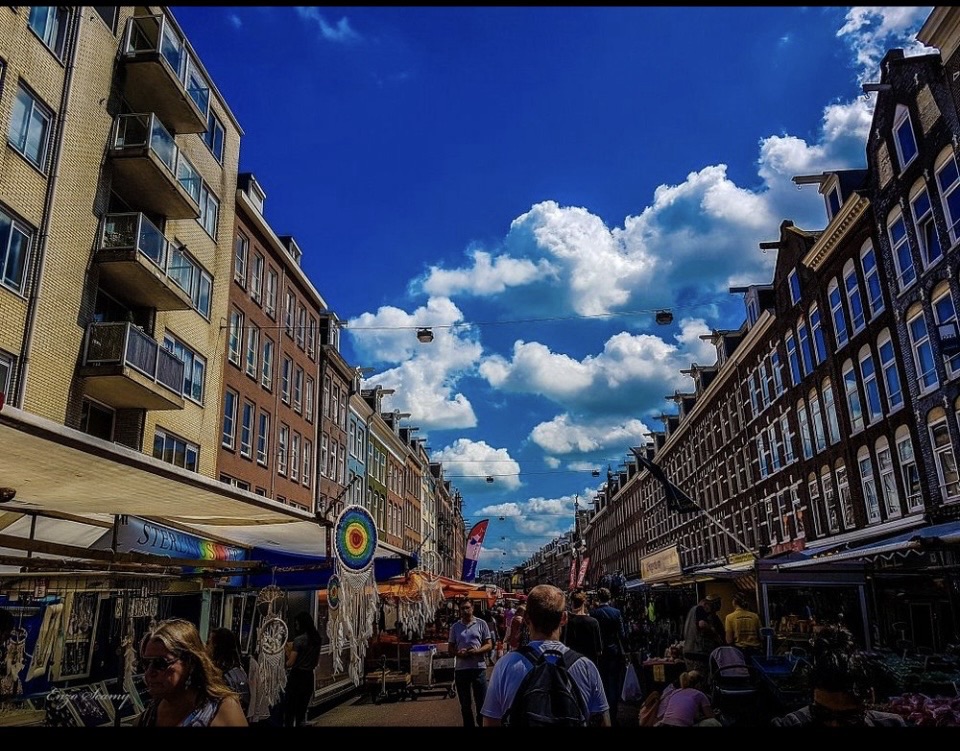
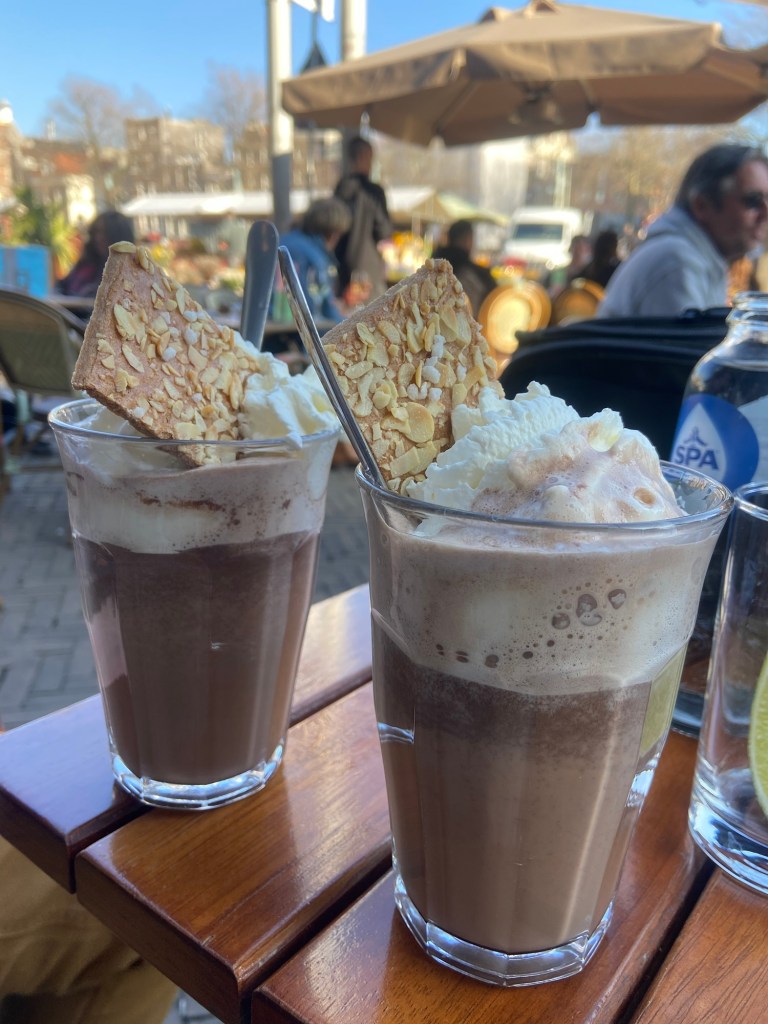
    • Market Eats: We hit the Albert Cuyp Market for fresh stroopwafels and hot fries. It’s the best way to eat like a local without the sit-down restaurant prices.

    • The Free Ferry: Hop on the ferry behind Centraal Station to Amsterdam Noord for a breeze and a great view of the skyline.

    The Verdict: Amsterdam is at its best when you mix the high and the low. Spend the money on a suite with chandeliers and a royal cat, but spend your time getting lost on the cobblestone streets. It was the perfect getaway

  • The Ultimate Creamy Tuscan Chicken Pasta (Easy 20-Minute Recipe)

    The Ultimate Creamy Tuscan Chicken Pasta (Easy 20-Minute Recipe)

    Do you ever have one of those nights where you want a restaurant-quality dinner, but you absolutely do not have the energy for restaurant-quality effort? Enter this Creamy Tuscan Chicken Pasta.

    Packed with juicy chicken, tangy sun-dried tomatoes, and fresh spinach tossed in a rich, velvety Parmesan sauce, this dish tastes like it simmered for hours. The best part? It goes from prep to plate in just 20 minutes.

    Whether you’re looking to shake up your midweek meal rotation or need an effortless date-night dinner, this recipe hits the comfort food jackpot. Here is exactly how to make it using standard UK measurements.

    What You’ll Need (Ingredients)

    Before you hit the kitchen, gather these simple ingredients. Everything can be easily found at your local UK supermarket:

    • 340g penne pasta: Holds onto the creamy sauce perfectly, but rigatoni or fusilli work great too.

    • 450g chicken breasts: Sliced into thin strips so they cook quickly and stay tender.

    • 2 tbsp olive oil: For searing the chicken and building the base of the sauce.

    • 3 garlic cloves: Minced.

    • 150g sun-dried tomatoes: Chopped. These add a rich, sweet, and tangy punch to balance the cream.

    • 60g baby spinach: Adds a pop of colour and a bit of freshness.

    • 240ml double cream: The ultimate base for a glossy, luxurious sauce.

    • 240ml chicken stock: Balances the richness of the cream.

    • 90g grated Parmesan cheese: Freshly grated melts the smoothest.

    • 1 tsp Italian seasoning: A classic herb blend to season the chicken.

    • 1/2 tsp dried chilli flakes (optional): For a subtle, warming kick.

    • Salt and black pepper: To taste.

    Step-by-Step Method

    1. Cook the Pasta

    Bring a large pot of salted water to a rolling boil and cook your 340g of penne pasta according to the packet instructions until it’s al dente (cooked through but still holding a bit of a bite). Drain the pasta and set it aside.

    2. Sear the Chicken

    Season your sliced chicken breasts generously with salt, pepper, and the teaspoon of Italian seasoning. Heat 2 tablespoons of olive oil in a large frying pan over a medium-high heat. Add the chicken strips and sear them for 5–6 minutes, tossing occasionally, until they are beautifully golden and completely cooked through. Remove the chicken from the pan and pop it onto a plate for later.

    3. Build the Creamy Base

    Don’t clean out the pan—those browned bits left behind mean extra flavour! Turn the heat down to medium and toss in your 3 minced garlic cloves and 150g of chopped sun-dried tomatoes. Fry for about 1 minute until fragrant, being careful not to let the garlic burn. Next, pour in 240ml of chicken stock and 240ml of double cream. Bring the mixture to a gentle simmer and let it bubble away for 3 minutes to reduce and thicken slightly.

    4. Wilt the Spinach and Melt the Cheese

    Stir 90g of grated Parmesan and 60g of baby spinach into the simmering sauce. Keep stirring for a minute or two until the cheese has completely melted into the cream and the spinach has wilted. If you like a little heat, stir your chilli flakes in now.

    5. Toss it All Together

    Return the cooked chicken and the drained penne pasta to the pan. Toss everything together vigorously for a minute or two until the pasta is completely coated in that glossy, velvety sauce and everything is piping hot.

    Top Tips for Success

    • Don’t Overcook the Garlic: Garlic burns quickly and can turn bitter. Make sure your pan has cooled down slightly from cooking the chicken before you toss it in, and only fry it for a minute before hitting it with the liquids.

    • Switch Up the Protein: If you don’t fancy chicken, this recipe works beautifully with prawns, or you can add some fried pancetta along with the garlic for an extra layer of depth.

    • Make it Vegetarian: Simply skip the chicken, swap the chicken stock for vegetable stock, and throw in some sliced mushrooms or artichoke hearts instead.

    Give it a Try!

    This Creamy Tuscan Chicken Pasta is guaranteed to please everyone at the dinner table. If you make this recipe, I’d love to hear how it turned out!

    Leave a comment below, let me know if you made any tweaks, and don’t forget to tag me on TikTok if you filmed your creation! Happy cooking!

  • Marvellous Creamy Sausage & Veg Pasta Bake

    Marvellous Creamy Sausage & Veg Pasta Bake

    Let’s be honest: there’s nothing quite like a traybake to save a busy weeknight. I’ve been obsessed with this specific combo lately—it’s inspired by a classic recipe which is “ Pinterest-worthy” and made in my own kitchen.

    The Secret is in the Sausage

    If you want this dish to go from “standard midweek meal” to “gourmet comfort food,” don’t skimp on the sausages. I highly recommend using high meat content sausages (look for 85% meat or higher) from your local butcher or even more reasonable Lidl do some brilliant ones . Heck sausages are good too.

    A proper Cumberland or a peppery Lincolnshire works beautifully here. Because we’re roasting them, cheaper sausages tend to shrink or release too much water; a high-quality banger stays juicy, holds its shape, and develops a gorgeous caramelised crust that flavours the entire tin.

    The Double-Roast Technique

    What makes this version a winner is the roasting process. Instead of just boiling everything, we’re roasting the peppers, courgettes, and red onions first to intensify their natural sweetness. Then, we toss in those chunky sausage pieces so they get lovely and browned while the veg finishes off.

    While the oven is doing the heavy lifting, you just boil your penne until al dente, drain it, and then the magic happens. You toss the pasta directly into that hot roasting tin, letting it soak up the juices. Pour over the silky double cream, blanket the whole thing in a sharp, mature Cheddar, and give it one last blast in the oven.

    The result? A colourful, quintessentially British “hug in a bowl” that looks like it took way more effort than it actually did.

    The Recipe & Method

    Prep time: 15 mins | Cook time: 40 mins | Serves: 4

    Ingredients

    • The Stars: 6-8 high meat content sausages (Cumberland or Lincolnshire are top-tier choices), cut into thick, chunky coins.

    • The Veg: 1 large red onion (peeled and wedged), 1 large courgette (sliced into thick half-moons), and 2 mixed peppers (deseeded and chopped into 3cm chunks).

    • The Pasta: 300g dried Penne pasta.

    • The Sauce: 100ml Double cream (don’t use single, it’ll split!) and 1 tbsp olive oil.

    • The Topping: 150g Mature Cheddar, freshly grated for the best melt.

    • Seasoning: A generous pinch of sea salt and plenty of freshly ground black pepper.

    Method

    1. Prep the Heat: Crank your oven up to 220°C (200°C Fan / Gas 7). You want it hot so the veg roasts rather than steams.

    2. The First Roast: Spread your chopped onion, peppers, and courgette in a large roasting tin. Drizzle with oil, season well, and toss. Roast for 10 minutes.

    3. Sausage Time: Add your high-quality sausage chunks to the tin. Give it all a good stir to coat the sausages in those lovely veg juices. Roast for another 20 minutes until the sausages are golden-brown and cooked through.

    4. Boil the Pasta: While the tin is sizzling, cook your penne in a large pan of salted boiling water for 10–12 minutes. You want it tender but with a slight bite. Drain well.

    5. The Big Mix: Tip the drained pasta into the roasting tin. Pour over the double cream and toss everything together until every tube of pasta is glistening.

    6. The Grand Finale: Scatter the grated Cheddar over the top. Return to the oven for a final 4–5 minutes until the cheese is bubbling, golden, and starting to brown at the edges.

    Serve it straight from the dish with a side of garlic bread or a simple rocket salad. Perfect!

  • The 15-Minute Lazy Gourmet: Viral Turkish Mantı Pasta

    The 15-Minute Lazy Gourmet: Viral Turkish Mantı Pasta

    Let’s be real for a second. We’ve all been there: it’s 6:30 PM on a Tuesday, your brain is absolutely fried from the day, and the thought of standing over a stove chopping onions makes you want to order takeout for the third time this week.

    But wait! Step away from the food delivery apps.

    If you have a pack of store-bought tortellini, some yogurt, and a stick of butter, you are exactly 15 minutes away from a dinner that tastes like it came straight out of a trendy Mediterranean bistro. Say hello to Lazy Turkish Mantı Pasta.

    The Backstory (Without the 3-Hour Prep Time)

    Traditional Turkish Mantı is a masterpiece. It consists of tiny, hand-folded meat dumplings served with a garlic yogurt sauce and infused melted butter. It is spectacular, comforting, and takes about three hours of intensive labor to make from scratch.

    Since we don’t have three hours on a weeknight, the internet did what the internet does best: it found a shortcut. By swapping the handmade dumplings for store-bought beef or cheese tortellini, you get all that pillowy, savory goodness in a fraction of the time.

    Why This Recipe Works (The Science of Yum)

    This dish is all about the contrast of temperatures and textures:

    1. The Hot: Piping hot, savory pasta.

    2. The Cool: Cool, creamy, sharp garlic yogurt.

    3. The Sizzle: Hot, foaming butter infused with dried mint and pantry spices.

    When that hot spiced butter hits the cool yogurt, it creates these beautiful, glossy red swirls that look like art on a plate.

    How to Make It (The 15-Minute Blueprint)

    Ingredients You Need:

    • 1 pack (9–12 oz) store-bought tortellini: Beef is traditional, but cheese or mushroom works beautifully too!

    • 1 cup plain Greek yogurt: Go for full-fat (4%) here. Trust me, it makes a difference.

    • 1–2 garlic cloves: Finely grated or minced.

    • 3 tbsp unsalted butter

    • 1 tbsp tomato paste: This gives the butter sauce a rich, savory depth.

    • 1 tsp dried mint: Don’t skip this! It sounds unusual for pasta, but it’s the secret ingredient that makes it authentic.

    • 1 tsp sweet or smoked paprika + 1/4 tsp regular chili flakes: A quick pantry hack to replace traditional Aleppo pepper.

    Step-by-Step Instructions:

    Step 1: The Pasta Base

    Bring a pot of salted water to a boil and cook your tortellini according to the package instructions. Drain it well, but keep it hot!

    Step 2: The Cool Garlic Yogurt

    While the pasta is boiling, whisk together your Greek yogurt, minced garlic, and a generous pinch of salt in a small bowl. Pro tip: Leave this bowl on the counter while you cook. If the yogurt is straight-from-the-fridge cold, it will chill your pasta too fast. Room temp is perfect.

    Step 3: The Sizzling Butter

    In a small skillet, melt the butter over medium heat. Once it’s bubbling, stir in the tomato paste and let it fry for about 60 seconds (this coaxes out the sweet tomato flavor). Turn off the heat completely, then stir in your dried mint, paprika, and chili flakes. It will foam up, turn a gorgeous brick-red color, and smell incredible.

    Step 4: The Assembly

    Grab a shallow bowl. Lay down your hot tortellini. Smother it generously with the garlic yogurt. Finally, drizzle that hot, sizzling spiced butter right over the top.

    And there you have it. You just made a restaurant-worthy meal in the time it takes to watch a couple of TikTok videos. It’s comforting, tangy, spicy, and deeply satisfying.

  • The Ultimate No-Bake Biscoff Tiramisu: A Caramelized Twist on an Italian Classic

    The Ultimate No-Bake Biscoff Tiramisu: A Caramelized Twist on an Italian Classic

    Hey everyone! If you’re anything like me, your love for Biscoff is less of a “preference” and more of a “personality trait.” We’ve all been there—standing in the kitchen with a jar of cookie butter and a spoon, wondering how something can taste that good. Well, today I am sharing something that is quite literally the dessert of my dreams.

    We’re taking that classic, velvety Italian vibe we all love and giving it a major, caramelized glow-up. Forget ladyfingers—we are using those iconic spiced Lotus biscuits. And instead of just plain cream? We’re folding in a massive amount of Biscoff spread to create a cloud-like mousse that is completely irresistible.

    The best part? It is entirely no-bake. That means you get to serve up a high-end, contemporary dessert that looks like it came from a chic bistro without ever touching your oven. It’s the perfect “wow-factor” dish for dinner parties, but easy enough to whip up on a lazy Sunday afternoon.

    Why This Recipe Works

    The secret is all in the “double-dunk.” By stacking two cookies together before hitting the espresso, you create a substantial, cake-like base that absorbs the coffee perfectly without turning into mush. When you let it sit overnight, the cookies soften into the cream, creating those beautiful, clean layers you see in the photos.

    Trust me, once you try the combination of bitter espresso, spiced cinnamon cookies, and silky mascarpone, you’ll never go back to the traditional version again.

    Scroll down to grab the recipe, and let’s get layering!

    The Recipe

    Ingredients

    • 600g Biscoff Cookies: Plus an extra 10–15 cookies for that all-important crunchy topping.

    • 400g Mascarpone Cheese: Ensure it’s at room temperature for the smoothest mix.

    • 200g Double Cream: Cold from the fridge to help it whip up thick.

    • 300g Biscoff Spread: Smooth or crunchy—both work, but smooth gives that silky finish.

    • 1 tsp Vanilla Extract: To round out the sweetness.

    • 300ml Cold Espresso: Strong coffee is key to balancing the sweetness of the biscuits.

    Method

    1. Prep the Biscoff Cream

    In a large mixing bowl, combine your mascarpone, double cream, Biscoff spread, and vanilla extract. Using a hand mixer on medium-high speed, beat the mixture until it is thick, smooth, and holds its shape. Be careful not to over-whip, but you want it sturdy enough to layer.

    2. The Espresso Soak

    Pour your cold espresso into a wide, shallow bowl. Take two Biscoff cookies and stack them directly on top of each other. Quickly dip them into the coffee—it should be a lightning-fast “in and out” to prevent them from becoming soggy and breaking apart.

    3. Build the Foundation

    Place the soaked cookie pairs into the bottom of a square 8×8″ dish, lining them up until the base is completely covered.

    4. Layering the Dream

    Spread exactly 1/3 of your mascarpone/Biscoff mixture over the first layer of cookies, smoothing it out with the back of a spoon or an offset spatula. Repeat the process two more times: cookie layer, cream layer, cookie layer, cream layer.

    5. The Finishing Touch

    Take your extra cookies and crush them into fine crumbs (a food processor or a rolling pin and a freezer bag works perfectly!). Sprinkle them generously over the top of the Tiramisu until you have a beautiful, even orange-gold crust.

    6. The Big Chill

    Cover the dish tightly with cling film and place it in the fridge. It needs at least 3–4 hours to set, but for the absolute best results (and the cleanest slices!), leave it overnight. This allows the coffee to fully penetrate the cookies and the flavors to meld together.

    Whether you’re serving this up at a chic dinner party or just treating yourself to a well-deserved slice on a Tuesday night, this Biscoff Tiramisu is guaranteed to disappear in seconds. There is something so incredibly satisfying about that first scoop through the silky cream and coffee-soaked biscuits. I honestly can’t wait for you guys to try it! If you do whip this up, make sure to tag me in your photos—seeing your creations is literally the highlight of my day. Happy “baking” (or lack thereof!), and I’ll see you in the next one!

  • The 20-minute Baked Salmon Tagliatelle You’ll Have On Repeat

    The 20-minute Baked Salmon Tagliatelle You’ll Have On Repeat

    Can we just be honest for a second? Some days, the thought of standing over a hot stove flipping food, dodging oil splatters, and washing three different pans makes me want to just pour a bowl of cereal and call it a night. I love a good home-cooked meal as much as the next person, but weeknight energy is a very limited resource.

    That is exactly how this recipe was born.

    I used to pan-sear the salmon for my pasta, but after one too many times of the fish breaking apart into sad little shreds (or worse, drying out because I got distracted), I tried baking it instead. Total game-changer. You just pop the seasoned fillets into the oven, let them get perfectly tender and juicy, and use that time to whip up the easiest, most luxurious garlic cream sauce you’ve ever tasted.

    And using tagliatelle? Absolute heaven. There is something so incredibly satisfying about winding those long, glossy ribbons around your fork, especially when they are carrying a velvety parmesan sauce and flakes of juicy salmon. It feels like a fancy £25 restaurant meal, but it takes about 20 minutes and uses ingredients you probably already have in the fridge.

    What You’ll Need

    • The Salmon: 250g salmon fillets, a drizzle of olive oil, a pinch of paprika, and a good pinch of salt and pepper.

    • The Pasta: 225g of tagliatelle nests (the thick ribbons are built for this sauce).

    • The Velvet Sauce: 2 tbsp butter, 4 cloves of finely chopped garlic, 60ml dry white wine (or just use a splash of pasta water if you’ve already finished the bottle), 240ml double cream, 50g grated parmesan, and a big handful of fresh baby spinach.

    How to Make It

    First things first, get your oven preheating to 200°C (180°C fan/Gas Mark 6). Rub your salmon fillets with the olive oil, paprika, salt, and pepper, then pop them on a baking tray. Bake for about 12–15 minutes. It should flake beautifully with a fork.

    While the salmon is doing its thing, boil your tagliatelle in well-salted water. Don’t forget this part: right before you drain it, scoop out a mug of that starchy pasta water. It’s pure liquid gold for making sauces silky.

    Now for the magic. Melt the butter in a large pan over medium heat and fry the garlic for just a minute until your kitchen smells incredible. Pour in the white wine to deglaze the pan, letting it bubble away for about two minutes. Next, pour in the double cream and let it simmer gently for 3 minutes. Turn the heat right down, stir in the parmesan until it’s completely melted, and toss in the spinach until it wilts.

    To finish, flake your baked salmon into lovely, chunky pieces (you can leave the skin behind). Toss the glorious tagliatelle ribbons and the salmon gently into the cream sauce. If it feels a bit too thick, splash in some of that saved pasta water to help it glide and coat the pasta.

    Top with a massive squeeze of fresh lemon juice, and you’re ready to eat.

    A Little Thought Before You Go…

    There is something so deeply comforting about sitting down to a warm bowl of pasta at the end of a long day. It’s more than just fuel; it’s a little reset button. I love this recipe because it proves that taking care of yourself and eating something genuinely delicious doesn’t have to require hours of effort or a mountain of washing up. Pull up a chair, pour yourself a glass of whatever you fancy, and treat yourself tonight. You’ve earned it.

    Let me know in the comments below if you make this, and tell me: are you team tagliatelle or do you prefer short pasta shapes like penne?

  • The Ultimate No-Bake Oreo Mocha Cheesecake

    The Ultimate No-Bake Oreo Mocha Cheesecake

    If you are looking for a dessert that effortlessly combines the rich, comforting notes of chocolate with the bold punch of espresso, this No-Bake Mocha Cheesecake is the perfect recipe. It features a crisp Oreo crust, a velvety espresso-infused chocolate filling, and a glossy mocha ganache topping.

    Because it requires absolutely no time in the oven, it is an excellent, stress-free option for entertaining. This version has been fully converted to standard UK ingredients and metric measurements to ensure perfect results.

    Ingredients

    For the Biscuit Crust

    • 22 Oreo Cookies

    • 70g Unsalted Butter, melted

    For the Mocha Cheesecake Filling

    • 360ml Double Cream, cold

    • 680g Full-Fat Cream Cheese (such as Philadelphia), softened at room temperature

    • 35g Unsweetened Cocoa Powder

    • 1 tbsp Instant Espresso Powder (Note: Use a fine espresso powder rather than standard instant coffee granules for a smoother texture and deeper flavor).

    • 120g Icing Sugar

    • 1 tsp Vanilla Extract

    For the Mocha Ganache

    • 60ml Double Cream

    • 2 tsp Instant Espresso Powder

    • 90g Semi-Sweet Chocolate Chips (or high-quality dark chocolate, finely chopped)

    • 1 tbsp Liquid Glucose (This is the ideal UK alternative to corn syrup, ensuring the ganache retains a beautiful, glossy shine).

    Step-by-Step Method

    1. Prepare the Base

    Lightly grease a 9-inch (23cm) springform tin with a small amount of butter or neutral oil and set aside. Place the Oreo cookies into a food processor and pulse until they form fine crumbs. With the motor running on a low speed, slowly pour in the melted butter until the mixture begins to clump together like wet sand. Transfer the crumbs into the prepared tin, pressing them firmly and evenly into the base and slightly up the sides. Place the tin in the freezer for at least 20 minutes to set.

    2. Whip the Filling

    While the base is chilling, pour the cold double cream into a large bowl. Using an electric whisk, beat the cream until it forms stiff peaks, then set it aside. In a separate large mixing bowl, combine the softened cream cheese, cocoa powder, and instant espresso powder. Beat with the electric whisk until the mixture is completely smooth and combined. Sift in the icing sugar, add the vanilla extract, and mix again. Finally, gently fold the whipped cream into the chocolate mixture using a spatula until completely uniform. Spoon the filling over the hardened crust, smooth the surface, cover with cling film, and refrigerate for a minimum of 6 hours (ideally overnight).

    3. Top with Ganache

    When ready to serve, run a thin knife around the inside edge of the tin to loosen the cheesecake, then carefully release the springform ring. Transfer the cake to a serving plate. To make the ganache, combine the double cream and espresso powder in a small, microwave-safe bowl. Heat for roughly 45 to 60 seconds until steaming. Add the chocolate chips and liquid glucose, allowing the mixture to sit undisturbed for 2 minutes. Stir gently until the chocolate is entirely melted and smooth. Pour the ganache over the top of the cheesecake, spreading it evenly. Allow it to set for 10 minutes before slicing and serving.

    Whether you are preparing this for a sophisticated dinner party or simply satisfying a weekend baking craving, this mocha cheesecake delivers the perfect balance of intense cocoa and bold espresso. Its smooth, velvet-like texture paired with the crunch of the biscuit base makes it a truly memorable dessert. Give it a try, let it set overnight for the best results, and enjoy the effortless process of a showstopping, no-bake treat. Happy baking!

  • The Ultimate UK Resale Guide 2026: Turning Household Clutter into Cash

    The Ultimate UK Resale Guide 2026: Turning Household Clutter into Cash

    Whether you’re clearing out your wardrobe or finally shifting those leftover rolls of wallpaper, the UK’s second-hand market is thriving. To make the most money with the least stress, you need to understand the unique cultures of eBay, Vinted, and the platforms you should probably avoid.

    1. Choosing Your Platform: Fees & Visibility

    • eBay (The Powerhouse): eBay is now free for private sellers (no final value fees). However, they heavily push you to Promote your listings for a percentage fee. Without this, your items can easily get buried. It is the gold standard for “searchable” items like home goods, tools, and niche hobby gear.  

    • Vinted (The Community): Vinted is free for sellers, but if you have a lot of stock, the Showcase feature is a game-changer. For around £10 a week, it highlights your entire wardrobe to buyers.

    • The Ones to Avoid: * Whatnot: We tried it and hated it. You have to be “on-air” live, and the audience expects items for £1. For the stress and low returns, you’re better off just donating to a charity shop.

    • Depop: Now a ghost town. Sales are slow and the volume is very low; don’t waste your energy here.

    2. Mastering the Logistics: Shipping & Labels

    Both platforms generate pre-paid posting labels, but how you use them matters:

    • InPost Warning: I strongly suggest printing off your labels rather than just using the QR code to stick items in a locker. Mix-ups are frequently reported on social media where couriers apply the wrong label to the wrong “blank” parcel.

    • Vinted & Royal Mail: If you use Royal Mail, they often provide a QR code. I always print this off and stick it on the parcel myself. At the very least, write the name of the buyer on the parcel so you don’t get them mixed up at the drop-off point.  

    • The InPost App: Lockers get full quickly. Download the app to check live availability before you leave the house so you don’t make a wasted journey.

    • Local Hubs: Many Post Offices now take Evri parcels as well as Royal Mail. Turn on as many postage options as possible on Vinted to maximise sales, but disable any that aren’t convenient for you.  

    3. The “Hidden Gold” in Your Home

    Don’t just sell clothes! There is a massive market for household “odds and ends”:

    • Wallpaper: Leftover odd rolls are gold dust for small DIY projects or upcycling furniture.

    • Bedding & Curtains: Quality linens and heavy curtains sell brilliantly on eBay.

    Mugs . Yes you read that right . People break their favourite mugs and NEED a replacement. Your junk could be someone’s holy grail. I’ve lost count of of the number of times someone has contacted me because they have broken mum/dad/ girlfriends favourite . You could be a lifesaver !

    Crockery

    Though this can be a nightmare to package we have done really well on odd plates dishes etc . If you break one item from a dinner set you have to buy a new one. EBay can be the way to sell your own odd plates to complete someone else’s

    I went on eBay years ago because I lost a part on my then baby daughters steriliser and eBay found me one ! So don’t throw this type of things out they sell !

    • Presentation: Ensure clothes are freshly laundered and ironed for photos. My rule of thumb: “Would I be happy to receive this?” If you hesitate when looking at a flaw, don’t list it.

    4. Buyer Protection: What You Need to Know

    • eBay: Robust and automatic. Buyers pay a Buyer Protection Fee (included in the price). If an item is “not as described,” the seller must pay for return postage. Offers on eBay are binding—payment is taken immediately when you accept.  

    • Vinted: Buyers pay a fee at checkout but only have 48 hours to report an issue once delivered. Crucially, the buyer usually pays for return postage. Offers here are non-binding—people “ghost” all the time, so only celebrate once the label is generated.

    5 Pricing

    2. Price Research: Don’t Guess, Use the Data

    Before you list on eBay, you need to know what your item is actually worth—not just what people are dreaming of getting.

    • Sold vs. Active: Never base your price on current “Active” listings. Someone might be asking £50 for a vase that only ever sells for £10.  

    • How to check: On the eBay app, search for your item, then tap Filter and scroll down to toggle on “Sold Items.” * The “Green” Numbers: This will show you the “Completed” listings. Prices in green are what the item actually sold for. If the price is in black, it ended without a buyer. This is the only way to see the true market value.  Be realistic it’s better to sell and get the item sold than have it In the death pile on the spare bedroom!

    6. Final Pro-Tips

    • Double Listing: You can list on both platforms at once, but delete the listing on the other platform immediately when it sells. Getting caught out is a nightmare for your ratings!

    • Photos & AI: Vinted is strict—no AI-generated images or stock photos or you risk a ban. eBay allows AI background tools but still bans stock photos for used items.

    The Verdict

    While eBay is the best place to get top dollar for niche household items and branded curtains, Vinted is my personal favourite. Even though you might not sell items for quite as much as you would on eBay, they tend to move much quicker. The whole experience feels more laid back and social—it’s just a much easier way to clear your clutter without the corporate pressure . Any questions let me know !!

  • Raspberry Almond Bliss Overnight Oats (Easy Meal Prep)

    Raspberry Almond Bliss Overnight Oats (Easy Meal Prep)

    If you are looking for a breakfast that feels like a luxury but takes less than five minutes of effort, you’ve found it. These Raspberry Almond Bliss Overnight Oats are creamy, naturally sweet, and look absolutely stunning layered in a glass jar.

    By combining the nuttiness of almond extract with a bright, tart raspberry layer, this breakfast tastes exactly like a raspberry almond pastry—minus the sugar crash.


    Why You’ll Love This Recipe

    • Zero Cooking Required: Just mix, layer, and sleep.
    • Packed with Fiber: Chia seeds and rolled oats keep you full until lunch.
    • Perfect for Meal Prep: Make 3 or 4 of these on Sunday night for an easy grab-and-go week.

    Ingredients & Measurements

    Layer Ingredient Amount The Oats Base

    Rolled oats (old-fashioned) ½ cup Almond milk (or milk of choice) ½ cup Greek yogurt (plain or vanilla) ¼ cup Chia seeds 1 tbsp Maple syrup or honey 1 tbsp Almond extract ¼ tsp The Raspberry Puree Fresh or frozen raspberries ½ cup Lemon juice A squeeze

    The Toppings Fresh raspberries & blueberries A handful Sliced almonds 1 tbsp Dark chocolate curls or mini chips 1 tsp


    Step-by-Step Instructions

    1. Mix the Oats: In a medium bowl, stir together the rolled oats, almond milk, Greek yogurt, chia seeds, maple syrup, and almond extract until well combined.
    2. Make the Berry Puree: In a small bowl, mash the raspberries with a fork and add a quick squeeze of lemon juice to brighten the flavor.
    3. Layer for the “Look”: Take a clean mason jar or a clear glass. Spoon half of the oats mixture into the bottom, layer on the raspberry puree, and top with the remaining oats.
    4. Chill: Cover and place in the refrigerator for at least 4 hours, or overnight.
    5. Top and Serve: Right before eating, garnish with fresh berries, sliced almonds, and a sprinkle of dark chocolate.

    Pro Tip: For a beautiful “swirl” effect on camera, take a butter knife and gently drag it up against the inside of the glass jar before putting it in the fridge!


    Did you make this recipe? Tag me on TikTok or leave a comment below to let me know how yours turned out!

  • The Ultimate One-Pot Cheesy Gnocchi Bake (aka The Sunday Morning Lifesaver)

    The Ultimate One-Pot Cheesy Gnocchi Bake (aka The Sunday Morning Lifesaver)

    We’ve all been there. The sun is shining a little too brightly through the curtains, your head is doing a passable impression of a techno festival, and your stomach is demanding immediate attention. You need food, you need comfort, and you absolutely cannot deal with a sink full of dishes.

    Enter the holy grail of hangover food: the One-Pot Cheesy Gnocchi Bake.

    Why This is the Ultimate Hangover Cure

    When you’re hurting, your body is crying out for a few specific things, and this recipe hits every single one of them:

    • The Ultimate Carb Blanket: Gnocchi is pure, pillowy comfort. Unlike heavy pasta that requires waiting for a massive pot of water to boil (who has the patience?), gnocchi cooks right in the sauce. It provides the fast-acting carbohydrates your brain is begging for to restore your crashing blood sugar.

    • Hydration & Electrolytes: Alcohol dehydrates you, stripping your body of essential salts. The rich tomato passata and veggie stock pot in this recipe act like a delicious, savory electrolyte drink, helping your body retain moisture and kickstarting your recovery.

    • The Magic of Melted Cheese: Let’s be honest, science aside, melted mozzarella is good for the soul. The fats in the cheese help line your stomach and trigger those happy endorphins to battle the “hangover anxiety.”

    • Minimal Effort, Maximum Reward: It’s a one-pot wonder. You chop a few veggies, dump everything into a casserole dish, cover it in cheese, and let the oven do the heavy lifting while you lie on the couch.

    Ingredients & Method

    Here is exactly how to pull this together when you’re operating on 10% brain power.

    Step-by-Step

    1. Get the base going: Heat a splash of olive oil in a heavy-based, ovenproof casserole dish. Toss in your chopped onion and garlic. Let them cook over a medium heat for about 6-8 minutes until they’re soft and fragrant.

    2. Add the bulk: Stir in your chopped aubergine and let it cook for another 10 minutes. Give it an occasional stir—nothing too strenuous.

    3. Preheat and level up: Crank your oven to 220°C/200°C fan/gas 7. Stir the chopped peppers and a handful of torn basil into the pan, letting them cook for 5 more minutes.

    4. Make the sauce: Dissolve your stock pot in 200ml of boiling water. Pour that into the pan along with the passata. Give it all a really good stir.

    5. The best part: Stir the gnocchi straight into the sauce (yes, raw!). Tear up your mozzarella and scatter it generously over the top.

    6. Bake and relax: Pop the whole dish into the oven for 15-20 minutes. You’re looking for a bubbling sauce and a gorgeous, golden, melted cheese crust.

    Scatter a few fresh basil leaves over the top to make it look pretty, grab a bowl, and go melt into the sofa. You’ve earned this.

    What’s your go-to drink to pair with a hangover meal like this—are you team ice-cold cola or team extra-spicy Bloody Mary?